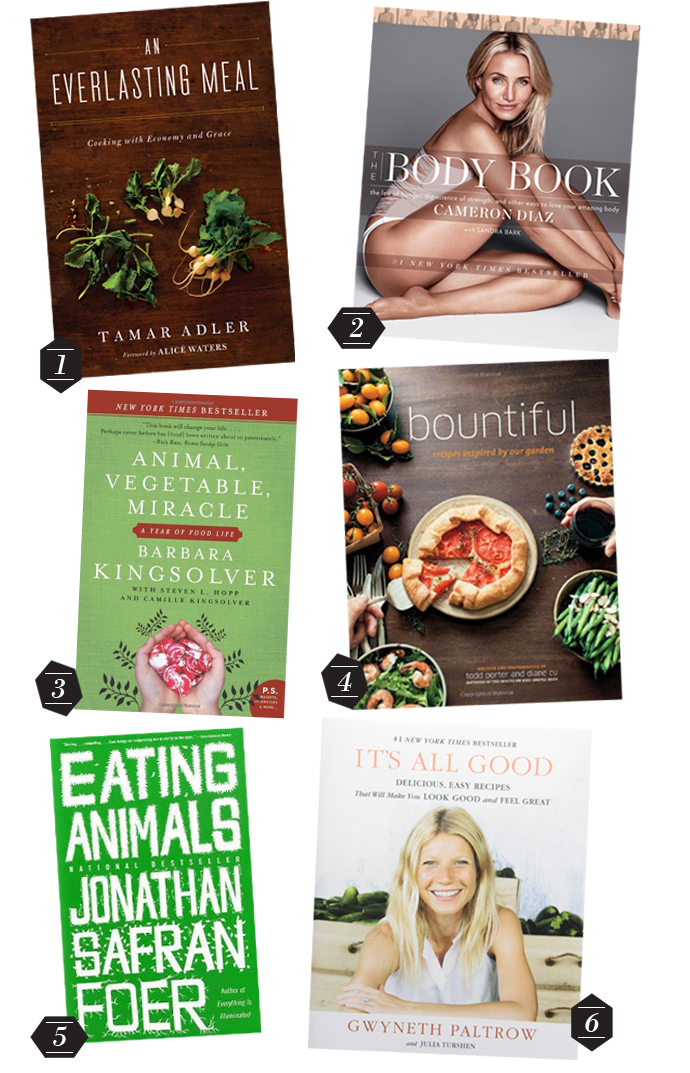
While I think information and knowledge is vital to us learning to take proper care of ourselves, what we often need more of than just facts and figure, is a little bit of inspiration along the way. I love to read, but this past year my nightstand is pretty much stacked with one food book after another. Some of my cookbooks are even found on my nightstand, as I love to flip through them when winding down, looking for new ideas. These books listed below have helped not only inspire many meals, but also have helped make me a more knowledgeable foodie. A mix of both recipe books, narrative and non fiction, this assortment will help you when you’re feeling stuck in the kitchen, or confused as to why you should be eating in season. I can’t recommend these all enough! And note, while some may not consider certain recipes included in the books below particularly “healthy”, they all offer lots of information for cooking and eating real, whole foods, no matter what the calorie count may be.
An Everlasting Meal: Cooking with Economy and Grace: Not quite a cookbook, not quite nonfiction, this reads more like narrative, with beautiful stories, real-life kitchen experiences, and the occasional recipe woven in. It is actually chock full of instructions for cooking and eating your way through the kitchen, but offered in a story format as opposed to an instruction manual. Covering various topics from how to properly use herbs and spices, how to rescue a failed meal attempt, and how to eat well and waste little. She’s the one who inspired me to save vegetable trimmings to make my own stock, and gave me the confidence to cook my own beans. I can’t recommend this book enough, as it has been the biggest source of inspiration in the kitchen, and has completely changed how I approach food, in terms of getting creative and bold.
The Body Book by Cameron Diaz & Sandra Bark: Once you get past the fact that this book is written by another gorgeous blonde celebrity, appreciate it for what it is; a well-written, easy to read, fad free approach to eating, exercising and loving yourself. Diaz goes chapter by chapter breaking down nutrition for us (with the help of some experts), explaining why we need a healthy dose of all the food groups, including carbohydrates, healthy fats and protein. I still have yet to finish the book, but I love the sound approach to eating and helpful information. While there are I’m sure hundreds of other nutrition books that can teach you the same thing, I love that this book weaves body, mind and spirit together in one book, and takes a much needed modern day approach to healthy living. One of my favorite pages from the book is an infographic showing the evolution of the food industry along with public health. While correlation does not necessarily equal causation, it’s pretty telling to see that since the introduction and rise of the fast food and processed food industry, health issues from obesity to heart disease have all risen.
Animal, Vegetable, Miracle: More of a memoir of sorts, this book takes us through the life of a family of 4 who moved to a farm and took an oath to eat only what they could grow or buy within a small local radius. Saying goodbye to bananas from Ecuador and California strawberries, it shows the reader the value of eating in-season, sourcing sustainably and how our food choices effect the world around us. With some recipes thrown in, the book is written in chronological format to show how our forefathers and ancestors used to eat and prepare food for the winter months, long before we had mega warehouses and supermarkets.
Bountiful: Recipes Inspired by Our Garden
I have a particular fondness for Southern California locals Todd and Diane, the duo behind the wonderful cooking blog White On Rice Couple. I’ve met them a few times and their warmth and kind, creative spirits genuinely shine through. So I loved to be able to support such a great team when their cookbook came out last year. I had no idea I would fall in love with it so much, and have made at least 20 recipes in the short time I’ve owned it. The focus is on cooking meals inspired by their garden, so in that vain, the book is organized by produce type versus by meal category. Some may find this confusing, but as a produce nerd, I love it. Either way, once you get comfortable navigating your way through the book, you’ll get plenty of inspiration for adding produce into any meal or drink!
Eating Animals
This is not light summer reading my friends, but it is heavy on information. After extensively researching for this book for over 2 years, Foer did become a vegetarian, but it did not turn me into one. Instead, it left me feeling first, sad, and second, dedicated to sourcing my animal products more humanely, more ethically. I wrote a post about this book a while ago which you can read here, but bottom line, if you’re interested in reading about the meat industry in this country, and wonder why I’ve become so passionate about this topic, read this book.
The shift in my kitchen pantry and fridge from conventional products to more nutrient dense, “real” foods took some time. This did not happen overnight, I want to make sure I reiterate to you guys over and over again, because unless your personality can handle it, the “balls to the wall” approach when trying to change your dietary lifestyle can be demotivating, overwhelming and sometimes disastrous. At times my shifts were more subtle, and other times involved extreme cold turkey action. For instance, in preparation for writing an article for Babble back in August of 2013, I was researching the ingredients in some commonly used packaged foods, and I had a moment of clarity. We had been at the “clean eating” thing for a couple of months by then, and while I had been feverishly cooking most of our meals from Gwyneth’s cookbook, when it came to snack food, add-on items like coffee creamer, and when dining out, we were sticking with our old ways. Still continuing to frequent fast food places as a “treat”, continuing to use coffee creamer on the daily, and continuing to allow my kids to eat what I deemed to be, way too many freaking chicken nuggets. It got to the point where I could tell Syd was way too hooked on them because it was all he would order at a restaurant, and if I dare suggest he consider something else, he would sulk and get ridiculously moody. At one point I told him he could absolutely not order chicken nuggets when we were eating out on our summer road trip, and he erupted in tears. Something was not right.
I tell you all this because there wasn’t a whole lot of method to my madness in the beginning, and I just sort of made up rules and flexed as I needed to, and put my foot down when I needed to. In the end this approached has worked out for us, but once I did in fact make some “rules” when it came to allowing or ditching certain foods in our home, it made things a lot easier and our road a lot more clear. You know that saying when parenting, that kids need boundaries? Well once I established some boundaries for all of us, we were a lot less wishy washy about the whole lifestyle shift.
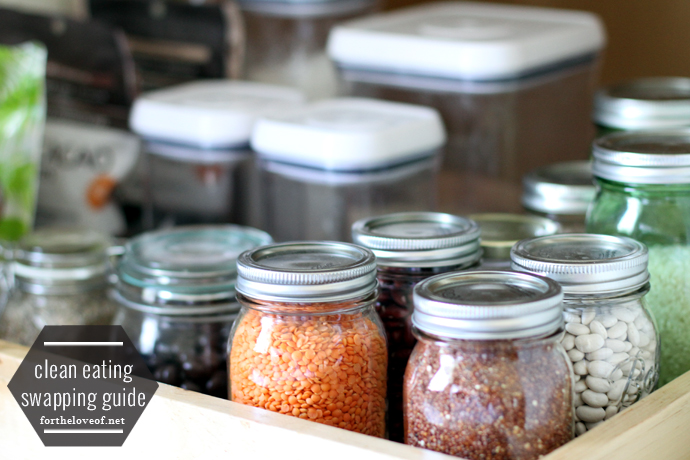
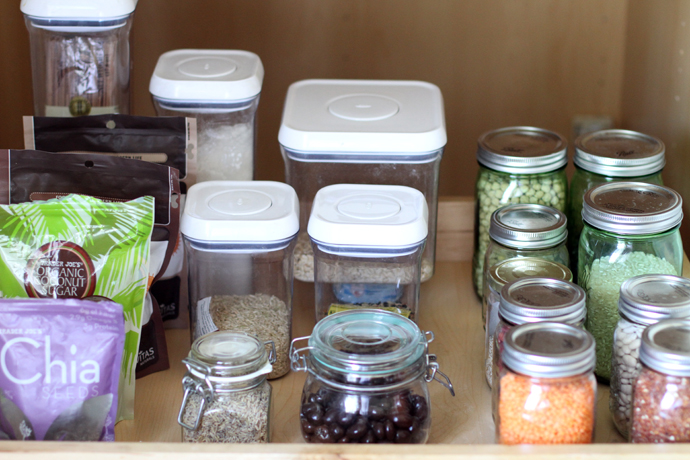
The first 7 food items I banned from the house were Nutella, Coffee Mate, Eggo waffles, Country Crock margarine, frozen chicken nuggets, Cheez-Its, fake maple syrup. These items were the biggest offenders in our household because they were filled with sugar, artificial colors, additives, preservatives, MSG, and hydrogenated oils. And we were consuming them on an almost daily basis. My biggest break through in all of this came when I started to see these as “fake foods” which were made to mimic real products, and offered no real nutrients. Here are the items I replaced these foods with, I’ll share the rest of my grocery list must-have items and swaps below.
Coffee Mate replacement: I tried several suggestions including coconut milk, almond milk, even butter, but I switched over to better coffee, and now just use a splash of good old half and half. The Strauss brand in particular is fantastically yummy, and if you still want a little bit of sweetness, add in a tsp of maple syrup.
Margarine replacement: Good old fashioned grass fed butter. I love the Kerrygold brand in particular, and buy blocks of it at Costco, and keep a small container of it on the counter so it’s nice and spreadable fr morning toast.
Eggo replacement: My kids love waffles and could eat them almost daily. Many weekends I make a double batch of my own from scratch and freeze leftovers for the week, but for moments I’m in a pinch, I love Kodiak Cakes. Natural ingredients, delicious and nutritious.
Fake syrup replacement: Real maple syrup which is lower on the GI index and offers a host of added nutritional benefits including manganese and magnesium. It’s sweet and pricer, so you just need a dollop and can be used as a white sugar replacement in many baked goods.
Frozen chicken nuggets: I replaced those with real homemade baked nuggets that my kids most definitely love more than frozen anyhow, so much so that Syd requested them for his birthday dinner yesterday. Now us moms love frozen nuggets for the convenience, I know, so on nights when I’m in a rush or just can’t cook another thing, I make them a box of Annie’s mac n cheese, which uses natural coloring and flavors.
Cheez-Its replacement: We still love to snack and I pack the kids with something crunchy almost every day for school, but we’ve switched from the addictive, artificially flavored orange crackers to more natural old fashion snacks like kettle corn, sea salt popcorn, tortilla chips, etc. We love Angie’s, the TJ organic corn chips, and Kettle brand potato chips. All have less than 5 all natural ingredients, are non-GMO certified and still satisfies the urge to munch on something.
Let’s talk about some other kitchen staples, and what I have swapped this for that. Feel free to dive right in, or slowly make the transition as the need arises. This list of items and brands is obviously not all-inclusive and I’ll add items as I think of them. If you’re curious about a brand or item not listed, feel free to ask. Also, some of these brands may not be available across the US so don’t get too caught up in the brands, I just include them as a frame of reference.
Sugar Replacements: Maple syrup is my favorite liquid sweetener, followed by raw honey. I have also switched from white granulated sugar to coconut sugar, and love it because it can be swapped cup for cup. I still see lots of “healthy” recipes for agave, and get asked about that one quite often. I don’t use agave because it has as much fructose and go through as heavy of a processing system as high fructose corn syrup. Here’s another great read on agave. I also don’t use sugar alternatives such as Stevia and Truvia, as those are just as chemically processed as artificial sweeteners, and I hate the taste. Sugar is still sugar, so even with the more natural sugars I keep in my pantry, I try to use with discretion. Brands I love include the Kirkland Organic Maple Syrup, Wholesome Raw Honey and the Organic Coconut Sugar from Trader Joe’s.
Oil Replacements: I was already a pretty avid olive oil user anyhow, so not much changed here, but I have added in coconut oil and keep that stocked at all times. It can be used for anything and everything including smoothies, sauteing foods, and as a moisturizer! When choosing between refined or unrefined, base it off of your cooking and eating needs. Refined is great for high temp cooking, but if you’re just using it to add to smoothies and other baking recipes, go for unrefined to get the most nutritious bang for your buck. I also just started cooking with ghee, which is clarified butter used in Ayurvedic medicine for thousands of years. Because the milk proteins have been gently boiled down, this is a great high-heat cooking alternative. I do keep a small bottle of expeller pressed organic Canola oil on hand for when I need a neutral flavor, and I also use touches of sesame oil here and there, just to enhance flavors of dishes, as you really only need a tablespoon of the fragrant oil to have an impact. I love the Spectrum line of oils.
Flour Replacements: While I keep a small container of regular all-purpose flour on hand in my pantry, my go-to is now whole wheat flour and rice flour. Enriched white flour has been stripped of all its nutrients, and therefore the nutrients are “enriched” back in. The goal in eating “clean” is trying to eliminate food that has been overly processed, so this is definitely one of them. This is why we also want to try and avoid enriched foods like white pastas and breads, as much as possible during our 30 day challenge. I keep rice flour on hand just because I’m often cooking from sites or books which happen to feature many gluten free recipes, even though we are not a gluten-free house, so it’s easier to just go with their recipe instead of trying to fiddle around with subbing ingredients. For all my flour needs I love Bob’s Red Mill, in addition the bulk bins at Sprouts. I also just recently added hazelnut meal or flour as a pantry staple for making “Nutella alternative” recipes and as a breading for chicken nuggets, in replacement of bread crumbs. It actually has a lot of great uses. Can’t find hazelnut flour, go with almond flour which is more widely available.
Animal Products: When we began eating clean I didn’t really give much thought to how this tied in with the animal products we were eating, but the more I delved in, and in particular after reading Eating Animals, I started to realize that there was an advantage to eating “clean” proteins as well. Following is a break down by category of the animal products I try to source as much as possible. Also, please read this helpful article I wrote a while back which helps decipher animal product labels. I’ll refrain from including specific links here so we don’t get too click happy, but if you want specific site sources, that article should include everything.
Eggs: While I would love to strictly purchase truly pastured eggs, and did indeed try for a couple of months, here in SoCal it proved to be cost-prohibitive so I stick with organic free-range eggs. I’m fortunate to know that the farm I’m sourcing my eggs from truly allows their chickens free range outdoor access, so I feel good about them. If you can get free range eggs at the farmer’s market, that’s your best bet because you can ask the farmer questions and raise concerns directly, versus a huge market where the stores often package under their own private label.
Dairy: I try to be pretty diligent about only organic dairy products because the organic label requires that by law, the cows must spend a specific amount of time on pasture. Plus, in a study published last year, organic dairy was proven to be more nutritious than conventional dairy products. You want to look for dairy products that have gone through low temp pasteurization versus ultra high temp pasteurization (UHT), which kills most important beneficial bacteria, and also changes the milk proteins, making it harder to digest (Horizon Organics is one company which uses UHT, which is why they are able to have such a long expiration date). UHT also makes the milk taste burnt, so companies often have to include additives to make the smell and taste pleasant again. A lot of natural foodies love raw milk, and it is indeed good but just too pricey for my family of 5, so I love Strauss and Clover dairy products, as well as Brown Cow Yogurt. When it comes to cheese, I have cut down on how much cheese I eat in particular, but I do like to always have a block of good parmesan cheese on hand, and buy nice cheeses on occasion from a local cheese shop. Once you start getting the hang of eating this way, I promise you won’t miss all that cheese, which now seems to upset my stomach more than anything else.
Non-Dairy: We have substantially cut down on how much dairy consume and so we always have coconut milk and almond milk on hand at all times.
Red Meat: I began sourcing most of my red meat through a local farmer who offers a discounted CSA (Community Supported Agriculture) program. Here’s the details of the CSA program, and another way you can save money buying more expensive cuts of meat. The organic label is helpful but not necessary, and if you can source from a local farmer who is labeled organic or not, even better. Note that grass fed is starting to become diluted a bit, as all cows start off on pasture and are “grass fed”. The grass finished label means that the cows stayed on pasture its entire life and never went to a feed lot. The article at the header outlines all these specifics if you have questions.
Poultry: Happy healthy chickens, and in particular turkeys, are hard to find in conventional supermarkets. Most are raised on antibiotic laden feed, have their beaks clipped, grow so big so fast they can’t even support their own weight, and are confined to windowless coops, some holding as many as 40,000 birds. I belong to the DaLeRanch CSA, and I also purchased whole chickens in bulk, which I receive every month, through Primal Pastures. Both farms set up at various farmers markets or have drop off locations throughout Southern California. When I have to supplement with products from the market, I stick with Mary’s or Rosie’s Chicken, which are both air chilled, and I occasionally buy Diestel Farms turkey sandwich meat, which is a bit harder to find but is fantastic. I also love Applegate Farms, which is available all over including Target, and Colombus Farm To Fork Naturals (not to be confused with their regular label). There is a kosher label Empire which sells various poultry products at Trader Joe’s.
Pork: In learning about how animals are raised for meat production, I was most saddened to read about how pigs are raised, all in the name of fueling our bacon obsession. Most of the very large scale hog ranches use gestation crates for their sows, including Smithfield and Tysons. These crates confine the momma pig so she can barely move and most certainly can’t move around. Big ranchers explain they do it for safety, but the truth is they are cruel, and there are plenty of small scale farms raising their pigs in bedded pens or the outdoors, the old fashioned way, Yonder Way Farm is one such lovely example. DaLe Ranch supplies me with some lovely pork products that are beyond tasty, and when I need to supplement, I look for pork products from Niman’s Ranch.
Sauces and Dressings: I make most of my own dressings and sauces now because once you get in the habit they are really quite easy and quick. Some are more complicated and I reserve those for the weekend, but a simple salad dressing requires nothing more than olive oil, a squeeze of citrus or vinegar, and some salt and pepper. I keep a bevvy of sauces on hands to heighten foods and dishes including Red Boat Fish Sauce, hoison sauce, tons of vinegar including red wine, white wine, balsamic, white balsamic, rice wine, red plum wine and apple cider. For richer dressings and sauces, I always have a container of plain yogurt on hand, as well as Vegenaise. Check out Gwyneth’s Old Bay Ranch dressing for an example of a great and easy dip you can make at home from scratch.
General Pantry Items: Nut butters, both peanut and almond. Contrary to some beliefs, both have just about equal nutritional value, but almond butter has risen in popularity because for those following a Paleo diet, it falls under the nut category, versus peanut butter is a legume. Dates are awesome for sweetening baked goods and other awesome things like these Carrot Cake Inspired Energy Bites. I love having cacao powder, cacao nibs and chia seeds on hand as well. I like Navitas Naturals for some of these items. Quinoa flakes are great for hot cereal and making Quinoa Granola, and the kids love having oatmeal for breakfast so I always have old fashion rolled oats on hand. Quinoa of course, brown rice and arborio rice for making risotto, and I’ll often browse the grains aisle at Costco to see what they have new and exciting in. Last time I was there I picked up the ancient grain freekeh and absolutely love it, as well as a yummy Qui mix for cereal and smoothie toppings. I have also added arrowroot powder/starch to my cooking rotation and have swapped it out for corn starch to thicken sauces and soups.
Herbs & Spices: Cinnamon, cumin, garlic powder, cardamon, dried sage, turmeric, fresh basil, cilantro, parsley (flat leaf), the list goes on. Anything fresh or dried is on the table and up for grabs when it comes to adding flavor to dishes. If you want to make your healthy homemade food taste flavorful like the not so healthy food you love, you need to be bold and freely use herbs and spices, I cannot stress this enough!
Produce: There’s really nothing in the produce aisle that should be avoided! But to narrow it down, items I love to have on hand at all times include a selection of greens like kale, spinach and chard. Carrots and beets. Oranges and lemons (and limes too if it weren’t for our lime shortage). Onions, any shade and size and garlic! Potatoes, both white and sweet, but I prefer small reds or golden potatoes over starchy russets. Broccoli, cauliflower and whichever squash is in season. Apples, avocados, tomatoes and melons if in season, and bananas. I focus first and foremost on what’s in season, and try to source locally as much as possible, and definitely try to stick with US grown, but do buy bananas and pineapples.
Snack Item Faves: Kettle Brand potato chips, Trader Joe’s Organic Olive Oil Popcorn, Angie’s Popcorn, both Kettle Corn & Boom Chicka Pop, Mary’s Gone Crackers items, plain organic graham crackers, organic tortilla chips, Pure Bar fruit strips and sandwiches, and just about anything that has few, all natural ingredients. Look out for hidden forms of MSG, added sugar and artificial coloring. Take one look at that MSG list and your head will spin, this is why I try to just stick items with basic ingredient lists I can recognize and don’t need a science degree to decipher, but of course it’s always helpful if you’re wondering, to do a quick search on your smart phone.
As I said above, this list is not meant to be exhaustive of every product I use, but it’s a general overall guide. Once I have it all fine tuned, I plan to make a cute printable you can take with you on shopping trips or when meal planning. But for now, I’ll add a bullet point list in my recipe format plug-in, so you can at least have something printable until the list is finalized. You can print that up below. Please let me know if you have any questions or products/categories to add. I think I’ve thought of almost everything, but know it’s not everything!
Thanks guys and remember when tagging your posts on social media, please use #Andreamademedoit. Also, subscribe by email or bloglovin on the right side bar.
A general reference guide to help you make healthier swaps in the kitchen
Author: Andrea Howe
Ingredients
Sugar Replacements: Maple syrup, raw honey, brown rice syrup, coconut sugar. No agave, artificial sweeteners or no calorie all-natural sweeteners. Kirkland Organic Maple Syrup and Lundberg Farms.
Oil Replacements: Coconut oil (refined for high temp cooking, unrefined for general use), ghee (clarified butter), olive oil, sesame oil. Spectrum brand is great but there's countless other great choices too.
Flour Replacements: Whole wheat, rice flour, almond and/or hazelnut flour, arrowroot starch for thickening. Bob's Red Mill for most of my flour choices.
Eggs: Pasture raised or free-range organic preferred.
Dairy: Organic, non UHT pasteurization. Strauss & Clover Organics, but whichever is local/regional in your area.
Red Meat: Preferably grass fed and grass finished if possible. Organic.
Poultry: Free range, air chilled if possible. Mary's, Rosie's, Diestel Farms, Empire Kosher, and Applegate Farms are all good, but whichever is local to you at your store or farmer's market.
Pork: Applegate and Niman's Ranch, or whichever is local to you at your store or farmer's market.
Grains: whole grains trying to avoid "enriched" products. Organic if possible, especially with wheat since it is one of the heaviest sprayed crops.
Bread: Dave's Killer Bread, Alpine Valley, Silver Hills Bakery and Essential Baking Company for gluten free option, these are all great faves in our home.
I detest diets. There, we’ve got that out of the way. It’s my detest of diets and all they involve including calorie counting, low-fat, artificially sweetened products, and words like cheat and guilt, that made me so interested in finding a healthy balance when it came to feeding myself and my family. While 1 in 3 Americans are indeed overweight or obese and need to make a drastic change to improve their health, most of us don’t really need to diet, but rather simply need to learn how to feed ourselves the right foods. I say “simply” somewhat sarcastically because many days I feel confused and frustrated trying to decipher labels and weed through the information to decide what’s right, and what’s just fear mongering propaganda. By no means do I claim to have it all figured out, but I’ve come along way in my self-taught journey, and I have learned a thing or two, and the most important thing is that feeding ourselves good food doesn’t have to be as complicated as we make it out to be.
Enter the 30 day challenge we’re going to start next Monday May 26th. It’s been a year now since we drastically changed how we eat, and while it didn’t all happen in 30 days, my hope with this challenge is that it will provide some of you with the inspiration, courage, and know-how to get started on your own health journey. Before we begin, there’s a few guiding principles I want to establish for this challenge.
This is a challenge, not a contract and as such, there are no crazy rules, but only guidelines. This is about making healthier changes and swaps, and learning along the way. I don’t want any of us to use words like “cheat” or other guilt inducing language. The end goal here is to love this way of eating and feeling that you want to continue forever, not just for the 30 days. With that in mind, I want this to be enjoyable and fun.
You hold yourself accountable, no one else.
I highly encourage you to get the whole family involved, yet I understand if you want to start with numero uno first. My hope is that your end-goal is to get the family involved though, because we want the whole family to be healthy, and enjoy a healthy relationship with food from the get-go. This includes the whole family learning about food and where/how it is made, so they can all learn to make better choices. And to put it bluntly, why continue to feed your family junk while you’re cleaning up your act?
Go at your own pace, which means you decide how extreme you want to go. For some people, what works best is to go cold-turkey, but for others, making changes slowly over the course of time is what will lead to overall success. For some people, the loosey-goosey lack of structure may really bug you, and for that I apologize, but keep in mind that not one diet fits all, so with that in mind, you have to decide what’s right for you. I’ll get into what this means more later.
Because you’re not doing an actual diet, but just cleaning up your act so to speak, be prepared for some questions and some push back from family and friends. It’s traditionally more socially acceptable to turn down food or eat a certain way because you’re following the latest diet craze. Friends may support you or jokingly feel bad for you. But when you say you’re just trying to eat better, eat cleaner foods, etc., some don’t get it. Much of it is them projecting, and so they may take offense. I’ll address this in a separate post, because it’s an important topic, but just be prepared.
Just because we’re not counting calories doesn’t mean we don’t want to be mindful of the type and amount of calories we’re consuming. Mindless snacking and consuming empty calories from sugary drinks and overly processed foods which leave us feeling hungry an hour later is counter-intuitive to our end goal of eating better. We want to fill up on nutrient dense, whole foods which will give us energy and keep us feeling full and satisfied for an extended period of time. We also need to consider our activity levels and how they can drive our natural processes to eat more or less. On days I’ve been sitting in front of the computer working for hours, I serve myself smaller portions, but on days I’ve been very active, I naturally consume more. If I come home starving from yoga at 9pm, you better believe I eat a great snack, even though some “experts” say not to eat past 7pm. And here’s an easy read that explains why not all calories are created equal.
Last but certainly not least, we will not be cutting out any whole food groups, and this is important! You are encouraged to eat what makes you feel best, and that can include whole grains, legumes, dairy, etc. With that being said, I’m not talking about continuing to eat flavored yogurts with tons of added sugars and additives or good old white bread. This is about making healthier swaps, not elimination, so you will need to do your due diligence and read your labels, do some research, and feel free to ask questions, and I’ll do my best to answer them.
So let’s talk about some of the guidelines for this challenge, because we do indeed need a place to start, otherwise it really wouldn’t be a challenge. This is where I strongly encourage you to say “no” to certain foods. This could mean cutting them out completely, or at least drastically reducing your consumption.
Fast Food
Soda
Refined Sugars
Artificial Sweeteners
Enriched Foods
Heavily Processed Pre-packaged Meals & Snacks
Fake Food Items like margarine and “maple syrup”
If you request all the sciency sounding articles and studies which show why all this stuff is bad to the bone, I can do that. When the Babble site is back up and fully functioning I will go back in and add links to studies and articles which make me not a liar, but for now, you can trust me.
Now let’s talk about the foods we’ll say “yes” to!
Veggies and fruit in all shapes and sizes and colors, preferably in-season (because it is better for you and helps the planet). Aim to add in as much produce as you can, and make it a goal to have at least half your meal consist of veggies. When possible, purchase organic produce, but not necessary!
Dairy products in moderation and preferably organic, and grass fed. A study released last year show that organic dairy products contain more nutrients, particularly Omega-3’s, than conventional dairy products, because organic guidelines and principles dictate how much time the animals must graze on pasture versus being fed a diet heavy in grains.
Grains, legumes, bread!
Grass fed and pasture raised, antibiotic-free animal meats, if budgets allow. This can include organic meats, but keep in mind that it doesn’t have to be labeled organic to be great. None of the meat I purchase through my farmer’s markets or CSA is labeled organic, but is completely organic in principle and raised humanely and sustainably.
Caffeine and alcohol in moderation and as simply prepared as possible. This means coffee, minus the Coffee Mate, or a cocktail made with raw honey simple syrup and fresh juices, versus additive and sugar laden premade cocktail mixes.
Throughout this week I will be posting my favorite books on food and cookbooks that will help guide you along the way, brands I love, and other tips and resources that will hopefully help you out on your quest to eat clean, including a Clean Eating Swapping Guide. Please let me know if there are any specific questions or topics you would like me to cover now, so I can get them ready and posted for you all.
You may be wondering why I mention buzz words like sustainability, in-season, etc. Clean eating is as much about making dietary changes, as it is about choosing your food mindfully. This means when possible, knowing where your food comes from and how it was grown/raised. An overarching principle of this “lifestyle” is eliminating the disconnect between our huge food system of mega grocery stores, and becoming better connected to our food source. Bottom line, if the company I’m buying my food from, especially animal products, has no transparency about how they produce their food, I don’t buy it. Nowadays finding out information about companies, farms and their practices is nothing more than a click away on the computer. I encourage you all to do research as you shop for this challenge, or at least start thinking about these topics.
If you don’t have the means to buy grass fed or organic, will you be kicked out of the clean eating club? Heck no! The end goal of eating this way is to eliminate processed foods as much as possible, and get more whole foods in to your diet as much as possible. I wrote all that because I think it is important to add to the conversation, but by no means should that be a deal breaker in whether you choose to participate.
In an effort to be upfront as you join in on this challenge, a few things you can expect if you take this thing seriously:
You will be spending more time in the kitchen, so prepare yourself, and prepare ahead of time.
If you choose to buy organic/pasture raised animal products, you will be spending more money, so you may want to consider eating less meat. We have definitely cut down on our meat intake to account for the cost.
You will need to pay attention to labels, and at times you will feel like you need a science degree, but don’t be intimidated, over time you will become proficient if you keep at it. Remember, this is not a race, but if it were, slow and steady usually always wins.
You will be saying goodbye to some conveniences. In the past year on too many occasions to count, I realized how much I had become addicted to cheap and convenient. But I have also come to realize that all that cheap convenience comes at a cost. This challenge is about trying to break free of some of our old habits and form new, healthier ones. With that in mind, please don’t ask for a “clean” frozen chicken nugget suggestion, because I don’t have one. I can’t spend my life in the kitchen though, and neither can you, so I will share some of my go-to convenience items I keep stocked in the kitchen at all times. I hope these will help.
Lastly, I want to encourage you all to pace yourselves so you don’t get burnt out, and be patient with yourself and the process. This does take time and there is a learning curve, but keep in mind that Rome wasn’t built in a day, so just do the best you can. Also, I’m not perfect and make no claims to be the leading expert on all things clean. I just do the best I can, and I want to share what I’ve learned with you, and how we’ve been able to change without losing our minds or going into debt. There will always be someone who is doing more than me, or knows more, and I’m okay with that, I just acknowledge how far we’ve come, and it’s miles away from where we started. All that to say, please be kind and offer some grace, meaning I accept helpful suggestions but not downright criticism. Criticism is what keeps people stuck in their old ways, because they’re afraid of doing it wrong. With the right attitude and intentions, there is no way to do it wrong, only learning along the way.
Oh, one last thing, please use the silly, yet funny hashtag #AndreaMadeMeDoIt when posting on social media, that way we can all follow along, be encouraged, be inspired and grab suggestions.
Best of luck all, and please let me know if you have any questions at all! Much love!
Some of you may already know this, but Art and I celebrated 15 years of marriage on April 24th. Because we were in Scottsdale spending a few days with friends and the kids for Spring Break, we had a belated 22 hour getaway this past weekend. We found a great deal on Expedia for the Terranea Resort, and were in awe at how beautiful the resort and surrounding scenery was. It’s amazing what just 22 hours away with your partner can do for your relationship.
Speaking of relationships, you don’t need me to tell you how hard they can be, and how much work they require. As we near “middle age” and the dreaded 40’s, we’re beginning to hear whispers of divorce amongst acquaintances and sometimes the struggles you hear of or the movies you see about this time in our lives, hits a little too close to home. I just turned 38, and Art is turning 40 in less than 30 days now. While neither of us feels particularly “old”, we are definitely feeling the tug and pull of self-analyzation a little more often. I think it’s natural to reflect on your own life at certain key periods, and ask if your life is turning out to look like the one you’d imagined, and we can either ignore the strings of discontent, or do something to try and change, however small. While we don’t practice what we preach as often as we should, I’d like to think we’re always taking baby steps towards improvement.
We took a baby step this past week in changing some routines that in the end, can greatly impact how we function as a family. I am a lark by nature, whereas my husband is a night owl. I can easily fall asleep by 10 and be bright eyed when the sun rises, but Art loves to stay up late and can sleep in like a college frat boy. Granted it’s been years since he has, what, with 3 kids and all, but if he had the chance, he’d easily function on the 1 am bedtime and 9 am rise schedule. During the week when we have kids to get to school and work to get to, on most days he groggily and resentfully gets up at 7:15 am and walks around in a fog for 30 minutes. At best it’s inconvenient that he’s not alert when it’s go time, at worst, it’s very frustrating. Most mornings involved lots of sighing, yelling, and literally running out the door to cross the street to school, and yet still be late. Tired of nagging, I became apathetic and instead of picking up the slack, allowed myself to fall into this dismissive hands up in the air routine when it came to getting the kids ready for school. None of this was my fault, you’re to blame buddy. Needless to say, this wasn’t working. At all. While Art’s schedule was in need of some fixing, my attitude about the whole deal needed fixing too. So we agreed to change together. It’s only been one week, but we’ve already seen a vast improvement.
Art has been going to bed earlier, with me, and waking up at 6 am. He showers and gets ready long before the kids have to get up at 7, and does a few simple chores like feeding the dog and picking up the dog dirt. Because he owns his own business and his schedule is a little more flexible, he’d often help me get the kids off to school, then get ready for work, arriving just before 9 am, but then struggling to get home by 7pm. It was nice to have his help in the morning, but I’m sure most would agree, dinner and homework time is when you really need the reinforcements. So back to the schedule, he’s ready to leave by 7 am, says good morning to the kids and then he’s out the door. I then have to get the kids fed, dressed and lunches packed by myself, but he’s been home between 5-5:30 most days and it’s made the biggest difference in our lives. Dinner is earlier, bedtime isn’t getting pushed back, etc. Getting to bed earlier has made us both better rested, and dare I divulge too much, but it’s even helped in the intimacy department. And instead of me waking at 6 and futzing around the house, on Facebook or Instagram, I’ve made it a point to get my butt in gear too.
I’m sure for many of you, this type of schedule is one you’ve adopted years ago. What can I say, we’re slow to learn.
The eventual end goal is for Art to get more adjusted to this early to bed, early to rise routine, and maybe even get caught up at work. Once his body is adjusted, he’d like to start going to the gym either before or after work, because right now he’s doing zero exercise and he knows that’s got to change. Studies show that a man’s body actually starts to change around 40, with their blood getting thicker and stickier, making them more likely to have a heart attack than women. They also start to lose muscle mass in their 40’s, and beginning gaining on average an additional 3-4 pounds each year. Benefits of exercise for men include a lower risk of T2 diabetes, lower cholesterol, and even a reduction of colon cancer. Two months ago I signed him up, probably a little prematurely, for CrossFit, and he still hasn’t made it in. Rome wasn’t built in a day, so getting our life routine in order is probably more important to do first, before he adds in a new level to the routine. At any rate,I’m hopeful, and right now, that’s the most important thing.
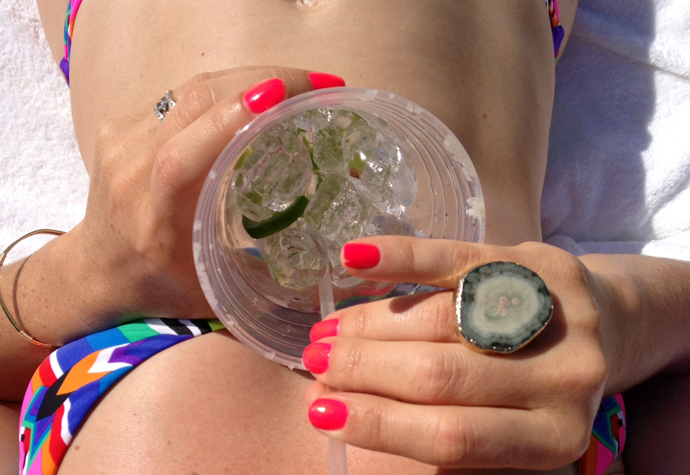
After my exciting 1 minute encounter with Gwyneth on Saturday, I was feeling wild and dangerous, so I went bikini shopping. As you know last year, I hid myself under several flattering one-piece suits, and while I still love both the pink and green suits I chose, truth be told, life under a one-piece is hot. I knew I wanted to get a bikini this summer for the simple fact that I wanted the option to feel a bit cooler when hanging outside by the pool. Plus, we’re planning to go back to Scottsdale at some point to visit my friend and her family, and 115 degree heat definitely calls for a 2-piece.
So I sauntered across the street to Everything But Water, and started pulling a few suits to try on. I was going for the bandeau look, because now that I’ve finished nursing 3 babies, my girls just aren’t what they used to be. I figured I might as well embrace the small chested look and go with a strapless bandeau over my usual triangle top which I’ve worn for years. I picked out a couple, but also took in several styles which had a more athletic/ballet style top. I have a couple of similar looking sports bras in this same silhouette, and not feeling half bad in them, I figured I’d give them a go. I loved both styles with this type of top and took them over the bandeaus.
I also opted to try on some slimmer cuts on the bottom. The previous weekend on a very hot day, I slipped on an old Target bikini, with a full coverage bottom and the tight bands around the leg openings, and truth be told I looked terrible in them, or at least felt terrible in them. The binding squeezed and cut in at all the wrong places and left me feeling not as good as I actually feel I look. So taking a cue from my new favorite underwear from Soma, I took a few bottoms into the dressing rooms that actually had less coverage on the backside and didn’t have any binding around the legs, or if it did, was more for finishing of the garment than for squeezing in squishy thigh skin. They take some getting used to and probably aren’t best for lots of active beach going with the kids, but they are indeed more flattering than the traditional banded full coverage bottoms, at least for my shape.
As I was trying on the suits and chatting with the nice young girl who was helping me, I told her I was going away for an overnight anniversary getaway with my husband. She made sure to tell me how good I looked for having 3 kids. I came out asking for a different size in one of the tops, and as she saw me, in one of the smaller bikinis, she said with enthusiasm, “You go girl!” I know I may be projecting here, but it was like she was saying, “Wow, I can’t believe you have the confidence to rock that suit, but you go girl!” My backside may not be completely firm and toned, and goodness knows I still have some pudge in my mid-section, but I actually do feel pretty darn good right now. I’ve been working hard, doing yoga every day and eating right. And while I may weigh 10 pounds more than I did before I had Hayden, I have a much healthier and positive outlook on my physical being than I ever had before. In other words, I feel comfortable in my skin. What a concept, right? In the end I went with a 2 piece suit from L*Space including the halter top and crochet boyshort bottom in pistachio, and this graphic Mara Hoffman Kites 2 piece suit. In no way shape or form do I look like the models pictured in these suits, but I’m really okay with that.
I’ve compiled several suits for this 2014 swimwear guide, which I have personally tried on and have found to be flattering, both 1 and 2 pieces. For reference, I’m 5’10” and hover between 140-145. I’m smaller on top, and have some hips and a booty, and I have consistently found that the slimmer cuts in back, as well as the boy shorts that dip in the back look best on me. Suits which are full coverage on the bottom indeed look the least flattering, so if you are in any way like me, you have to decide to either cover up, or take a chance and bare a little more, for a more flattering look. For one-pieces, because of the natural curve of my back and the way it accentuates my tummy, it is imperative that the suits either have a tummy ruching detail or a busy pattern. Other wise it is a very unflattering look. I have a longer torso, so the one pieces which have solid tank straps, as opposed to a halter or bandeau neck line, ride up and feel uncomfortable in the crotch area, and cause that puckering hollow effect in the back area. I’ve found that there’s suits we want to wear, suits we think we should wear, and suits we should actually wear. Yes, function has to come into play, especially if you’re a mom, but beyond that, you sometimes have to take risks or step outside your comfort zone when it comes to swimsuits. Think of it this way, we all hate low rider jeans and love the comfort of high waisted jeans because they suck it all in, but they look terrible, so you have to find something in between that you’re happy and comfortable in, but also feel good in (and sometimes feeling good is a matter of our husbands/partners telling us we look good, because we don’t always see ourselves through the correct lens, ie., we’re way harder on ourselves than necessary).
I make it a point to convey that this health journey I’ve been on the past year is not to lose weight, and I in fact bristle a bit when people ask if I have lost weight eating this way (no, I haven’t really lost anything worth noting), but I’ve come to a place where I do feel good, and so why not celebrate it? And for me, celebrating means wearing a bikini this summer. Although I still need to get a new 2-piece suit I can feel safe wearing to the beach with the kids.
A few weeks ago I received a pretty shitty PR pitch from a fashion company that went something like this: “Not enough time to workout or even do a juice cleanse? In need of some instant slimming secrets that will help you step out in confidence all spring and summer long? -Name withheld- dresses feature built-in shapewear, which eliminates an entire dress size in one zip. Like ‘Botox for your body’, these dresses smooth from top to bottom. Because what woman wouldn’t want to look thinner?”
Getting to this point in feeling comfortable in my skin every day has been a year in the making. It’s not something that I could have achieved by doing a 3 day juice cleanse or completing a 30 day bootcamp. And it’s as much mental as it is physical, but a huge part of it for me personally was coming to the realization that I am doing all I can to nourish myself and give my body the best I can through exercise and food. At this point, the body I’m left with is the body I’m supposed to have. There was always this sort of internal mental chatter that I was conflicted about, and I often thought that if I could just figure out what I was supposed to give up (sugar or carbs?), or if I could just limit myself to the right amount of calories (1500?), if I could just get the food thing right, then I’d achieve the body I was meant to have, and then I’d feel good. But the truth is, this is the body I’m meant to have, so I may as well embrace it, right? And it’s a pretty good body too, as it is strong and capable and allows me to do yoga and pick up my kids and take long walks with my husband. And while others may not agree, I look in the mirror and I think it looks pretty decent in a bikini too, even for having 3 kids 😉
On Monday May 26th I’m leading a 30 day clean eating challenge over on my GMMDI IG account. I’ll get into more details this coming week, but I will say that it’s not about hitting summer weight loss goals, and abiding by strict rules, but more about starting down the path to making healthier choices and swaps. And for those who are already eating pretty clean, it’s about challenging yourself to go a little further. I for one am going to work on cutting down on the daily chips and guacamole, and limit wine to weekends only. You don’t have to be suffering a health ailment to get involved, you may just want to start feeding yourself and your family better. You may want to achieve some fitness goals, or you may want to eventually feel good in a bikini. Whatever you’re looking to achieve, I hope it will be a good starting place for you. The hashtag for the challenge will be #GMMDI30days. I was going to add on the word challenge but figured that would get too long. In the next couple of weeks as we get ready to start, I’ll be posting some tips and helpful resources, so follow along via Bloglovin or via email subscription, which you can do by entering your email in the field on the right sidebar.
Thanks guys, and happy, drama free swimsuit shopping!
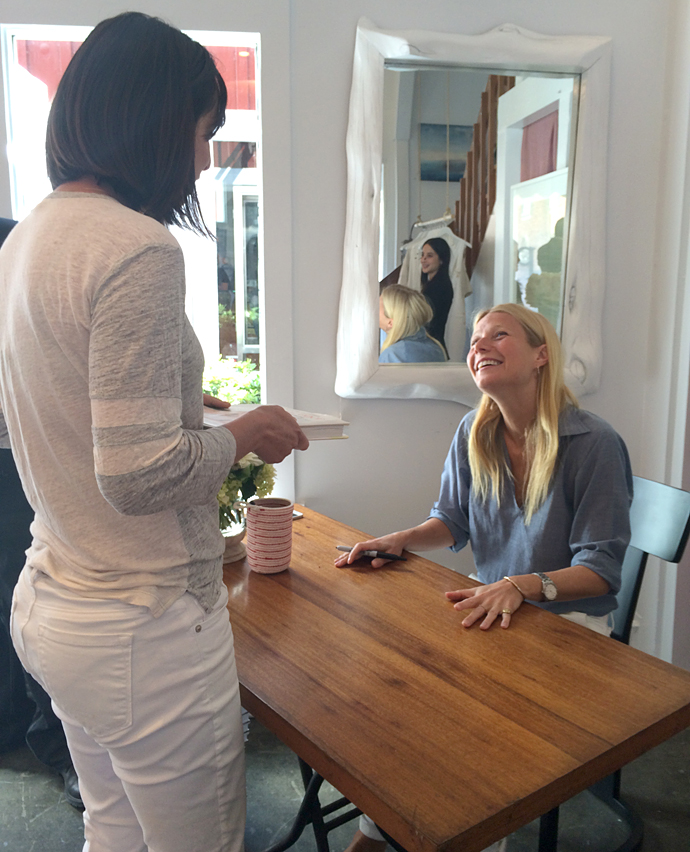
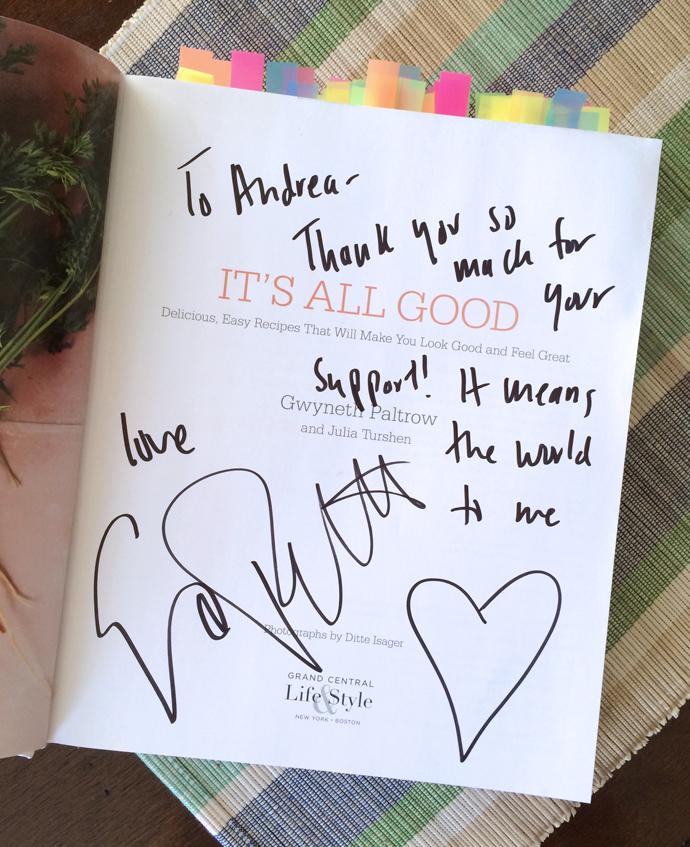
I realize it’s been weeks since I’ve written a proper post over here. I’ve been in a post-spring break haze, fumbling around, still trying to get back into the swing of things. It’s getting warmer, the sun is out longer, and I’ve been doing yoga every day, so in other words, there have been so many other things luring me away from the screen. It’s definitely not a bad thing I suppose. I have so much to tell you all, and share with you about what life has looked like around here lately, but I thought I’d start back with a bang, and tell you all about the day I met Gwyneth Paltrow.
Chandra alerted me that GP would be signing books at the Goop pop up shop in Brentwood, and at first I really hesitated. In all honesty, I was afraid of meeting her, and coming off as some celebrity groupie. So when I decided to go, I spent a little bit of time the night before practicing what I was going to say. I do realize that statement in and of itself makes me sound like a celebrity groupie, but I felt it was important to strike the right balance between showing my appreciation for her and the cookbook, and not showing sheer adoration. As I’ve said before, Gwyneth didn’t change my life, I did, but she inspired a big part of the change.
Truth be told, I was also afraid she would come across as dismissive or sort of blase when I told her about how she’s inspired me this past year. If this turned out the be the case, I know I would have felt disappointment that I had championed for her and the book so much in the past year.
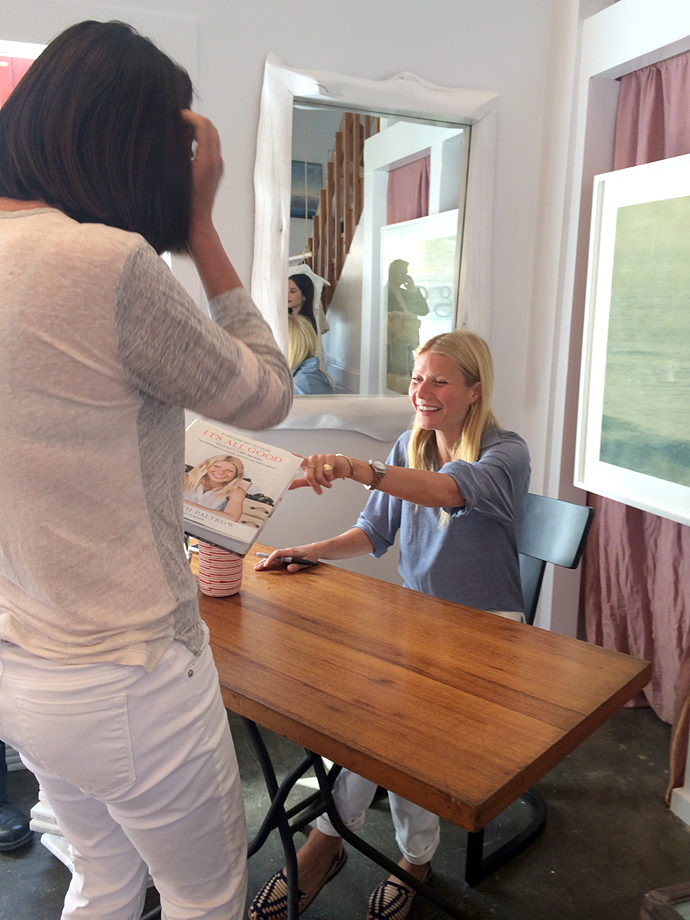
But I put my nerves aside, practiced some selfies with Art standing in for GP, and headed on out on Saturday morning to stand in line at the Brentwood Country Mart. When I arrived at 8:45 a.m., I was the 5th person in line, and the first 5 of us stood there for about 20-30 minutes chatting it up, before anyone else even arrived. About 15 minutes before she was set to start signing books, a couple of gals from the Goop store came on out and started going over a few things with us. They opened our book jackets to the right page for her to sign, and they instructed us that there would be no photos with her. If someone wanted to take a photo of us getting our book signed by her, that was fine, but there would be no posed photos, no swinging behind the back of the desk to pose for a selfie with her. It was a total “boo!” moment, and so myself and the gal behind me started to devise a plan of how I was going to snap a photo with her. She was so sweet and ensured me that she would somehow make sure I got a posed-ish picture with her. One look at her IG and I could tell I was in good hands. She obviously had an excellent eye and good camera skills. As we got prepared to go inside, I handed my phone to her and was ready to go.
The doors to the store promptly opened at 10am, and inside GP enthusiastically cheered, “Let’s get this started!”
The first 5 of us in line were let in, and they closed the doors behind us. The problem was, the sweet photog behind me was 6th in line, and was trapped outside with my phone! I panicked a little, but after the first 2-3 copies were signed, they opened the doors and let in the next 2 in line, so my photographer was safely in line behind me, ready to sneak in the perfect shot of us.
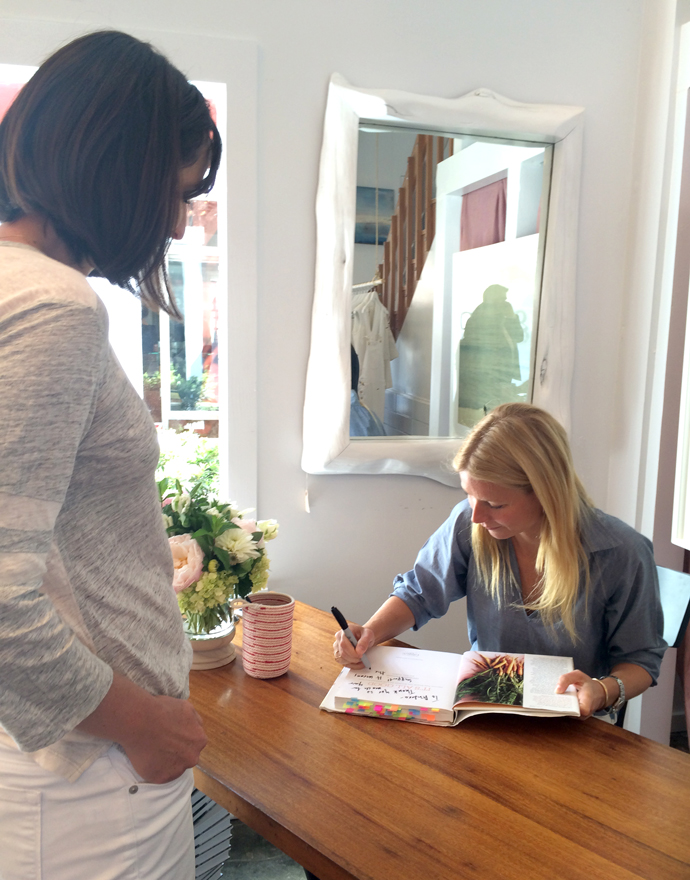
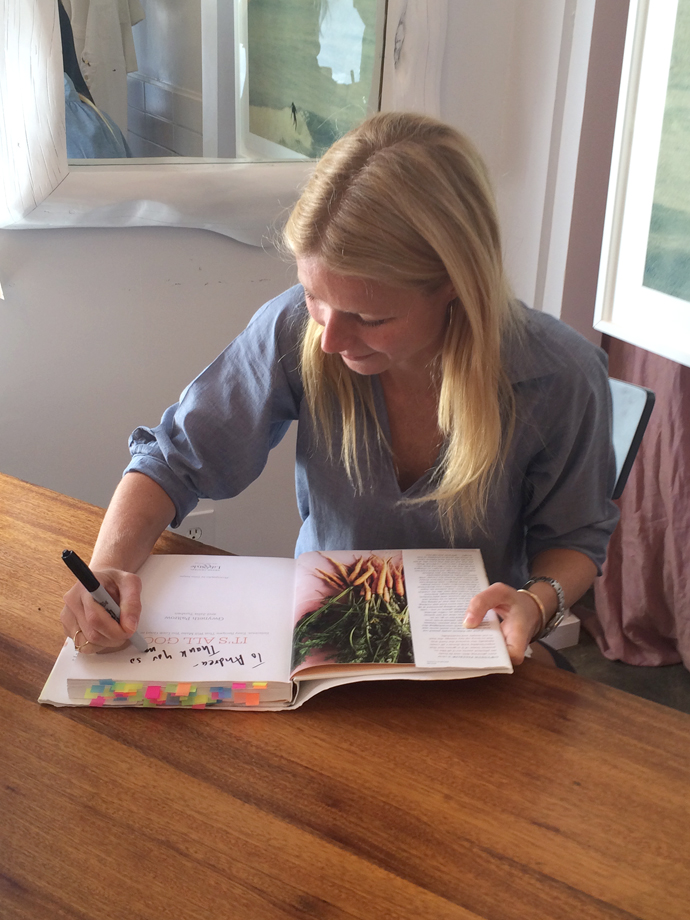
As I stepped up to have my book signed, I told her I needed just a minute of her time. She chuckled and told me to take my time, and at that point she noticed my cookbook, flagged with at least 40 neon post-its, and said she could tell I’ve been using her book it a lot. I don’t remember exactly word for word what I said, but it went something like this:
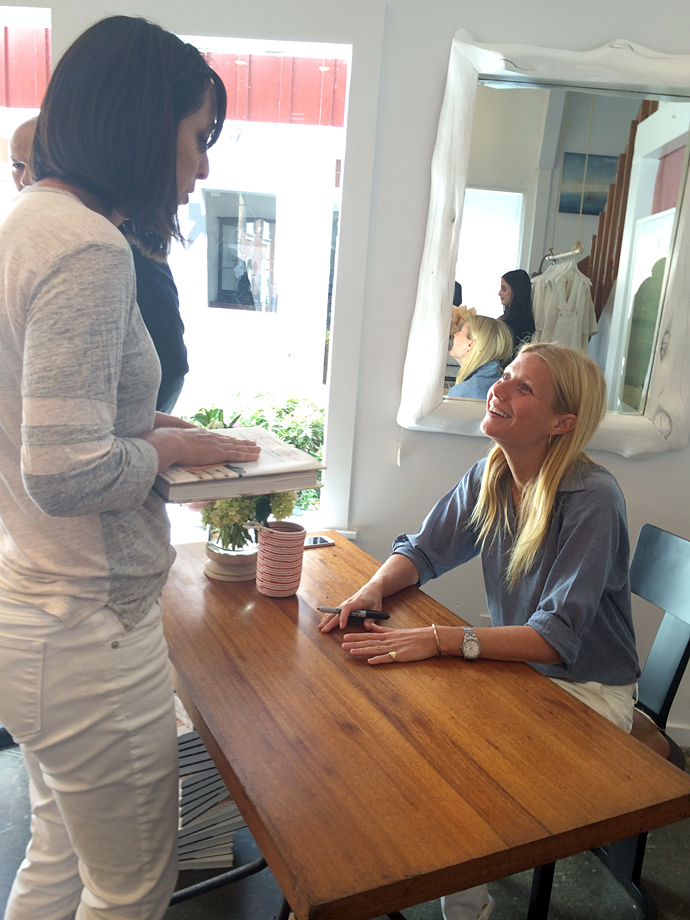
“Your book has inspired me to completely change the way I eat and cook for my family. I love it so much that I started an Instagram account named Gwyneth Made Me Do It, and I now get to inspire thousands of others and share how to eat well too. I also have a column on a parenting website where I share how to eat and cook this way with a family, and make it manageable. So thank you so much.”
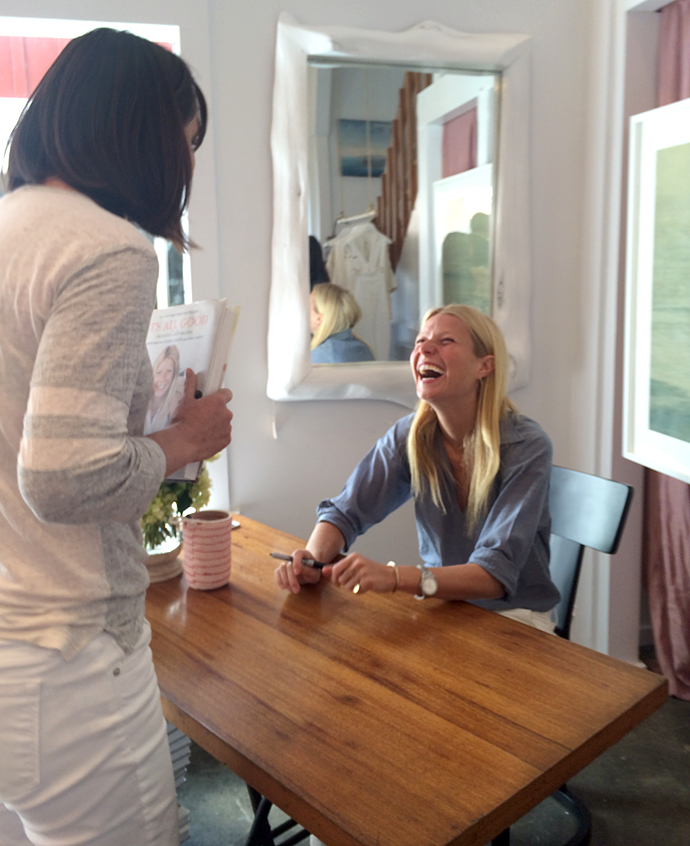
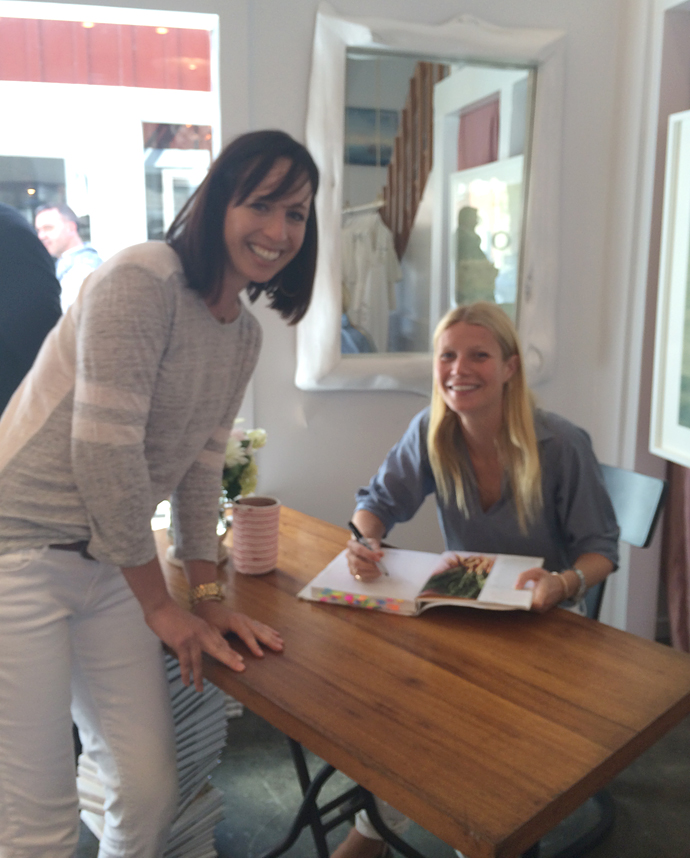
You guys, she sincerely seemed touched and excited to hear the brief synopsis of my journey. She laughed when I told her the name of the account and said something like “Oh my gosh, no way!?!” When I paused, she turned to her assistant Holly and said to me, “We have to do something together! This is so great! We’ll find you!” She then started to sign my book and as she was signing I told her I loved her recent Goop article where she reacts to the 9-5 comment controversy, and she looked up and shook her head at how crazy that whole thing turned out to be.
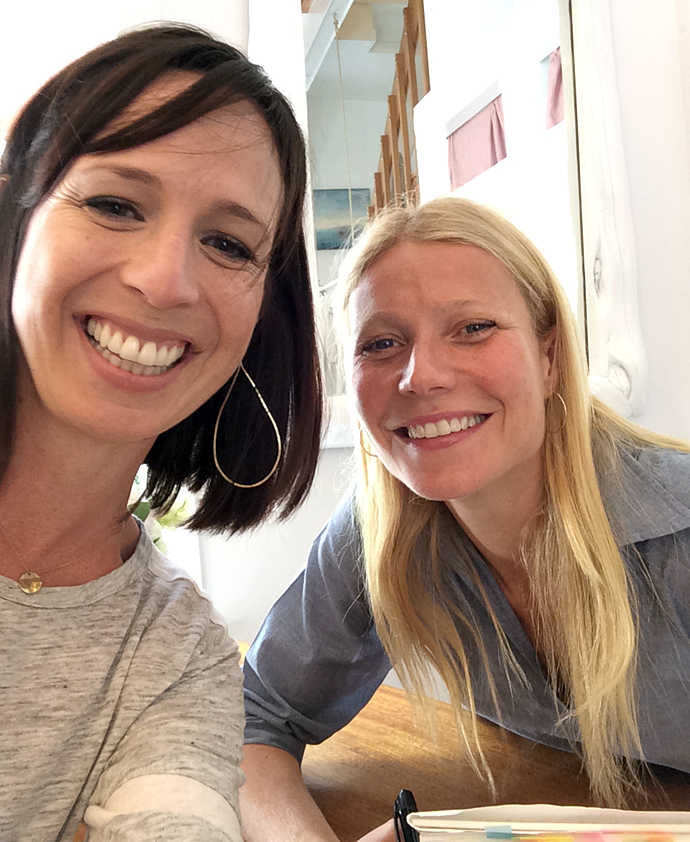
As she finished signing and handed my book back to me, she said again to Holly, make sure to find her, Gwyneth Made Me Do It, right? Her genuine kindness and enthusiasm made me feel at ease and I was so caught up in how nice she was, I ignored the previous rules of no photos and asked her if she would take a selfie with me. My new photography friend who was busily snapping away, handed me my phone, she leaned in, and the rest is history. I’m actually not even much that into selfies, as you can see on my IG account I post a one every few days or so, but my friends and followers on GMMDI joked about how amazing it would be to get a selfie with her. Probably because she has such a reputation of being pretentious or snobby? I don’t know, but for some reason I too became a little obsessed with getting this selfie with her, and I have to say, I think we nailed it.
After that, I’m not really sure what I said or did, but I grabbed my copy and walked out the door, not even really stopping to shop the store or anything.
I milled around for a bit sort of in a haze, both laughing at myself for having the balls to pose for a selfie with Gwyneth, and laughing at myself for making such a big deal out of it all.
At any rate, it was a very full circle moment for me, and was a great way to cap off what has been a very big year of growth for me.
If I had met Gwyenth in the first couple of months of eating this way, I don’t that I would have been so genuinely excited to meet her. Let’s not forget that this all began in a very tongue in cheek vain. But it turned out that the joke was on me.
In many ways I’ve moved beyond her cookbook It’s All Good. I go back to it often and have staples I still cook every week it seems, but I have many others I now reference on the regular too. But the thing is, her book was the catalyst for change, and got me looking at and thinking about food in a whole new way. It’s been empowering and liberating to finally have the confidence and know-how of what I need to eat to feel my best, and how to feed and teach my children how to take care of themselves.
If I did have the chance to work with Gwyneth in some capacity, I would ask for her help in raising awareness of the devastating food deserts which exist in our country, and strategize on how we could bring more healthy food options to rural, urban and low-income communities. There still exists a huge disconnect in the health food community, and while many of us like to argue about the toxicity of grains and legumes, or ponder the negative effects of consuming too much kale, there’s millions of people in our country who don’t even have access to fresh fruits and vegetables. Millions who would love the opportunity to feed their family a head of broccoli instead of McDonald’s. I would also ask for help in food education for young people, so that we can empower them with the knowledge and skills in how to nourish themselves properly, so we can put a dent in the rise of childhood obesity, and help tackle the ongoing epidemic of eating disorders in young people. Or we could always just cook a meal together. That would work too.
We’ve lost our way when it comes to food in America. I’m forever thankful that in the last year I’ve been able to find my way back to the basics, with help from of a certain blonde celebrity with killer legs. Thanks Gwyneth.
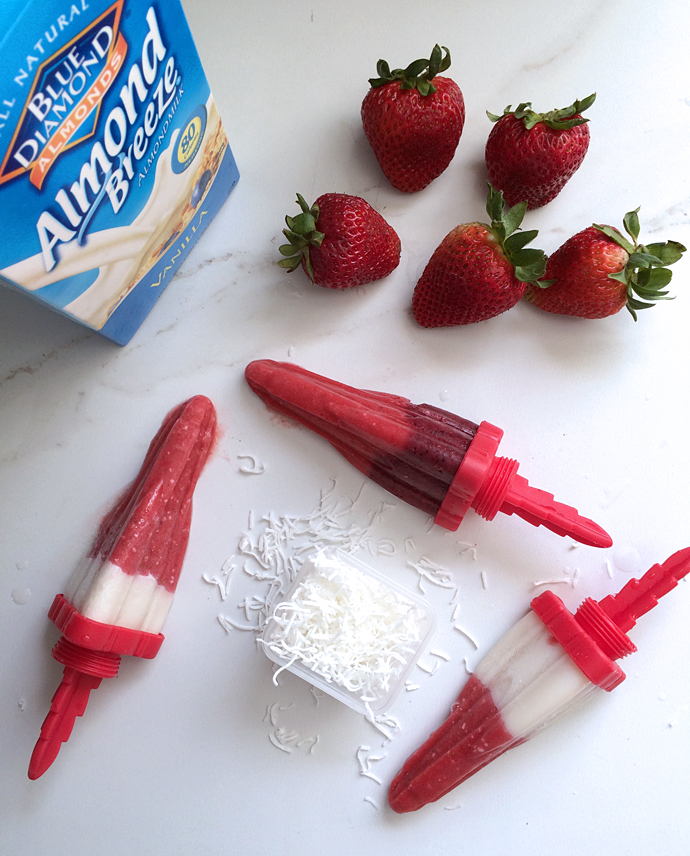
Our usually mild California weather has been a bit schizophrenic the past few weeks. Wilder than usual winds and record breaking heat waves one day, and then chilly temps that have you wearing a sweater the next. I can’t make heads or tails of it, and the other day I felt a cool after school treat was in order, after the big kids had come home from school the previous day limp from the heat. Rather than drag Hayden out to the store with me, we just did a little fridge raid and came up with the perfect ingredients to make our own creamy berry popsicles. I whipped them up in just a few minutes and had them ready for the kids when they got home. To say they were excited was an understatement.
Because these were a last minute throw together treat, I did a little winging it in the ingredients department. I started off with just a plain strawberry mix, using fresh strawberries I had on hand, but then quickly realized there wasn’t enough mixture to even fill up 3 popsicles. So then I dug through the freezer and a bag of frozen berries and blended those up. We were getting there, as we now had enough mix to fill up about 6 popsicle molds. Since we have a 9 piece set of molds, I mentally felt like I just had to fill them all up, so I then just added plain almond milk to top off some of the molds, hence the reason why we have a few different variations. It made for fun when choosing their flavor of choice though, so it all worked out.
In the photo of Hayden above you can see how dusty our pool got from the crazy wild winds. We were feeling a bit caged in, stuck inside the house and classrooms (kids didn’t even take recess that day it was so hot), so we ventured outside under the shade of our Chinese Elm and enjoyed our pops. All 9 are all gone and the kids are asking me to make them again. They loved the coconut flavor addition, and I think next time I’ll try to be a bit more prepared and have some blueberries on hand to make red, white and blue pops. Or maybe some mango and banana for a more tropical flavor combo. To get the layered look, just freeze the first layer for about 20 minutes, enough for it to slightly set, but not freeze so much you can’t get the stick in, and then add the other flavor layer. Set a time and go about your business. Seems like a pain but really it wasn’t. Also, the molds are from Cuisipro if anyone is interested.
A simple and refreshing healthy popsicle that is dairy free and free of refined sugar.
Author: Andrea Howe
Recipe type: Dessert
Serves: 8
Ingredients
2 cups fresh or frozen fruit of choice. If you want to vary the colors of your popsicles, I suggest using strawberries and some sort of darker berry like blackberry or blueberry.
½ cup Almond Breeze Almond Milk
1 tbsp unsweetened shredded coconut
1 tbsp added sweetener if desired, such as maple syrup or honey
Instructions
Blend all ingredients in a powerful blender, and freeze in popsicle molds. To achieve layered effect, freeze in layers for about 20 minutes, before adding another flavor.
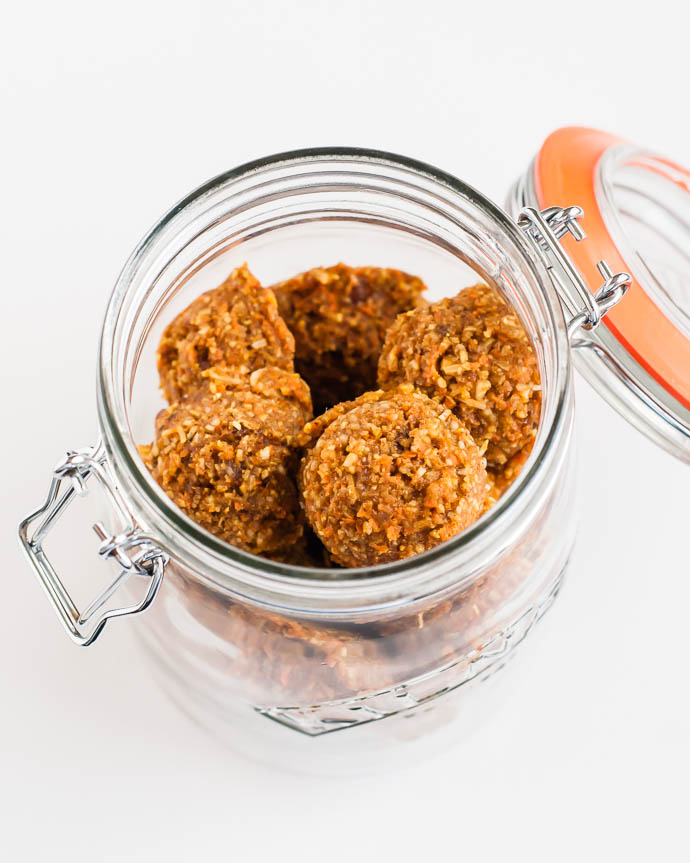
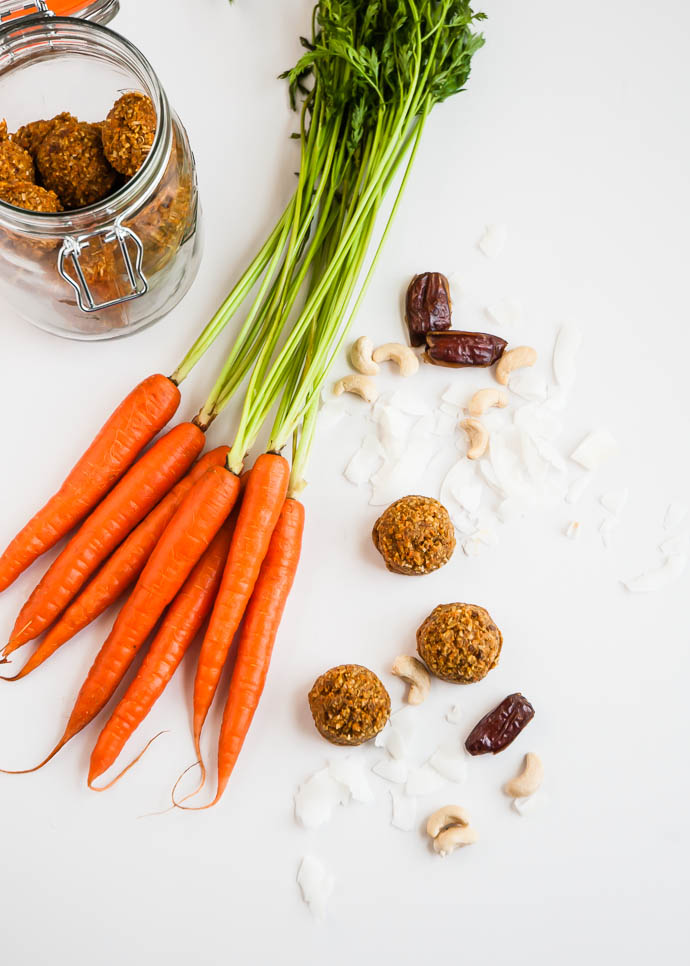
Energy bites are one of my very favorite snacks for several reasons. I love that you can make them with myriad ingredients depending on your mood. Today it’s carrot cake energy bites because it’s spring, the weather is warm, and I want to be outside. And for that I need a snack that gives me a little energy boost – these bites do that. They are grain-free, gluten-free, dairy-free, and naturally sweetened with dates. They also come together very quickly and keep well in the fridge for a week or so, of longer in the freezer. That means you can whip up a batch or two and not have to worry about making more for a few days. The other thing I love about these is that my kids will eat them. SO much better than a chocolate chip cookie after school and just as tasty.
I sat down to think about my favorite components of carrot cake – the carrots (duh), coconut, nuts, and dried fruit. I also like the spices in carrot cake. (Okay, I like the cream cheese frosting too, but there wasn’t any room for that in these energy bites!) Normally when I make energy bites, I use gluten-free rolled oats. For these I like to use raw cashews. They’re a bit like Larabars that way. The dates sweeten them just a bit without being too sweet and also helps them hold together. The sunflower butter also helps with that. You could substitute almond or another nut butter if you want, or even leave it out and add a few more dates. I love the flavor of these, but they do benefit from some cinnamon, ginger, and vanilla. It takes the bites into the realm of tasting like dessert without actually being dessert. I leave them plain, but if you want to, you can roll them in shredded or desiccated coconut.
A healthy and nutritious treat for snacks and on the go.
Author: Lindsey Johnson
Recipe type: Snack
Cuisine: American
Serves: 18-20
Ingredients
1 cup diced carrots (about 2 medium)
1 cup raw cashews
1 cup unsweetened shredded coconut
10 medium sized dates (5 very large)
2-4 Tablespoons raw sunflower butter
1 teaspoon ground cinnamon
1 teaspoon fresh grated ginger
1 teaspoon pure vanilla extract
pinch salt
Instructions
Place carrots into the bowl of a food processor fitted with the chopping blade. Pulse until finely chopped. Transfer to a medium mixing bowl.
Next place raw cashews into the food processor and pulse until finely chopped. Place in bowl with carrots.
Repeat the same process with the coconut and transfer to the bowl with the other ingredients.
Put the dates into the food processor and pulse until chopped, then add the carrots, cashews, coconut, 2 Tablespoons sunflower butter, cinnamon, ginger, and vanilla. Pulse until the mixture comes together. If it's too dry, add more sunflower butter a little at a time. Scrape down sides and pulse again, if needed.
Lay a piece of parchment paper in a clean, dry surface. Use the small ice cream scoop or tablespoon-sized measuring spoon to form the mixture into 18-20 balls. Eat immediately, or place in fridge or freezer to firm up a bit. Store in an airtight container in the fridge for about 1 week, or in the freezer for a month or two.
Note: You can roll them in unsweetened coconut or leave them as is.
3.2.1284
As I said, you’ll want to keep them refrigerated, but that doesn’t mean you can snag a few for the road. They are great little snacks when you’re hiking or doing something else outdoorsy.
Isn’t a Mother’s Day gift one of the hardest gifts to shop for? How do you say, “you are one the most important parts of my life” with a stationary set? Perhaps a gift that say, “I love you so very much” so have a pretty lemon juicer? Can a potted flower, a thrift-store painting, or any gift really say all that you want to say this Mother’s Day? Probably not, but a heartfelt and hand-painted gift just might be a good start to showing your appreciation for mom! Good news too, because I am going to teach you how to make this custom arrow painting and you will soon see that it is as easy to make as it is cute to look at!
Stuff you will need:
– A piece of wood or some kind of canvas to paint
– Craft paint in a variety of colors (including white)
– A paint brush or sponge brush
– Painter’s tape
Step 1: For the first step I divided my paints into two different color categories so that I would have two arrow with different color schemes. Begin by taking the paintbrush or sponge brush and painting the general area where you will want your arrow. I combined and mixed colors to give it a really random and organic feel-like an impressionist painting. Also, random means no perfect lines and no color rules…just go for it! Make sure to let this paint dry completely. I let mine sit for about and hour.
Step 2: After your paint has dried it’s time to transform those colorful streaks of paint into an arrow using painter’s tape. I began by creating the arrowhead. First I ripped several short strips of painters tape and then stuck them together by overlapping the long edge of the tape strip. Once I stuck 5 strips together I had a “sheet” of painters tape that I could cut into a triangle for the arrowhead. After I cut the arrowhead I placed it over a completely painted area on my wood and made sure all the edges were firmly stuck to the wood.
Step 3: Now it’s time to finish taping off the rest of the arrow. For the arrow stick I used two long strips of tape. I used lots of overlapping small strips of tape for the arrow “feathers”. I liked how the ripped ends for the tape were rough and added texture to the feather.
Step 4: Now it’s time to put that tape to good use. With white paint I painted all of the wood surface that wasn’t covered in tape. I also painted around the edges of the tape to ensure a clean outline of the arrows. You may need to paint several coats of white paint to get a crisp white color. I painted 3 coats and let each coat dry for 30 minutes.
Step 5: Step five, and the final step, is my favorite. After all the white paint dries simply pull off all the painter’s tape to reveal a brightly-colored arrow! This is my favorite step because I love the clean lines of white and color that painter’s tape creates.
The finished product is a lovely and simple painting of two fabulously colorful arrows! I love that the paint strokes in the arrows abruptly stop and start where the white paint surrounds. This will be the perfect way to add a pop of color to your mom’s special day!
If you don’t like miniature racoons and fake moss grass then this craft isn’t for you (I bet you also hate unicorns and sunshine). If, however, you can’t get enough of those tiny quaint trees and you love anything clever, this is just the craft for you! I love myself a little nature shadowbox. In fact, after I built this woodland shadowbox for my son’s room I knew a mini desert scene needed to be my next project. Plus, I am so sick of winter and I knew I needed to come up with some little craft that brought a sunny nature vibe inside.
Here is what you need to make a nature shadow box of your own:
– Wood and trim scraps (we will cut these to size).
– Craft paints, a paint brush, and a sponge brush.
– Fake moss. You can buy this glorious stuff at your local craft store.
– Hot glue gun and glue sticks.
– Nail gun and nails. You could use screws and a drill or nails and a hammer, however, I found the nail gun and nails to be the easiest to work with.
– Props! Little critters and little plants…really get creative with it. Maybe you want to do a city shadow box-buy yourself some mini cars, light posts, and a teeny tiny park bench!
Step 1: To start, you need to create your “canvas” for your shadow box. In other words, you need to cut the background and side pieces to your shadow box. I used a table saw to cut the wood but you could use a hand saw instead if power tools are not available. The background piece I cut to 12″ wide by 8″ tall. The two side pieces are 5″ wide (I used 5″-wide trim scraps) by 8″ long. The top and bottom pieces are 5″ wide by 13.5″ long.
Step 2: Next, you will want to paint the sky first. My toddler helped me paint because “I’m not like those regular moms, I’m a cool mom” ;). Also, he wouldn’t nap so we improvised. As you can see, I painted all of the “top” piece and half of the background and two side pieces. I let the sky-blue paint dry for 15 minutes before I moved on to step 3.
Step 3: Now, for step 3, paint on the rest of the details on the background, sides, top, and bottom. I added mountains and a little river. Remember that the 5 pieces of wood act as one painting so your mountains and rivers can be painted as if they continue from one piece to another. You will notice that when you nail them together the mountains and streams match up.
Step 4: For step 4 I added fake moss as grass to the bottom piece of trim. I made sure to cut it around my river so that it looked like the river was flowing through the grass. That last sentence sounded like DIY poetry. Using hot glue, secure the moss to the trim surface and don’t hesitate to really glob on the hot glue.
Step 5: Now it is time to nail all the sides together to create a box. All 4 sides of the box need to be flush with the background piece of wood, meaning that if you laid the background piece flat on the ground, all four sides would stand flat on the ground (not on top of the background piece). Nail all side pieces into the edges of the background piece, making sure that the top and bottom sides cap off the ends of the two side pieces. Finish nailing the box together by nailing the top and bottom pieces to the side pieces.
Step 6: For step 6, and the final step, you get to add all the props! Put that hot glue gun to good use and glue down those critters and greenery.
Finished! There is no denying that this is the cutest shadow box you have ever seen, right!?
For The Love Of contains paid advertising banners and some contextual affiliate links. An affiliate link means that I receive commission on sales of the products that are linked to in my posts. So if you click on a link and make a purchase from an affiliate site, then I may make a commission from that purchase, however the price does not change for you.
Any products which have been gifted or provided gratis to For The Love Of for review is noted with an asterisk (*) or c/o (courtesy of) at the bottom of the post and are only posted if a good fit for the For The Love Of aesthetic and content. Any sponsored giveaways or posts will be noted as such.