Top 5 Favorite Beautycounter Items & Labor Day Promo

SHARE THIS +

IMG_4508 I joined Beautycounter as a consultant because I loved the premise of the company; beautiful products that performed, and were made safe. I started actively selling Beautycounter though, through “socials” and one-on-one appointments, because I was blown away by how well the products actually worked. But while I’ve been impressed with just about the whole line of products, I still have a few favorites that I wholeheartedly believe in and personally feel are the best I’ve ever used. This Labor Day weekend Beautycounter is giving away a full size jar of our Nourishing Cleansing Balm with every $150 purchase, so if you’ve been thinking of making a purchase and trying out this line for yourself, now’s the time. If you need help with where to start, here are my recommendations.

Note that I have color treated hair and overall dry skin, so these products work especially well for me. If you have concerns or questions though about my recommendations working for you, let me know and I’ll do my best to answer.

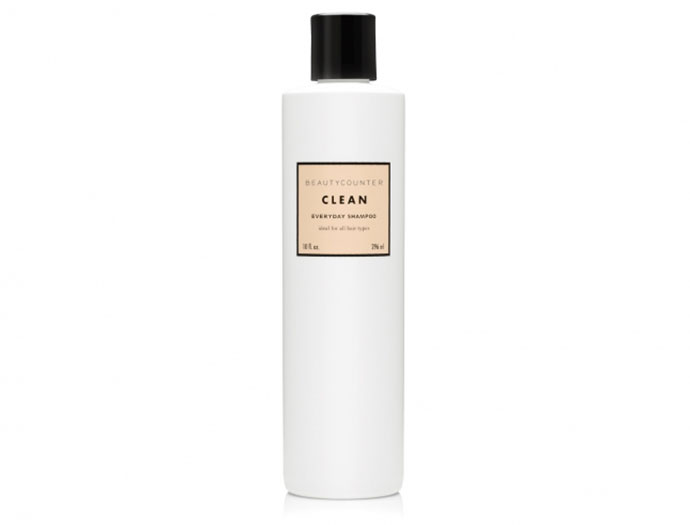
Clean Everyday Shampoo: I’ve sang this product’s praises before, and I’ll continue to do so until all my friends try this stuff out. The best I’ve ever used, it manages to clean my oily hair without drying it out or leaving it feeling stripped and lifeless, making it hard to style. Made with pure plant botanicals and zero sulfates, which can irritate the skin and contain known carcinogen 1, 4 dioxane, this shampoo instead uses ingredients derived from coconut oil and amino acids. beautycounter-clean-shampoo-1534x1168

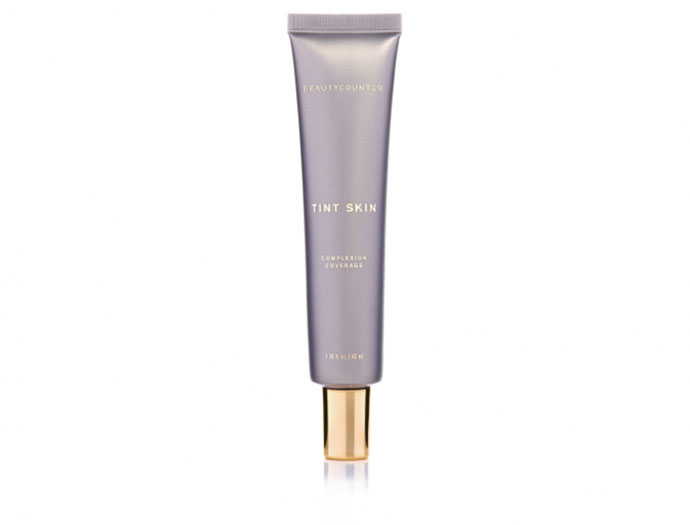
Tint Skin: I’ve written about this foundation being wonderfully lightweight and yet still able to provide exceptional coverage, but I failed to mention the active skincare ingredients it contains, including hyaluronic acid, a natural moisture magnet which promotes smoother-looking skin and reduces the appearance of fine lines and wrinkles. It can go on with your fingers, but goes on even smoother with the retractable complexion coverage brush. beautycounter_tint-skin-complexion-coverage_porcelain_1534x1168_view1

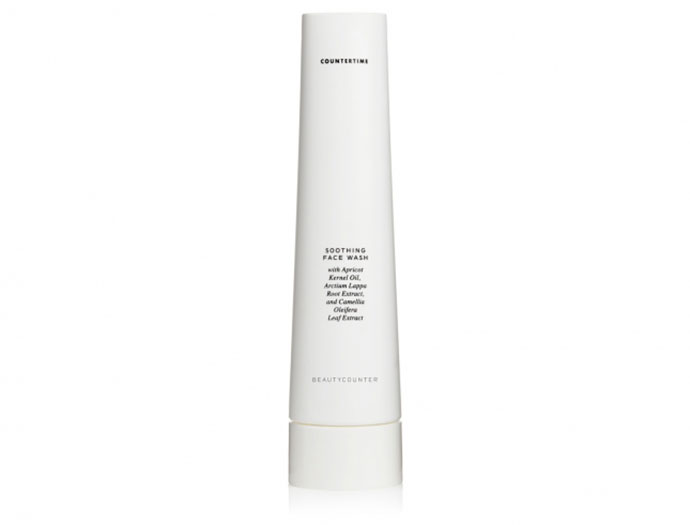
Soothing Face Wash: I’m always impressed with any face wash which can remove my Tarte mascara, which is usually a bitch to take off, and this stuff does just that, safely. Gentle yet highly effective at countering the signs of aging, with plant based ingredients including apricot kernel oil and camellia leaf extract, which work to provide the skin with moisture and a heady does of antioxidants. I have fairly sensitive skin, but this face wash truly works wonders for my skin. beautycounter_countertime-soothing-face-wash_main_1534x1168

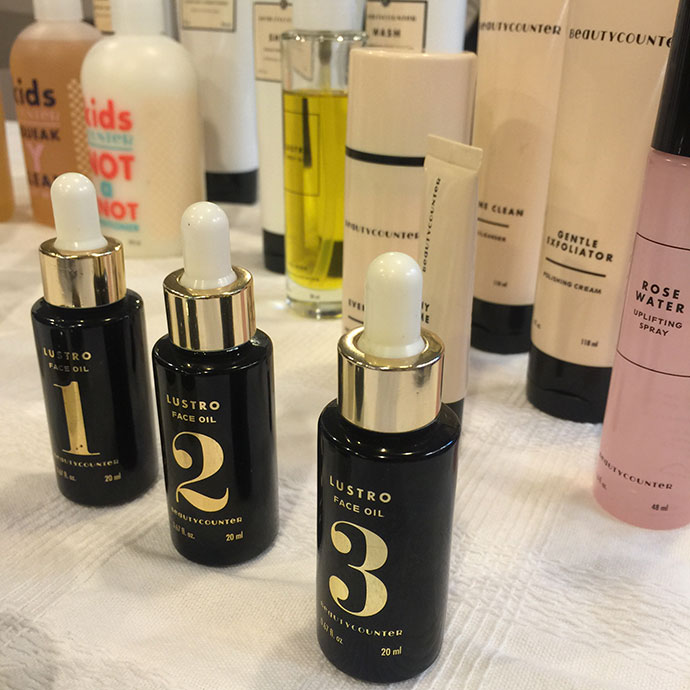
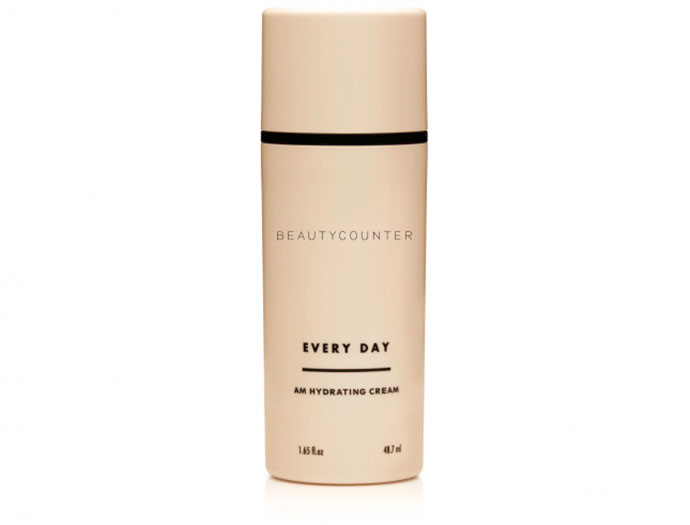
Every Day Hydrating Cream: Super lightweight and non-greasy, this lotion is the perfect primer for my makeup, and leaves my face feeling great when I’m having a makeup free day. I recommend this to most women who are not seeking an active anti-aging regimen, because it’s gentle yet effective, and works for any skin type, be it super dry to oily and troubled. And like all of our products, paraben free, which is a preservative that mimics estrogen and is linked to endocrine disruption. I mix my cream with a drop or two of Lustro Face Oil #1 if I’m feeling particularly dry that day. beautycounter-every_day-hydrating_cream-1534x1168

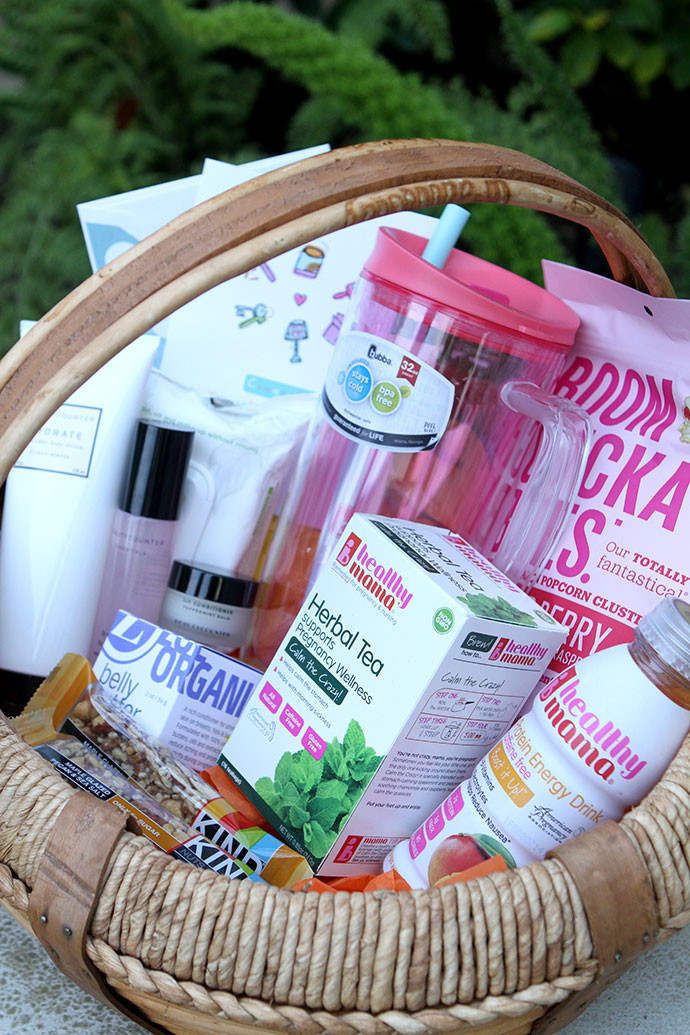
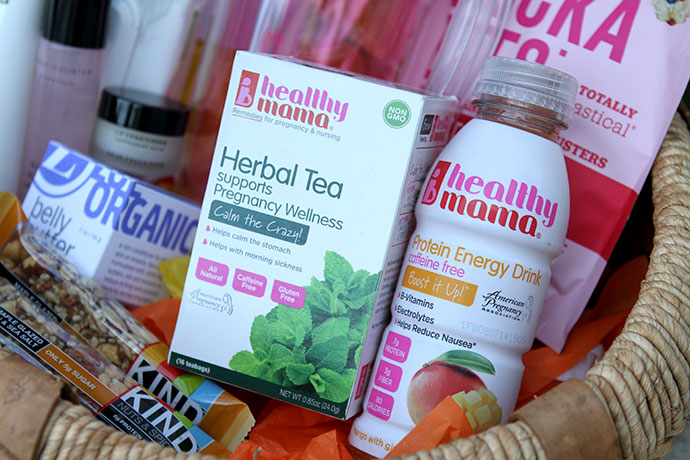
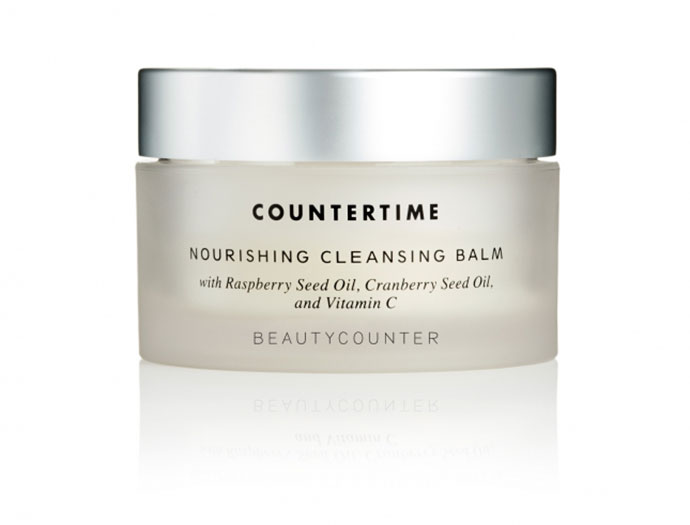
Nourishing Cleansing Balm: If I feel like my skin needs some deep cleaning, I use this before my Soothing Face Wash, but mainly I just use it as a night time mask, once every couple of weeks. It also works wonders on dry elbows, knees and cracked heels. Part of our anti-aging line, it can be extremely powerful if used everyday, so because of my sensitive skin, I use it sparingly when I feel I need a good dose of hydration. Either way you use it though, be it every night or once a month, a little goes a long way and you will get months and months of use out of it. Raspberry Seed Oil and Cranberry Seed Oil hydrate and revitalize the skin, while Vitamin C brightens skin tone. This is the item you get for free by the way, when you make a purchase of $150 or more this weekend.  beautycounter_countertime-nourishing-cleansing-balm_main_1534x1168

Bottom line guys, I’m so happy and proud to be repping this line. I love the product, and even more so, I love the company and their mission. A few of the reasons why I chose to sell Beautycounter over another line? Here are a few bullet points that I like to rattle off if someone asks.

  • Beautycounter only uses ingredients with a proven safety record. Most commonly used ingredients in personal care products have never been tested for safety and therefore have no safety data. They have one of the strictest ingredient screening processes in the industry though, and will only use an ingredient they know to be safe. This eliminates the all too common scenario of swapping one bad ingredient for another.
  • Beautycounter respects nature and science. I always emphasize that Beautycounter is not an all natural company because we do use some synthetic ingredients, but as I mentioned above, only those with a proven safety record. It’s this beautiful combination of nature and science that helps the products work so dang well.
  • With science, safety and performance in mind, Beautycounter has assembled a kick-ass team. Gregg Renfrew, our founder, is a wonderful businesswoman who believes in the entrepreneurial power of women, which is part of the reason she chose a direct retail business model (the other reason was to help get the proper education put forth through consultants like myself). Christy Coleman, as a renowned makeup artist, ensures that our products actually perform. Mia Davis, head of Health & Safety and one of the responsible parties for getting BPA removed from everyday plastic items, helps to uphold our strict ingredient screening process. And lastly, our new Science Director, Nicole Acevedo, will help us better understand the physiological component of endocrine disrupting chemicals, and she will work with the health and safety team to screen all potential ingredients for safety and to move forward ground-breaking research.

Let me know if you guys have any questions at all about the products mentioned above. Tomorrow, I hope to share a few other great Labor Day promos going on with some of my favorite companies. Hopefully I’ll get around to it 🙂 I don’t always like to feel like I’m encouraging shopping, even though this started out as a style blog. But the truth is, if I’m going to spend money I like to do so intentionally and especially during a promo time, and I figure most of you feel the same way too.


Potty Training the 3rd Time Around

SHARE THIS +

Potty-training We set out to get Hayden potty trained a couple of weeks ago, just several days shy of his 3rd birthday. In all honesty, had we not been required to have him fully trained for the start of preschool, I’m not sure I would’ve finally taken the plunge. He’s my 3rd and final baby, and I fully admit that by keeping him in diapers I was able to stay in the sheltered world of De-Nial, and keep him as my forever baby. But we all know that’s not the most functional form of parenting, so we took on the challenge gosh, 2 weeks ago now, and I’m happy to announce that we’ve conquered the loo and we now have our last kid out of diapers.

The basic run-down of the last couple of weeks goes like this. We began on a Wednesday by ditching the diapers completely and putting him in undies. For the first 3 days, we had him sit on the potty every hour during awake times. For naps we kept him in undies, but at night we put him in a diaper. For the first 3 days we had nothing but accidents and he didn’t use the potty a single time. By day 4 though, we had a very good idea of his “schedule” and could anticipate the times he was going to have to go, so on day 4 we backed off from having him sit down every hour. This is when the magic happened, and by the end of day 4 he went pee on the potty for the first time. He continued to have at least 1 accident a day for the next 3-4 days, and by day 8 he was telling us when he had to go potty, which is when you know you’re really making progress. It was also at this time that he asked to wear undies to go to bed, so we swapped the diaper for the undies and he’s continued to wake up dry (last night he even woke up Taylor and told her he had to go potty, and went!). He’s now routinely telling us when he has to go, and as of yesterday, is comfortably going when out in public. We have yet to nail down the pooping situation, but since we are only 2 weeks in, and about a week since a urination accident, we’re not too concerned with pushing him. We have confidence that he’ll get it pretty soon.

A few thoughts on our pretty straightforward process, just because I’ve had some friends and readers ask.

  1. No Pull-Ups: We’ve subscribed to the no pull-ups at all routine with all 3 of our kids, and it has not failed us. I read somewhere many years ago when we were first starting to train Taylor, that putting them in pull-ups will only delay the process, because it prevents the child from feeling the whole bodily process of having to go, and then releasing. I double checked, and it seems that many “experts” still agree on this no pull-up method. For day time we kept him in undies all day, and at night, we put him in a diaper, which he eventually asked us to replace with his undies after about 6-7 days. *We are lucky in that we breed camels for children, and can count on one hand the amount of night time bed wettings we’ve had with all 3 kids. In fact, I don’t think any of them have ever wet their bed at night, so if you have a child who’s still waking up with wet diapers, consult  the “experts” because I don’t know what to do 😉
  2. In regards to signs of readiness: Hayden was displaying all the typical signs of readiness including waking up with dry diapers, asking us to change his dirty diaper after going potty, telling us he’s going potty, hiding in the corner to go poop, and showing an overall interest in the potty.
  3. In regards to “waiting until they’re ready”: Aside from the elimination communication form of potty training, most “experts” agree that a child is ready to be potty trained around the age of 2, and at maximum should be trained by 3. For all intents and purposes I’d agree, based off of my own experience with my 3.  Taylor literally trained herself in a couple of days when she was 22 months old, while Syd did take a bit longer and after he finally relinquished the idea of “control”, was trained in a weekend just after his 3rd birthday. Hayden quite honestly, with his easy going temperament, could have been trained even younger, but like I said, we sorta waited out of sheer laziness and denial that our little dude was growing up. With all that being said, I don’t agree that potty training should be one of those areas that we just let the children take control and lead the way. Kids need our guidance and structure with most everything they learn, and potty training should be no different. If you can make the process carefree and stress-free, it’s my personal belief that potty training should be led by the parents, when they are ready, not necessarily when the child is “ready.” I had a couple of people suggest to me that I should hold off and wait a few more months(!) just because I mentioned that Hayden was still having accidents on day 3. Had we not continued to stick with it and I instead let Hayden “lead the way” we wouldn’t have a very proud and happy little boy, going potty on the toilet just like his big brother. I think this topic is just a matter of parenting style, so please follow your gut and if you truly believe all parties involved are ready, then ignore the unsolicited advice from other parents telling you to back off.
  4. Getting them used to the potty: Nope, we didn’t do this either. We have 2 kinds of potty seats; one of the cushioned rings which fits over the big seat and keep downstairs, and one of the little toddler potties that they can sit on and you dump the pee, which we kept upstairs. When we decided to start, we brought both out and simply said, “This is where you go potty!” We didn’t leave it beforehand so he could “test it out”, so don’t feel like that bit of advice should be followed. I think, just like the pull-ups advice, is unnecessary and can even be confusing for the kids.
  5. Going naked: This method of letting them run around so they get the full sensation of the urge to go, and then release, is quite effective. But because we were living with my in-laws where she has lots of nice rugs all over the house and expensive hard wood flooring, I took the route of having him wear one of those Gerber padded undies underneath a pair of regular undies. Who knows, having him wear undies the whole time may have taken a few days longer, but in the end we were successful with this method, so don’t feel like the free and naked route is the only way to go.
  6. Being home-bound: This is another method which “experts” say make potty training easier and quicker, and that may very well be the case, but we did not stay home-bound the entire time. We got out plenty, and yes, we did have a few accidents, but nothing that wasn’t manageable. We always made sure to have a change of clothes with us, and we took the toddler potty with us so we could have him try to go before and after we went somewhere, but we didn’t have much luck in the beginning with this. But now, we can go out and he will tell us that he has to go, and actually go!
  7. Using a reward system: By the looks of my social media feeds, it seems the M&M reward system is pretty popular in getting kids potty trained. I can’t say whether it works or not since we’ve never tried it, but I can confirm that a more nonchalant system of congratulating for a job well done works great, and doesn’t get you stuck in a never-ending, demanding cycle of pee/candy/pee/candy. Every so often, after Hayden started actually going pee on the potty, we would go crazy with congratulations and high fives, and then say “Hey buddy, here’s a little treat!” We never really used it as a reward per se, or a bribe to get him to go, and now he’s going just find without prompting or cajoling, and he’s not expecting anything in return.
  8. Withholding poop: From my own personal experience and from speaking with countless friends and family members, not all kids train to go both pee and poop simultaneously. Because poop tends to be a little easier to control than pee, some kids may withhold going, either for control or because they’re just not getting how to make a bowel movement happen when sitting down on the potty. This happened with Taylor, was no problem with Syd, and is now happening with Hayden. He’s yet to make a bm on the potty, but as I said above, it’s really only been 2 weeks total, and because he mastered pee pretty easily and quickly, we’re not too concerned that poo will come next, and soon.

So that’s over 1500 words on the subject of potty training. I didn’t think I had that much to say, but I guess after 3 unique experiences with 3 kids, there’s a lot to be learned and discussed! Bottom line, my advice is to not make it into a huge production. I know it can seem overwhelming, especially with your first child, but take it seriously and be consistent, and after a few days you’ll see that it’s no big deal. My last big piece of advice that I didn’t really mention above, is to not get upset about accidents or scold and shame them. I’m not saying you have to be a happy patient saint every time there’s an accident (believe me, I let my frustration slip a bit here and there), but just stay consistent with the practice and offer plenty of reassurance that accidents are okay, but remind them where their pee and poo go; in the potty! And remind yourself that accidents are great learning experiences for you too, because you get a better idea of their schedule and can anticipate when they’ll have to go. This will avoid countless, unnecessary hours spent on the potty.

I hope this helps and isn’t too vague! Please let me know if you have any questions about any of this, I’d be happy to share any info I may have missed! I just love talking about poo and pee! 😉


My Latest Thrive Market Order

SHARE THIS +

Thrive Market Order I just received my latest Thrive Market order, and I figured I’d go through my purchases because I got several new things this time around, with a special emphasis on after-school and lunchbox snacks.

If you’re not familiar with Thrive Market, it’s an online market which focuses solely on health-conscious, natural and sustainable food items, at a discounted price. There is a yearly “membership” fee of $59.95, but your first month is free and your first order is 15% off, so you can order a couple of times and see how much you’ll save. For some, it’s worth the fee and can easily be recouped in just 1-2 orders, but I’m sure others have found it may not be worth it. Either way, you get a month to try it out, and shipping is fast and free on orders over $50. I usually get my orders within 2 days, and so far I’ve been really happy with everything I’ve purchased. Oh, and I love that Thrive gives one free membership for every paid membership, focusing on low-income families, so that everyone may have access to healthier food options.  Thrive-1

So let’s go through my latest order, shall we? Starting at the top and working left to right:

New Primal Grass-Fed Beef Jerky $5.70/bag: I sampled this jerky at Expo West, and was impressed with the flavor and the no-junk ingredient label. The beef comes from grass-fed cows, and the limited ingredients include gluten-free tamari, honey and less than 2% spices and seasonings, so that the flavor really comes through. I put a few small pieces in the kid’s lunch boxes and they love it.

Lundberg Brown Rice Cakes $2.35/package: The cheapest I usually find these for are $2.99 so I picked up a couple of packages since I was running low. I eat these quite often, topped with a couple of tbsp of guacamole or almond butter and berries. They make an excellent, low calorie gluten-free snack that fills that salty, crunchy craving I so often get.

Justin’s Mini PB Cups (milk & dark chocolate flavors) $4.95/4.7 ounce pouch: These are just delicious and a fun little something something to add to the kid’s school lunches for a treat. I got milk chocolate for the kiddos and dark for myself. Thrive-2

Crofter’s Jam $4.45/16 oz jar: We’re close to being out of jam, and so I would just order this while I was thinking about it. We’ve bought this jam before and it’s delicious, and pricey at Sprouts, the primary place I shop. I think it’s usually $5.99 a jar and rarely goes on sale.

Justin’s almond butter packs $11.95/10 packs: These are great for on-the go and I usually pair a pouch with some apple slices or a rice cake. I think my Sprouts usually has them for about the same price, so not a significant savings.

Peelu gum $6.95/100 pieces: This is the best “natural” gum I’ve tried. Tastes great, lasts a long time and is made with fibers from the Peelu tree, which help to give your teeth a little bit of a cleaning while you chew, and is sweetened with Xylitol, a 0 calorie natural sweetener.

Organic Ghee $10.95/13 oz jar: This is definitely the cheapest I’ve seen this ghee for. It will be my first time trying it out, and I hope I like it as much as Omghee.

Inka Plantain Chips $3.29/2 4 oz bags: Many stores have their own label of plantain chips including Trader Joe’s and Fresh and Easy, but I love the Inka brand the best. This is a great price, better than anywhere I’ve seen.

Roam Pork Sticks $34.95/24 sticks: These were a definite splurge purchase, but I’ve been wanting to get these for the kid’s lunches since seeing them at Expo West, and it saved me some $$ by purchasing in bulk. They’re pastured pork sticks and are sweetened with maple sugar and flavored with a simple list of spices.

Justin’s Hazelnut Butter $11.95/16 oz jar: I know that I can get this same jar for $10.95 when on sale at Sprouts, only problem is, it goes on sale intermittently, and we go through a jar of this stuff every few weeks. Still a significant savings off of regular price, and worth the extra $1 I’d normally pay when on sale at Sprouts, just for the convenience of not having to check the sale price at Sprouts. By the way, this spread has 1/3 the amount of sugar as Nutella so that it actually tastes like hazelnuts and not like frosting, and is made with ethically sourced palm oil.

Surf Sweets Jelly Beans $1.95/3 oz pouch: No artificial colors or flavors, these and the gummy bears are really good, and have been used in helping get Hayden potty trained. By the way, I’ll write more about potty training for the 3rd time, and we don’t do the usual candy for each potty try, but hand out as a casual, nonchalant way of saying “hey, good job on going potty” occasionally after using the toilet.

Thrive-3 And a special shout-out to the best bag of seeds I’ve ever had. These Go Raw sprouted pumpkin seeds are slightly salted and truly taste amazing. At $10.95/16 oz bag, they may feel like a major splurge, but the bag is huge and will last you several weeks if not months. They are tasty on their own, mixed with a trail mix, or topped on salads. Truly delicious and Thrive has them for a great price!

So is Thrive really that much cheaper than stores like Whole Foods and Sprouts? Well, it depends. I’d say all things considered, and when not comparing to grocery store sale items, they absolutely are, but when on sale, I’ve noticed that on many things, the prices are comparable. Considering this, Thrive is great for really busy people, or those who don’t have the interest or experience with seeking out sale items, reading grocery store circulars and maybe even clipping store coupons. They also carry many items that are really, really hard to find at most stores. The jerky, pork sticks, gum, pumpkin seeds and even the Inka brand of plantain chips aren’t even carried at my local Sprouts. I’d have to go to Whole Foods on the other side of town, and even then they may not carry everything.

Bottom line, I don’t use Thrive to do all my grocery shopping, but I do use it to stock up on hard-to-find items, buy items in bulk, or buy items I know for a fact are cheaper than what my store carries them for (the rice cakes for instance). You have to do what works for you and based off of prices in your area, but for Southern California, I’m finding that the membership is definitely worth it.

Let me know if you have any questions at all! I hope this post helps though. You can get 15% off your first order and a free 30 day trial membership by visiting this link here.


Thriving With Hashimoto’s – Self-Care & Supplements

SHARE THIS +

IMG_4164 It’s been almost 6 months since I last wrote about the treatment of my Hashimoto’s, and almost a year since my initial diagnosis. Because I’ve been asked lots of questions, and because I’m just pretty darn excited, I wanted to give you all an update on my health and what I’m currently doing to manage my thyroid condition. Note, that I’m managing my Hashi’s symptoms, I’m not curing myself. The good news is, I feel great, and I hope the next couple of posts will help answer questions and maybe even give some of you suffering through this, hope that it can get better. I’m splitting this into 2 posts just to keep them brief, and because there’s been two important components to managing my Hashis, which each deserve their own space; self care & supplements, and diet. Let’s start with the supplements and self-care portion.

So far, I’ve been very fortunate to not have to be treated with any medication, and I hope to preserve my thyroid for as long as possible, and delay the eventual thyroid burnout. You can read a refresher on my original diagnosis in this post, and my initial treatment protocol from my Integrative Doc, in this post. Quick recap though, my Anti-TPO levels, which is what they test to detect for the autoimmune disease Hashimoto’s, was at 136. These levels were still pretty low so that my endocrinologist didn’t feel the need to treat me with any thyroid meds. Her approach was to just sort of wait it out, until the autoimmune response eventually burnt out my thyroid, which we would then treat with a synthetic at that time. This approach didn’t seem to make sense, so I went to an Integrative Doc who put me on a treatment protocol. So far it’s working out great for me.

Daily Supplements I’m Currently Taking
Selenium – 1 capsule daily to support thyroid function.
A-Drenal – 2 capsules before breakfast to help build up the adrenal glands and support adrenal hormones.
Vitamin D – 1 capsule daily
Focus DL – 1-2 capsules before breakfast to help with brain fog and mental clarity.
Magnesium and a Simple single-strain Probiotic – 1 capsule each for gut health and to balance out bowel movements.
DoTerra Lifelong Vitality Daily Vitamins

Supplements I Only Take When Necessary
Calm PRT – 2-3 capsules before bedtime to help lower my cortisol levels.
Travacor – 1 capsule 30 minutes before bedtime to help build up the serotonin levels.
I initially took these 2 supplements for about 8 weeks and saw an immediate improvement in sleep. Literally overnight I was sleeping better. I forgot them on a trip, so didn’t take them for a few nights and I was still sleeping well, so I stopped taking them. My guess is they did help my body get into a healthy sleep cycle and I no longer needed them. I take them now on the rare occasion I have a couple of bad nights of sleep, and they help me get back on track.

*A note about supplements: I cannot say this enough, but do your own research when taking supplements! I know there is a lot of skepticism in regards to supplements, as well as quite a few worthless products out there. I detailed all this out just because I wanted to share with you my specific treatment protocol, but I am not endorsing this specific treatment for anyone else. To be honest, I cannot tell you all with 100% conviction that it was supplements, and supplements alone that helped get my health back on track. In all truthfulness, it was most likely the multi-thronged approach of the supplements, along with diet and self-care, that has me feeling better. A friend who was dealing with some health issues of her own, and was also taking supplements, concurred that these supplements may be having no other effect on us than that of a placebo, but having both been in a such a rough place, we agreed that placebo or not, something was working and that was good enough for us! With that being said, I have scaled back on my original doses and eventually will phase out of these all together, hopefully by the end of the year.

Self-Care
The main thing to emphasis here is that I’ve had to learn to  take much better care of myself than before. Sleep is absolutely without a doubt essential. I aim to get 7-8 hours nightly, whereas before I would skate by on 5-6 hours of sleep. And it needs to be quality sleep, so I go to bed between 10-11 pm, when I am naturally drowsy and can fall asleep easily, and stay asleep. I don’t do a sleep song and dance routine, but just the usual necessities, like making sure my face is washed, contacts out and teeth are brushed, so I can comfortably relax in bed either watching TV or reading. I essentially prime myself for sleep. And I really feel that using the 2 supplements above, in conjunction with a healthier approach to sleep, completely solved my insomnia issues. I was able to easily fall asleep, but could not stay asleep, and at least 4-5 days a week I started my day between 3-4 am. That’s enough to tire anyone out, no matter what medical condition they have. Bottom line, I cannot stress the importance of restful sleep enough! This includes the occasional, or even routine daytime nap.

Alcohol intake has been another area where I’ve had to become very calculated and controlled (not that I was out of control before, but you know what I mean), so that at times it’s not even that enjoyable to drink because I’m so concerned about how it will impact my sleep and health. Bottom line, my tolerance has had to become significantly lower than before, and I have to watch that I don’t drink too close to bed time either. When drinking, I must eat and drink plenty of water, and I can’t really go beyond 2 drinks before I start feeling the negative affects of it. Overall, I guess this isn’t a bad thing, and as long as I can still enjoy a glass of wine while I’m prepping dinner at the end of a long day, I’m good.

Dietary Guidelines
Like I said, the diet part will be discussed in the second post, but for the most part I’ve continued to maintain a 80/20 gluten free diet, and I try to eat as clean as possible, most of the time. If I eat well, I feel great, but like most people who eat an overall balanced and healthy diet, if I have a few days off the grid, I definitely notice it. I’ll get into the specifics of the eating plan that helped me feel best in Part 2.

I was talking with some friends a couple of weeks back, and overall, we all have to take much better care of ourselves than we did when we were younger, even in the beginning of our motherhood journey. We all have to get more rest, we all suffer from more sensitive stomachs, and we all wake up with a hangover if we drink one glass too many. Our stories are all so similar that it can be hard to tell when you’re truly sick, or you’re just suffering the effects of getting old.

All I can say is to listen to your gut, and really take the time to monitor your symptoms. For me, I knew something was wrong when I was continually getting sick, and I could never feel like I had recovered from an illness in terms of fatigue and feeling better. I was always exhausted, I was down in the dumps, I had no motivation or drive to do anything other than get the kids to school and survive until bedtime. That’s it; at the risk of sounding overly dramatic, I really felt like I was just working to survive the day. With some patience and attention to self-care though, I’m truly feeling like I’m thriving once again. Now, I’m just like any other busy women and mother in her late 30’s – easily tired and a cheap date. I’ll happily take it. Let me know if you have any questions, and I’ll update this post once I get the 2nd part published.


House Update – Bathroom & Kitchen Design

SHARE THIS +

house-remodel-1 We are slowly but surely making headway on our home renovation, and the completion date is looking to be somewhere around early November. To get a refresher on what we’re doing, you can visit my original home remodel post and you can follow along on Instagram and see my #howereno tag for real-time construction updates.

At this stage in the remodel we needed to have the shower and bath valves ready for the plumbing crew. I’m learning a lot through this process and so when our contractor said he needed our valves, he didn’t even mean he needed the entire tub and faucet handles, but just the back-end of the plumbing fixtures. Because they’re all different though, we still needed to get the overall design of the bathrooms (and subsequently the kitchen too) squared away so we could order the right valves that went with our faucets and shower heads. Make sense? Don’t worry if it doesn’t, minor details anyhow 😉

So when it comes to “designing” a kitchen and a couple of bathrooms from scratch, my fear of screwing it all up is way more prominent of an emotion than actual excitement. I had dreaded the moment that we would have to start getting down to picking finishes just because I didn’t want to choose wrong and I knew I’d get overwhelmed with it all. Sure I have specific tastes and wants/needs, but when I see a room I like on Pinterest, I don’t feel very sure of being able to design and execute the design in a way I’d love enough to live with for the next 20-30 years. I guess you could say I don’t lack confidence in my taste preferences, but I do lack confidence in my ability to execute my taste preferences. That, combined with the idea of running around to different stores to pick out tile and fixtures, just doesn’t sound all that fun to me. Maybe I’m in the minority here.

In the end, I decided to have my friend Shelly of Van Rozeboom Interiors help me out and steer me in a clearer design direction. I sort of have varied tastes, and while I definitely have strong opinions on what I like and don’t like, I knew I could trust her design aesthetic to get us to a place we’d be happy with, otherwise I was afraid I’d end up designing a house that was all over the place. Because she’s recently moved, she’s doing e-design for us, which is an affordable option for those who just need a little hand-holding through the design process. I wasn’t looking for someone to take me around and spend hours shopping with me, or even show up at the house and oversee product installs. I just needed someone to narrow down what seems to be endless options, and so far I’m so happy we made the decision to go this route. With e-design she basically creates a story board for inspiration and then helps us pick out all the fixtures, tile, counter-tops, lighting and other necessary accessories. Because we’re friends she’s a bit more flexible with how she helps us out, but for the most part I believe she provides a client with a story board and then provides a couple of different options in each category to choose from. She typically gathers info from a client questionnaire, and looks at your Pinterest board. Just from our conversations, knowing me personally and looking at my Pinterest boards, she gathered that I was going for a modern day Santa Barbara Spanish style design aesthetic. Sounds great to me! Here’s where we’re at so far.

Master-Bath In the master bath we’re going for a bold statement with the floor in a painted concrete tile, which is a much more affordable option than traditional painted ceramic tile. We’re waiting on samples to make sure they won’t be too slippery in the shower, but if it passes the slip test the tile will run through the shower as well, and that vertical rectangular tile will run along the shower walls. To offset the black and white flooring, we’re going for brushed gold fixtures and a reclaimed wood cabinet. The countertops will be some sort of quartz in a white/light gray color. Key words in here were warmth, cozy, graphic and modern. I’m really, really excited about this room. house-remodel-2 A couple of progress pictures of the master bedroom and bath. This used to be the boys room, so they are being transplanted to the front master bedroom, and we are added a new bathroom back here. You can see the fresh concrete is where we added about 3 ‘ to the existing bedroom, and then the 8’ bathroom addition. It was really important to us not to encroach too much on the backyard that we love so much, so with that in mind we’re going with the basics. No soaking tub, just a shower, and no walk-in closet. The build-out in the photo above, to the left of the window, is where my closet will be, with just a standard sliding door, nothing fancy.

And the photo above is the one design risk we did take with the remodel. Using this bathroom as design inspiration,  we went with a huge picture window that overlooks the backyard. The posts will be wrapped/stained to match the cabinetry, and the mirrors will hang right on the posts. We will install a very sleek linen shade up top that can roll down for privacy, but otherwise we will keep it open to let in light most of the time. I’m excited and nervous to see how it all comes out.
house-remodel-3

Taylor's-Bathroom Taylor’s bath is still a bit of a work in progress. Because this bathroom will primarily be used by a tween girl, but also serves as the guest bathroom, we wanted it to be fun and modern, but also sophisticated. I’m still deciding on the mirrors and for the flooring we are either going with a light blue color as shown, or maybe even an orange sherbet color. We definitely want some pops of color in here to offset the white. The cabinet will have louvered doors but in a more modern, sleek style than the one pictured, and the shower/bath tile is going to be a very basic white subway tile to keep costs in line. Counter top will most likely be the same or similar quartz that we use in our bathroom. I love the lights we chose, but like I said I’m still not sure about the mirror, and this is already the second option she’s thrown out. I may keep looking. Key words in this room were fresh, light, fun, modern and sophisticated.

Kitchen-Design Finally, the kitchen will be the main center-point of the house, since when you walk in the front door it will be staring right at you. The new house design will be a completely open concept, so while the first room of the house is technically the living room, you pretty much see the kitchen when you first walk in. I wanted the kitchen to be bright and warm at the same time, and not super duper white, which is why we’re going to paint the 10′ island deep navy blue, and go with an alternate counter-top for the island as well. For the rest of the counter-tops, we’ll continue with quartz since it is so durable and there are so many beautiful options these days. Those pendant lights are amazing and I want them so bad, they’re just a wee bit out of our budget, so we may hold off on them or keep looking.

The photo below is of my new and improved kitchen window, which measures close to 5 glorious feet and opens up nice and wide to let in lots of fresh air. Our old window was a small garden box which had 2 teeny tiny vented side windows that let in no air. I’m really so excited about this new window above the sink and can see myself happily doing dishes here for years to come.  house-remodel-4

While the design of the kitchen is of course important, the main beef of the room revolves all around the appliances. Shelly answered some general questions for us, but really in the end choosing the right appliances for our needs and budget was really left up to us. We have decided to go with a Thermador 6 burner counter-top range, a Bosch double oven, dishwasher and microwave, and a Samsung fridge. This past weekend I went to 3 different stores and spent lots of time researching online and scouring Consumer Reports. While I initially went in thinking we’d go for a Thermador package (buy a range and oven and get a dishwasher free), when push came to shove it just didn’t make financial sense, and we really wanted to stick with our budget. We’ve quickly found out that going over budget here and there quickly adds up, and with appliances things could easily get out of control. Bosch makes a great product that rates well and is very affordable compared with the other high-end appliances. Plus, Thermador now owns Bosch, and I would have went with Bosch for all the appliances but they don’t make a 6 burner range top, just a countertop stove.

Believe it or not, choosing the fridge took the most time. We originally designed a built-in fridge for the kitchen, but when we learned that built-ins start at $7,000 and don’t really give you all that much extra storage space, we scrapped that idea. Instead, we decided to go with a counter-depth fridge to get the same sort of look as a built-in but at a fraction of the cost. Yes, you sacrifice some storage space (about 5 cubic feet depending on the model), I figure a smaller fridge just helps me keep things more organized in there. I routinely clean out our fridge every week, so a little less storage shouldn’t be that big of an issue. Plus, we do have a back-up fridge in the garage. Bosch makes a nice counter-depth fridge, but in the end we went with Samsung because it had a couple of extra cubic feet as well as some extra features we were looking for, and was very energy efficient, so much so that SCE is giving us a $75 rebate!

Now that we’ve got the design thing figured out and we’ve chosen the appliances, I’m getting really really excited and very anxious for this to be done! I can’t wait to move past this bare-bones look and start seeing some more progress, like insulation and drywall hehe 🙂 Thanks for your patience while we adjust to a new living situation and I find it a bit more challenging to share in this space. I can’t wait to be back and settled in and return to more regular posts here. Talk soon and keep in touch on IG!


What I’d Buy From The Nordstrom Anniversary Sale

SHARE THIS +

The Nordstrom Anniversary Sale started last Friday and because we were on our road trip, I haven’t had a chance to go in and do any damage, which is probably a good thing. I did some browsing last night though and found a few things I plan to order up, and because of the great free returns option, will just send back what doesn’t work. I rounded up a few items I either want for myself this year, or very similar/identical items I bought last year that I absolutely love and continue to wear. Because I know the fit and quality was great, I’m making a few recommendations for you just in case browsing through pages and pages of their website isn’t all that feasible for ya.
anniversary-sale-vest-picks Left – Faux Leather Trip Drapefront Vest $59.90; Right – Shawl Collar Vest $49.90

At $60, I’m definitely ordering the wool boucle vest on the left, and I’ll style it probably just back to a T-shirt as shown here. And the vest on the right reminded me a lot of the vest I wore earlier this year, but about half the price I paid for it. Embrace the vest friends!   anniversary-picks-jackets Left – Angelina Zip Leather Moto Jacket $199.90; Right – Caslon Drape Collar Leather Jacket $218.90

I had a leather moto jacket on my wishlist last year, but opted to buy a more practical jacket instead. Seems only fair then that this fall I invest in something a bit more fun, but still classic. Both of these leather moto jackets look like fun options, with a bit of a more sleek and feminine feel to them, minus the buckles and zippers you usually find in a moto jacket. The one on the left reminds me a lot of my silky moto jacket I bought earlier this year and got a ton of wear out of.  anniversary-sale-denim-picks Left – AG Cigarette Jean $149.90; Middle – Rag & Bone Dre Slimfit Boyfriend Jean $175.90; Right – Paige Denim Skyline Jean $124.90

Last year I bought one blouse and a pair of designer jeans during Anniversary Sale, in addition to a couple of pairs of shoes for the kids. I showed restraint if you ask me 😉 I bought the slim cut boyfriend jean from Rag & Bone, seen center, and I absolutely love them and wear em quite often. The other pair of nice designer jeans I picked up, not on sale, were the Paige Highline, seen right, in dark denim and they are the perfect skinny jean. Higher rise at the waist, and super comfortable, they are offering a slightly lighter wash for Anniversary Sale and I think if you’re going to invest in a great pair of skinny jeans, these should be it. Super stretch too so no harmful accidents should occur! The ankle denim on the left are just too cute so had to add them in. anniversary-sale-picks-tops Left – Split Neck Top $29.90 also available in solid colors ; Right – Plaid Blanket Poncho $38.90

I bought this exact same blouse, just in a different print, last year during the sale and I LOVE it! Lightweight and very flattering on, it looks great back to denim or slacks/pencil skirt for more of a work look. Available in a variety of prints and solid colors, and a fantastic price. The blanket poncho on the right is also a great price and so cute.
anniversary-sale-handbags Left – Vegan Leather Pocket Tote $31.90; Right – Heidi fringe boho bag $305.90

The infamous reversible faux leather copycat Madewell tote bag got a style refresher with added pocket for the Anniversary sale, and the price makes it a no-brainer. Dying over this fringe leather bag by Frye. Probably won’t take the plunge here, but someone definitely should have this bag! anniversary-sale-picks-athletic-gear Left – Nike Cool Breeze Running Tank $22.90; Middle – Nike Free Flyknit $96.90; Right – Zella Live In Capri $33.90

Let’s not forget about sportswear because Anniversary sale is always a great time to stock up. When we were in Portland I mentioned visiting the Nike employee store. While there, I picked up this tank in white, and my first pair of fly knits, and oh my gosh I love them both. The tank is really lightweight but also loose fitting so it’s ridiculously comfortable. Our friend who we stayed with while in Portland is a shoe engineer for Nike, and he told me these shoes are designed to feel like you’re just wearing a sock, and that’s pretty much accurate. Really lightweight and unobtrusive, you hardly feel like you’re wearing much at all. And the Zella leggings will last you year after year of sweaty use, and fit like a glove. I have them in solid black and a couple of prints, but am really digging this one. anniversary-sale-girls-shoe-picks Left – Ruby & Bloom Josie Flat $32.90; Right – DV Savina Bootie $54.90

Lastly, the only one who will get a new pair of shoes (or 2) from the sale will be Taylor. Syd burns through tennies so fast these days, no matter how high quality they are, means that I’m sticking with cheaper pairs. And Hayden is at that fickle toddle shoe stage (most of you can relate, right?), that one day he’ll love a pair of shoes and the next day he finds they’re too tight, too lose, too “hurty.” So that leaves us with Taylor, who is content to wear 2 pairs of quality shoes that are comfortable all school year long, and whose feet grow super slow. Last year I bought her both of these shoes and they lasted most of the school year. She got the ballet flat in gold and the elastic heel made them much more comfortable for kiddos, plus they help to keep the shoes on so you can go up 1/2 size and they won’t slip off the way a regular ballet flat would. This makes them of course last longer. I’m going to get her 2 pairs of these she loved them so much. And she wore the heck out of these same DV booties (although in plain brown leather) and I finally threw them away just a couple of weeks ago. With dresses, jeans, shorts, whatever, she loved them and found them to be made very well and were really comfortable. I don’t love the metallic pair as much, but they’re still cute.

And that’s all she wrote! Do you guys usually shop the sale and stock up for Fall?


Daily Style – 24 Hours in Portland

SHARE THIS +

IMG_5973 Chambray Back Dress – Vince on sale at Shopbop; Sandals – Sam Edelman Garrick; Fringe Crossbody – Nordstrom; Necklace & Earrings – Stella & Dot

If you’ve been following along on Instagram, you may have noticed that we’ve been on a pretty ambitious road trip since last Thursday. We traveled 600 miles our first day on the road, to make it just a couple of hours outside the Oregon border. On our second day, we made it into Oregon, making a quick stop at Crater Lake before arriving in Bend, Oregon late in the afternoon. We stayed in Bend for 3 nights and visited quite a few places in our short time there, and on Monday we left the mountainous high desert to travel 3 hours into Portland.
IMG_5992 When we get home and settled in, I’d like to write up a whole recap of our trip, but for now I just wanted to do a quick check-in from Portland. We’re staying 2 nights here, and at first we figured 2 nights would give us a chance to get a good flavor of the city, but the reality is we’ve barely scratched the surface. We have managed to pack in several highlights while here though. IMG_5987 Last night after a long day on the road, we arrived famished so we just grabbed a quick burger along with truffle fries at Little Big Burger. We are staying with friends here in Portland (and in fact we’re staying with friends throughout our entire trip), and they live in the Alberta area. Alberta is a great little street with one delicious option after another of great food, beer, coffee and ice cream joints, with some retail shops mixed in. After a quick burger and beer, we crossed the street to Salt & Straw for a famous ice cream cone.

They are known for their made fresh to order waffle cones, and unique ice cream flavor combos. I ordered a scoop of marionberry goat cheese habanero, and oh my word was it amazing – sweet and creamy with a little kick at the end.

We were lucky to not have to wait in line too long, but either way it would have been worth the wait. The ice cream was so good in fact that tonight we went back for more, and this time I ordered a split scoop of the strawberry balsamic black pepper and olive oil. IMG_5978 Other highlights of the trip have been a tour of the Nike World Headquarters where our friend works as a shoe engineer, along with a trip to the Nike employee store where everything is 50% off and of course no shipping. We cruised through 2 coffee shops including Stumptown, and also had dinner at Hopworks, a great local brewery that is super kid friendly and has some great food.

We are back on the road early tomorrow morning, but first we’re going to hit up one last coffee shop which came highly recommended by some readers, and a gluten-free bakery. We’ve done nothing but eat and drink the last 24 hours, almost to the point of gluttony, but it’s been fun to make the most of such a short trip.

IMG_5996 By the way, these are the only shoes I’ve worn the entire trip, besides my tennies, and they’ve gone well with everything and have been so comfortable. I wore this dress for the first time today, and it was the perfect thing to get me through a hot and busy day. Ridiculously comfortable, and casual but also put-together. The fabric draped beautifully and the front panel didn’t wrinkle at all, as you can see since these photos were taken at 8 o’clock at night. The back chambray panel wrinkled a bit, but didn’t look sloppy. This was the perfect outfit to take me all day through this casual and fun city, and the dress is on sale right now! IMG_5988

Follow along on Instagram, either at my personal account @andreavhowe, or on my food account @howeweeat, to see highlights from our trip. I’ve lived my whole life in California, and I can’t believe it’s taken me this long to make it up to our bordering state Oregon. It’s been a memorable trip and we’ve had such a great time so far. Here’s to another few great days on the road!


Supporting Mom-to-Be with healthy mama®

SHARE THIS +

“This post is part of a social shopper marketing insight campaign with Pollinate Media Group® and healthy mama® , but all my opinions are my own. #pmedia #gethealthymama disclosure IMG_5933 Two of the most exciting experiences of my life was when we bought our home, and of course, being pregnant and giving birth to my three kiddos. Exciting and wonderful experiences, but also both very stressful and exhausting. I can’t imagine going through both things at the same time, but my sister in law and brother are doing just that. When They recently purchased a home and my sis in law especially, is going through the challenges that come along with packing and unpacking and settling into a new home, while 6 months pregnant.

They are thrilled to be moving to a home with more space to accommodate their growing family of 5, but I know it’s gotta be a lot for them. I visited them at the new pad last weekend and helped unpack several boxes while I was there, and it barely seemed like we made a dent. I felt overwhelmed just looking at all there was to “get done”, so I can only imagine how my sister-in-law felt. Before we left on our week long road trip, I put together a little care package for her to send along with my mom the next time she visited. I assembled a basket of goodies I know she’ll love, featuring a couple of items from the revolutionary new company healthy mama®.
IMG_5923 healthy mama® is a line of products designed specifically for pregnant and nursing women, and is the first brand to offer safe and effective wellness solutions for some of the most common pregnancy and nursing related ailments. From lack of energy to heartburn and constipation, healthy mama® has a full range of products to fit almost every need, and a their products are what I built my care package around.I started with the Boost It Up caffeine-free protein energy drink, because we all know moving is exhausting, but moving while 6 months pregnant is a whole other beast. I should have bought her a case of this stuff, but we’ll start with one bottle of the mango flavor. I also bought her a package of the Calm the Crazy! peppermint tea, to help ease the nausea she continues to experience, and settle her down at night so she can get a restful night of sleep. IMG_5957 I found the line of healthy mama® products under the new maternal health section at Target, which is near the pharmacy, and right down the aisle from the feminine care products. Even though this new section came a little late for myself, I’m happy retailers like Target are working with companies like healthy mama which are working to create shelf space for prenatal care, so that women can more easily find great, safe solutions during while pregnant and nursing.

I also love that healthy mama® is committed to making products that are safe and pregnant women can feel god about using, without worrying if they include potentially harmful ingredients. Their products are all made in the US, are free of artificial dyes, sugar, gluten, parabens, and are non-GMO and when possible, use organic ingredients. The company’s social mission is one in which they are committed to being environmentally responsible and to giving back, partnering with organizations like March of Dimes, which are committed to helping mothers sustain healthy, full-term pregnancies. All these points made including healthy mama® products in my sis in law’s goodie basket a no brainer.

IMG_5959 The remaining items I included were all things I wish I always had a steady supply of when pregnant with each of my kiddos; snacks, water and beauty products that helped me feel a bit pampered.

The house they purchased is charming and has a rather large backyard complete with pool, but the home is pretty much all original, built in the 50’s 0r 60’s, so my sister in law has a lot of plans for the house, some of which she plans to start on straight away. So between unpacking, setting up a nursery, and now adding in DIY home improvement projects, I don’t imagine she’s going to set aside a lot of time to cook and prep meals multiple times a day. So to help keep her energy up she’s going to need lots of quick snacks on hand, so I included several Kind bars, as well as a bag of popcorn to munch on when things get a bit stressful. IMG_5934

A huge insulated water jug in a pretty shade of pink will hopefully remind and motivate her to stay hydrated and drink plenty of water, which is vital during pregnancy. And to pamper herself a little bit, I threw in some of my beauty favorites including rose water spray, body lotion and lip balm because I know my skin and lips were always especially dry while pregnant. Belly balm will help keep her continuously growing belly hydrated and itch-free, and makeup wipes provide the perfect solution when she’s too tired at the end of the day to shuffle over to the sink and wash her face.

A simple “congratulations on moving” card completes the basket, and it was ready to head up to surprise my sister in law, the next time my mom went to visit.

It’s the little things that make a mama feel special when pregnant, so I hope this basket of goodies will help her feel loved and cared for, even though she’s going through such an exciting, but stressful and tiring transition.


Daily Style – Walking Nude

SHARE THIS +

IMG_5893 Caftan Maxi Dress – Lanston; Sandals – Sam Edelman Garrick Gladiator; Reversible Faux Leather Bag – Nordstrom BP; Nile River Necklace – Noonday; Hoops – Stella & Dot

So the MuTu program I follow highly encourages us to wear “barefoot shoes” in order to help with our walking form and alignment. Here’s a little bit of information on why it’s important, but basically, “when you walk properly (read ‘naturally’), the muscles of your backside, core and pelvic floor work properly too. As a result your glutes actually work as you walk and run, your core is effectively supporting your centre of gravity as you move and your pelvic floor muscles are at full length and doing their job of holding everything in.” And in order to walk correctly, you have to be wearing shoes that allow your feet to wiggle freely and which have a heel strap of some sort so your toes aren’t constantly trying to hold the shoe in place, as they do when you wear clogs and flip flops. The sole should also be soft and flexible. Most barefoot shoes are, to put it nicely, interesting looking, so imagine my excitement when I came across these pretty sandals by Sam Edelman, which for the most part fit the profile of a good barefoot shoe; secure ankle straps, open room for toes to wiggle around, and a fairly flat and soft sole.
IMG_5873 I was even more excited about these sandals because they are three shades of brown, making them really versatile. Plus, I’ve always had good luck with Sam Edelman shoes lasting a long time. My last pair of gladiators got multiple years of wear out of them and I was sad to finally toss them when the heels wore through. So in short, even if you weren’t intentionally looking for a good for your feet sandal, know that this one will benefit you, your feet and your pelvic floor. Women of multiple children, this is especially important to you and your life as it relates to sneezing and jumping.

IMG_5890

IMG_5894 Now, let’s talk about this maxi dress, which I’m fairly certain I could live in 24/7. The material is soft and lightweight, but not so lightweight that it’s see-through. In fact the coverage of this dress was something I was a little concerned about because of the light color, but it turned out to be perfect. The lower neckline and side slits are a perfect balance of sexy without being toe revealing either. And the silhouette is loose but not boxy. I am in LOVE with this dress and you’ll be seeing me in it all summer long! It runs true to size, so the medium fit me perfectly, and is a little more blush pink than these photos reveal. The pictures on the website are more true to color.

IMG_5911 Hope you are all having a great week and are keeping cool. Our summer has yet to really start, as June gloom has moved into July. Of course it will get hot right when the kids are ready to go back to school but that’s just the way it goes. Have a good day guys!


Healing My Diastasis Recti

SHARE THIS +

IMG_4849 I first discovered I had diastasis recti earlier in the year, towards the end of January. Diastasis recti is a separation of the abdominal walls and is quite common in postpartum women. In fact 2 out of 3 women with 2+ children have some sort of separation. Mine wasn’t completely severe at a 2.5 finger gap, but I was dealing with many of the issues commonly associated with diastasis just the same, including a weak pelvic floor, lower back pain and a bulging tummy that only seemed to become more pronounced the more fit I got or more weight I lost. In fact, the before photo above was taken the day I began the program to help heal my diastasis, which was also the last day of the 21 day cleanse I did. I had lost about 4-5 lbs, and was weighing in at 138, and the after photo was taking this morning and I currently weight 141. I also just started my period. So while the last cleanse I did certainly helped me feel better and trimmed up the rest of my body, it did nothing but make my tummy seem more pronounced. While I was by no means striving to achieve some level of perfection, it was more than demotivating to continue to work so hard on my fitness and eating right, and not see any improvement in my stomach.

Diastasis101Web image via MuTu System

I don’t even remember exactly how I had even learned about diastasis, but I remember feeling shocked that the condition wasn’t a regular part of standard OBGYN conversation either pre or postpartum, especially with it being so common. Once I found out about the condition and realized I had it, I learned that the ab exercises I had been doing were all in vain, and could actually be making the diastasis worse. Traditional ab exercises like plank, crunches and some yoga and pilates moves could cause more harm than good, and will actually do nothing to really help flatten the tummy out, if you have diastasis. I also quickly learned that you can either have your diastasis surgically fixed, but since mine wasn’t really severe that seemed out of the question. You can also perform certain exercises to help heal and close the gap on your own. This seemed more my speed. There were 2 main methods I discovered; the Tupler technique and the MuTu System. After some research, I went with MuTu because Tupler called for wearing a waist cincher and from reviews I read, the exercise count in the Tupler method got a little intense, upwards of 100’s of reps a day. No thanks.

MuTu is essentially a 12 week core and alignment focused program that includes a 7-8 minute core routine that you are supposed to perform twice daily, and as you progress in the program, you also add in a 20 minute “intensives” workout routine, which is to be performed 3-4 days a week. You are also highly encouraged to go on a 20-30 minute daily brisk walk to help with your alignment. Minimal equipment is needed, and in fact I already had a couple of dumbbells and just needed to get an exercise band which i found at Target. The focus of the program is to correct your alignment and to help strengthen your core, by beginning with the transverse abdominal muscles, which are the little muscles underneath the bigger ab muscles, which help to hold your tummy in nice and taut.

IMG_4850 The results I’m showing here were from following the program loosely 3-4 days a week for the last few months. For a couple of reasons including my ADD brain and the amount of enjoyment I get from actually exercising outside of my house with my group of friends, I did not exclusively stick with the program. But I can easily say that even just by adding in the core work and being very mindful about my alignment and posture, I was able to achieve these results. Had I stuck with the program as directed, by doing it everyday for 12 weeks, I’m sure my results would probably be better, but I’m pretty happy with where I’m at right now. My butt seems to be a bit higher and my obliques are definitely firmer too.

And guys, the core work is so EASY! Like, zero planks or crunches or sit ups. In fact so easy that when I first started I figured there was no way this would actually work, especially since I was already pretty active and fit. But oh my gosh I feel such a difference in the tightness of my core muscles, and the most amazing part?! My pelvic floor is working so much better now! I can jump rope and run without fear of peeing my pants! My back aches haven’t improved much to be perfectly honest, but I’m taking what small victories I can! The intensive routines do provide a challenging workout and plenty of them left me feeling sore, but they’re only 20 minutes long and I believe, totally doable for any fitness level.

Oh, my diastasis recti is also down to a 1 finger gap! That’s pretty amazing if you ask me.

Because the program is meant to be followed pretty concretely, I’ll tell you how I modified it a bit to suit my lifestyle, without compromising what I had learned in the program.

  • I did increase my amount of walking as directed, to almost everyday. And when I walk anywhere now I concentrate on proper alignment and heel to toe form. Walking with proper form, I’ve learned is so important to our overall spinal and core health.
  • I keep proper alignment and posture in mind now when I’m also standing and sitting. The program includes a lot of information and training on proper alignment, how to achieve it and why it’s so important to our core strength, so if this is confusing to you, don’t worry. I don’t always hold proper alignment, but I’m mindful of it a lot more now, and just gaining better posture alone has helped improved the physical appearance of my tummy.
  • I stopped doing all planks, crunches and basically any ab movement that stresses the outer abs and makes your stomach “dome.” I did continue to run, however, even though she advises against it, just because I love it and felt good doing it. I have now achieved enough core strength to go back to planking during my bootcamp workouts, but I still don’t do crunches or sit-ups, mainly because I just hate them haha!
  • I perform the MuTu core work about 4 days a week, twice a day. I did the 20 minute intensive workout routine for a few weeks, either at home or at the gym, but because it was similar to exercises I was already doing with my bootcamp, I’ve pretty much dropped doing those.
  • When exercising with my bootcamp though, I keep proper alignment in mind, and do not lift heavy weight that I don’t feel I can support.
  • I’ve continued to eat great, but have changed up a few things which I’ll share in another post because it deserves a post of its own!

The thing I loved most about this program is that it gave me a starting point and provided plenty of direction and helpful information. I felt comfortable modifying it because I was already in pretty good shape, but if I wasn’t and was just starting out on my fitness journey, I would have just stuck with the program 100%. For me, the MuTu core work was just another wonderful addition to an existing routine I already really enjoyed. Does that make sense?

Another wonderful aspect of the program is that you gain lifetime access to a very active Facebook group exclusive to members only, where you can go on and ask questions, read past threads on common issues, and also see inspiring before and after photos. These success stories are always really motivating.

Bottom line, MuTu, along with eating right and doing other exercises helped me achieve these results, but I think whether you follow the program to a T or modify it a bit like I did, good results are achievable.

You can purchase 2 different programs; either the 12 week program, which includes the intensives, or a scaled down version called Focus, which is just the core and alignment portion. Looking back, I probably could have just purchased the Focus program since I didn’t take advantage of all the intensive routines, but it was enlightening to see what Wendy developed as a safe postpartum exercise routine, and get confirmation that I was pretty much on the right track with my exercises. It was jut the core work I was doing wrong.

And sale alert! I just found out today that both programs are 44% off, which is why I kinda wanted to finally get this post published today! The sale expires at midnight though, so jump on it if you’re thinking of giving it a try.

By the way, you don’t have to have just had a baby to get benefit from the program. Some women in the program have babies who are 20 years old (even mine was over 2 when I began).

I think I’ve covered everything, but please let me know if you have any questions!