Spring Break Escape – Packing With 7 Easy Pieces & A Tea Collection Giveaway

SHARE THIS +

Ever since Taylor was born I have been a fan of Tea Collection clothing for little ones. I remember shopping for her as a new mom almost 8 years ago at the only store that carries Tea Collection locally. I would stop in once a month and pick up an item here and there and even though the prices were a bit higher than your average baby clothes, the quality warranted the cost and her clothes would last longer than she would fit into them. I continued the tradition when Syd was born, and loved their take on traditional baby boy clothes, with interesting kimono wrap styles, lots of bold yet age appropriate prints and patterns, and oh the softness.

Tea Collection asked me to pack a (virtual) suitcase filled some of my favorite items for Spring Break. I figured it would be good practice for outfit styling being that we will in fact soon be going away to Los Olivos for a few days. I chose 7 items for each child based off my strategy to always try and stick with 7 clothing items (excluding pj’s) per child when packing for a trip. We never seem to go on vacation for longer than 3-4 days so 7 clothing items seems to be the magic number that gets us through the trip and keeps us packing light. Any more than that and it just ends up being extra baggage we have to carry, pack and unpack. Here’s what we would be packing for each of our kiddos on our trip to the Central Coast of California. Baby Boy Tea 7 Easy Pieces 
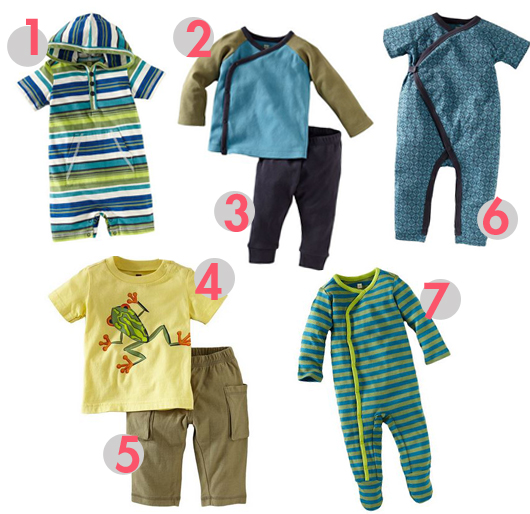
Beginnng with Hayden I focused on simple one piece rompers for easy quick changes, and a couple of pant and top sets.  We have a few Tea layette items that we received as gifts when Hayden was born and I love how generous the fit is so they last him a long time.  He’s still very easily fitting into his 3-6 month clothes.  Shown: 1. Ubuntu Striped Romper 2-3. Kimono Baby Outfit 4-5. Reed Frog Baby Outfit 6. Soweto Kimono Romper 7. Vilakazi Stipe Footie Boy's Tea 7 Easy Pieces 
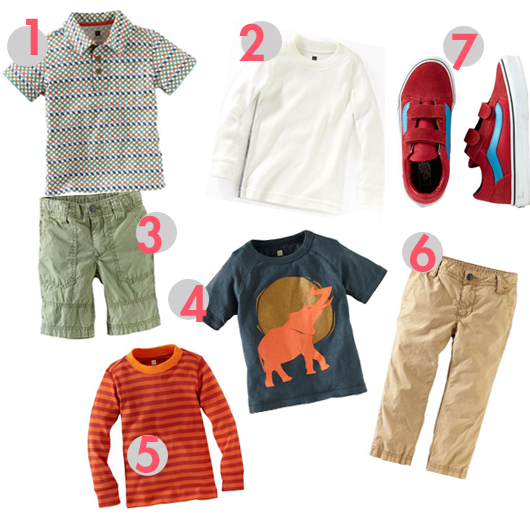
Syd is a tough customer to shop for. He is very particular in what he’ll wear so I have to always give a lot more thought to his packing and outfit planning. He will only wear soft collared shirts so polos, not dress shirts, and he really prefers colarless, and no hoods.  He likes his printed tees to have animals that are “nice” looking, and nothing too graphic or “scary” looking like skulls and crossbones.  Actually now that I type that out loud, it sounds like his tastes are very much in line for what a 5 year old boy should have 😉  Shown: 1. Tutu Print Polo 2. Purity Tee for layering when it gets cold because he hates wearing jackets 3. Sharp Sharp Beach Shorts 4. Elephant Sunrise Tee 5. Vilakazi Stripe Purity Tee 6. Sharp Sharp Chinos 7. Vans Old School velcro shoe because he refuses to learn to tie his own shoes just yet 😉 Girl's Tea 7 Easy Pieces 
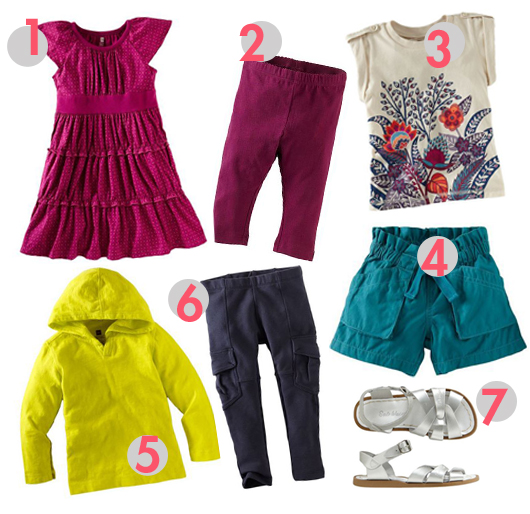
Taylor is fun and easy to pack for because she’s pretty easy going and she’s out of the “only wears pink” phase.  She loves trying different colors and styles and will wear just about anything.  It was really fun packing this virtual suitcase for her, and my favorite piece is the pop of neon of course! Shown: 1. Lychee Twirl Dress 2. Leggings (I have to say that I love that Tea coordinates all their dresses with leggings.  I think it is such a sweet, age appropriate look for girls.  It keeps my 7 year old looking like a 7 year old:) 3. Brush Flower Tab Shoulder Tee 4. Paperbag Shorts 5. Happy Hoodie 6. Skinny French Terry Cargo 7. Saltwater Sandals (we acutally own these in Silver and they’re the only sandal I’ll buy for her each summer now.  They last so long and go with everything, and she is comfortable in them, which is so important when they’re running non stop!)

So there you have it!  That was fun.  What are some essentials you pack for trips with the kids, and how much do you usually let them bring along?  We allow them their small suitcase with clothes, pj’s and shoes, and then there backpack is fair game.  Whatever amount of toys they can fit in it and still carry and close, they’re allowed to bring is our rule.

Would you like to pack yourself up a real suitcase of Tea Collection items for your little one?  Enter below for a chance to win a $75 shop credit to Tea Collection! And there’s a second opportunity to win another $75 shop credit on Instagram! Follow me over there @fourflights to enter!
a Rafflecopter giveaway


Making Clothes Work For You – Swimsuit Reviews

SHARE THIS +

I don’t want to be dramatic, which automatically implies that I am going to be dramatic I realize, but I can say with all honesty that this post brought up a lot of anxiety for me. Many people told me how brave I was when I told them I was trying on suits to show what a suit looks like on an “average” body type, that is, not on a swimsuit model. I honestly didn’t think it was a big deal. Looking in the mirror everyday, at 6 months postpartum, I felt (feel) good overall with my body. I think I’m exactly where I should be for this stage in my postpartum journey. But then I took the initial set of photos, indoors against a flat wall, with a tripod all on my own. And oh boy did I have a freak out session for about an hour. After my husband talked me down, he explained that I had set myself up in the worst possible situation so of course the photos looked bad. On top of that, cameras do not capture an accurate picture of what your eyes see since it shoots in 2D. While I still have a ways to go to get to my prepregnancy figure, the body I saw in those photos was not really an accurate portrayal of what my body looks like in full 4D.

So we reshot them last weekend, outdoors and in better lighting. I will admit though that I’m only going to show you the suits that I loved the most on, and I feel flattered me the most. I really saw no point in posting photos of myself that I didn’t feel good about just for a blog post. So while this post is not entirely inclusive of the good, the bad and the ugly, I hope you understand why I’m purposely including some photos. Shall we begin? Oh and a couple of things before we get started. I primarily chose one pieces because I’m not quite ready to get back in a bikini this season. I did try on some bikinis and a couple I liked that I’ll share, below, but I will not be showing any photos because I just don’t feel comfortable baring that much skin on here. Second, because my main problem area is my pooch, I concentrated on trying on suits that had a ruching detail along the tummy, which helps to hide a bit of the pooch versus a flat suit that usually accentuates the pooch. Oh! And I also stuck with wireless since I’m still nursing! IMG_1669 This first suit is the Ruched Bandeau Tank in Vivid Jade from J.Crew. It comes with a detachable thin strap to convert it into a halter style. I loved this suit overall except the leg opening could have come up a bit higher. I thought the ruching in the mid section was not overly done but just enough to hide the problem area a bit and the top felt supportive and secure enough so I wouldn’t worry about it falling down. I would definitely consider keeping this suit. IMG_1766 This fuschia pink suit is Merona from Target and is actually my husband’s favorite, and it’s in my top 2 as well. The problem I find with many of the more inexpensive suits is that the elastic on the leg openings is always way too tight and pinches in my flesh, creating this really unflattering divot in my skin. I hate that! This didn’t do that though, and the ruching was very slimming. The top could have been more supportive but I imagine with the halter strap attached it wouldn’t be a problem. I love the twisted knot detail on the bust too, very flattering.I would definitely keep this suit and think I will in fact! IMG_1627 I still want to really love this swimsuit and in all theory it is my favorite. The color, the sheen, they silhouette is perfection. It’s the Jersey Lomellina Bandeau Tank in Dark Slate from J. Crew and it is beyond chic. It comes with a removable strap to convert it from a strapless into a halter suit and is just so dang pretty! But looking at these photos and I’m not sure it is the most flattering of suits, especially considering it is the most expensive. The tummy area bothers me and it seems like out of all the suits, it accentuates the pooch the most. Perhaps the sheen of the fabric? At any rate I love it and is superb comfort and quality so if you don’t have a 6 month baby belly you may consider it for yourself! IMG_1724 The Midnight Paisley Ruched Femme Tank from J. Crew was lovely on and was quite flattering, but my main problem with it was the bust line was very small and kept riding up, so that the bottom of the cup seam kept landing on me mid-breast. The straps were a bit too thick for my liking, but if you’re more busty this may be advantageous. The print was served as a good “distracting” technique to the major midsection problem areas though. IMG_1750 For the record I am now more than ever convinced that tankinis are terribly unflattering and an awful option for us women. The tank rides up constantly, to show just a bit of flesh, usually a bit of loose flesh, leaving the wearer doing a constant hike down dance. I tried on at least 8 tankinis and this is the only one I thought was okay. Art loved it on me but I thought it was a bit much, with the thick halter strap and all, but overall not a bad look. It’s by Merona and is worn back to a simple side tie string bikini bottom from Exhilaration. IMG_1694 This last suit was probably my least favorite but just because I didn’t love the padded top, but overall I thought it was still a flattering suit. It’s by Merona for Target and would probably do even better with the detachable halter strap attached to pull the top up a bit. In the photo it is hanging a bit low but the strap would fix that. I tried on a few of these suits with the vintage-esque bottom that covers more of the hip area and I found this one to be the most flattering. It covered just enough but not too much if that makes sense.

So which one is your favorite? And are you still wearing a bikini or do you stick to one pieces now? This summer will be my first year wearing a one piece but I’m ready for it.

A couple of notes on what to watch out for and look for when shopping for a suit.

– Make sure the leg elastic is not too tight or else it will do that pinching thing I mentioned where it squeezes off part of your hip/thigh and makes your thigh look like a sausage. Or at least mine anyhow 😉
– Bigger bottoms is not always better. I have found that the more I try to cover up my bottom half, the bigger it ends up looking. If I stick to higher cuts for one pieces and lower rises on bikinis, my hips and butt look smaller overall.
– If you’re buying a cup size bra or one with some sort of bust definition, make sure it is large enough to cover the whole breast and doesn’t ride up to split it in half, which was a common problem I had with a lot of the suits I’m not showing on.
– Patterns do indeed seem to slim a bit, but go for more large scale prints like the midnight paisley one above, and avoid graphic prints like strips and polka dots. I tried on both and they didn’t do anything for my figure except me feel too old for them.
– Don’t be afraid to go with a different neutral color other than black. I know black is supposed to be the most slimming, but jewel tones in greens, blues and deep pinks have the same effect.

Important Stuff! When Posing For Pictures:
Learn from me and follow these tips. I’m no expert at all(!), but these tricks below took my photos from horrific to not terrible..
– Try not to shoot your entire body. If you look at every single one of the pictures in my Swimsuit Pinterest board, the models are all shot from mid thigh up. I figured this out after I looked horrible the first time when I shot full body!
– Do not stand to the side with one leg in front of the other or bent in front of the other. Stand forward with legs slightly apart, and twisted slightly at the waist.
– Hands should drape over the side of your thigh and/or lightly touch your waist.

Tomorrow I’ll share the suits I HATED (or at least strongly disliked)! Make sure to come back so you know what to avoid 🙂

I’d be thrilled if you’d consider liking my Facebook page or subscribing to this blog via Bloglovin!


The Craft Cabinet – Tickets On Sale!

SHARE THIS +

April-12-invite We’re so excited to announce that tickets for the April 12th Craft Cabinet event are now on sale and selling quickly (honest they are, I’m not just saying that!). The event will be held at Oh Hello Friend in Fullerton (you can see photos of the shop here), and Brenda Ponnay will be instructing attendees on the art of watercolor! You can read more about Brenda here.

Cost is $40 and includes food, drink and materials, and a good time with awesome ladies too! This is not a blogger only event, and is open to anyone with a creative spirit that wants to connect with other local woman in a fun and relaxing environment. Please visit the Craft Cabinet website for more details of what we’re about and why we started this venture, and to buy tickets!


DIY Watercolor Sprayed Easter Eggs

SHARE THIS +

watercolor-sprayed-easter-eggs
In an effort to keep the kids happy and busy (read, not bugging me to watch TV), I boiled some eggs for them to dye, while I finished up another craft project I was working on. I ended up spending some time getting them started, and it turned out that I loved these eggs even more than the project I was working on and abandoned it to make these with the kids. When it comes to anything artistic or crafty, my kids feel more is better while I take a more subtle approach. You can tell that the lightly sprayed eggs are mine, while the heavily doused eggs are theirs. Either way, they both came out lovely so I thought I’d share them with you. I quite preferred this process to the usual dye method as well.
watercolor-dyed-easter-eggs
To start you’ll of course need some boiled eggs, and then just some non-toxic concentrated liquid watercolors. There’s so many options available but they’re not always readily available in craft stores, but of course Amazon has several great options to choose from including these fun Fluorescent watercolors from Sargent or this Glitter watercolors set is fab too. Of course a Standard watercolor magic set is available too with primary colors. The bottles I purchased a few years ago are still going strong, so feel free to invest in a set and know that you’ll have them to use for years to come, unless you’re running a preschool of course. I  use the metallic gold and silver, or glitter colors to add beautiful shimmer by placing the metallics/glitter in little bowls to paint on, and the regular colors in spray bottles that I got at the Dollar Store.
IMG_1483
If you want to add a bit of shimmer to your eggs, which the kids did, then brush on some of the metallic on your egg first. It’s hard to pick up in the photos, but they do give the eggs a pretty shimmer look to them.
IMG_1486
As I said, the kids see this as a free for all and that’s fine, so I just let them spray at will. The colors have a nice way of blending together on the eggs so they look like they have a swirly tie-dye effect. IMG_1493 IMG_1509
You would think the colors would all just smudge together but they in fact somehow stay separated and create pretty rainbow effects. IMG_1599
Let the eggs dry for about 30 minutes before handling too much. Lots of dirty hands and messy counters, so lay down lots of paper and wear grubby clothes.
IMG_1507
For the more spotted and sprayed look that I achieved, just stand back a bit and give the eggs a light squirt of color.  Make sure to not stand close or else the color will come out in big sprays and cover the whole egg.
IMG_1502 IMG_1497 sprayed-watercolor-easter-eggs
We now have about 1 1/2 dozen hard boiled Easter eggs 1 week before Easter, so we’ll be making lots of egg salad sandwiches all week.  But the results were so cool and pretty we just kept on going and I boiled 1/2 dozen more after we made the first batch. IMG_1532 watercolor-easter-eggs
Enjoy and let me know if you try these! Happy Easter! watercolor-swirled-easter-eggs swirled-watercolor-easter-eggs


Bust A Move

SHARE THIS +

C_4LRU0004_718_1_S At 3 o’clock on Wednesday morning, I received an email telling me that the official launch of Kate Spade Saturday was happening. Lucky for me I have a baby who still insists on latching onto the boob promptly at 3:15 am everyday, so I was awake to see the announcement. Thank goodness for that! I jumped on my phone to order the one thing I have been daydreaming about since the brand did a sneak peek launch on Fab earlier in the month, and promptly sold out of; this iPhone case. When I went to buy the case however, I noticed that it was in fact for an iPhone 5 and I woke my husband with my loud wail of “NO!!!!” Since I’m not due for a new phone upgrade for well over a year, I feel it’s somewhat pointless to buy a $25 phone case to hold onto, knowing that by then Apple would have already launched the next phone. So I continue to daydream about Young MC and my favorite song from high school, bumping along in my Isuzu iMark.

The brand is a spinoff (duh, goes without saying Andrea), and the prices seem to be much more budget friendly than their normal $500 dresses. There’s plenty I love but I’ll hold off on making any commitments until I can hopefully see some of the items in person and try them on. Those cotton type fabrics in bold graphics can sometimes be tough to pull off if you’re not rail thin.

In other news, I’ve decided to get a jump on one of my Life List items, to read the Bible, and have started to watch the History Channel’s documentary. I’m kidding! About counting watching the Bible as reading it, not kidding about actually watching it. So far it is amazing and we’re hooked. I am in fact starting a Beth Moore series though, to help with the Bible reading thing. I know people have very polarizing opinions of her, but I figure I’ll try it out, since I really need to start somewhere. I’m really feeling that in order to grow into the next step in my faith, I have to read and understand His word, and what better way to do that but to study it? Bible studies at this point in my life scare me so for now I’m staying away. I’m excited to get started on it though. It’s the Living Beyond Yourself:Exploring The Fruit Of The Spirit series. Anyone completed it?

I wrote lots of emails asking for stuff for Craft Cabinet this week. I feel like a salesperson again. Thank you for those that have already pitched in. We have lots more work to do still and Jules and I will continue to hustle through the weekend before we put tickets on sale next week (squeeeeallll!) Sorry I actually hate that squealing thing that some people do, just felt it was somewhat necessary here. The Craft Cabinet is very squeal worthy in my book.

Lastly, before I bore you all to death with this very random post, I did some writing for some other places, and here are my favorite pieces, because they involve Hayden, and motherhood, and losing valuable makeup products underneath my car at a stoplight. Go read them if you have a chance, if anything you’ll laugh at how much of a mess I am and feel better about yourself!
6 Months Already?!? Slow Down Already Time, You Bastard! (the bastard part was not in the Disney title, they would frown upon that)
Lessons From Motherhood, or Why You Shouldn’t Try To Put Your Makeup On In the Car.

Have a great weekend everyone!! And don’t forget about the Hustling Giveaway!


3rd Trimester Maternity Style Recap

SHARE THIS +

Looking back through all these pictures makes me realize how much I miss being pregnant. I don’t take lightly the gift of being pregnant, and I learned to appreciate and respect it the older I got and the more women, family and friends I came to know who dealt with infertility and loss. This realization definitely made me enjoy my last pregnancy to the fullest, and I look back with great feelings of love and happiness. Having Hayden to hold and take care of every day is unreal and amazing, but looking at these photos, it’s clear to me how much he made me glow, swollen feet and all. AndreasMaternity-1085 The key to the 3rd trimester was creativity, and lots of makeup. Loose fitting tops, elastic and empire waistlines, and a bit of color carried me a long way as well.  I was able to wear quite a few non maternity clothes in the 3rd trimester, mainly in the form of dresses, elastic waist skirts and flowing tops, sometimes bought up a size.  The styles available now were definitely much more accommodating to a pregnant woman than they were years ago when all tops bordered on belly skimming length.  3rd-Trimester-Maternity-Style From the top left going clockwise (please note that unless otherwise stated, items are non-maternity): floral h&m top + gap maternity jeans; james perse dress + jean jacket; asos maternity skirt + flowy top; american apparel blouse + old navy maxi dress; tucker for target dress; target skirt + tank; target maxi dress + jean jacket; asos maxi dress; old navy tank + maxi skirt.

3rd-trimester-maternity-style-part-2 target striped maternity tee + gap maternity jeans; h&m maternity jeans + st. john knits bolero jacket + target maternity tank; isabella oliver maternity dress; forever 21 dress; h&m maternity jean shorts + target sweater; asos maternity dress.

You may have noticed that at least half the looks were not even maternity, and of the other half, only a small portion were maternity only outfits. The point being, with a little bit of creative shopping and styling you can stretch your current wardrobe and your dollar by sticking with as many non-maternity pieces as possible. Because maternity is considered specialty clothing, they tend to jack up the prices making you pay more overall. Look for elastic waists and loose dresses with empire waists. Layer long tanks under existing tops and tanks that may be too short otherwise. Plan out your season of dress accordingly and buy just 1-2 pairs of maternity denim. If you know that when you’re the biggest it will be the hottest, purchase a pair of denim shorts and perhaps a loose pair of denim boyfriend jeans as opposed to skinny jeans, which can feel restrictive when you’re feeling huge and hot. If you’re pregnant for the majority of Fall and Winter, then perhaps 2 pairs of skinny jeans will be all you’ll need so you can tuck into boots and such.

As far as jeans go, I have never found a pair that I absolutely loved.  Although I did find the 2 pairs from H&M to be decent.  I really did not like the Gap jeans and found their solid thick waistband to be uncomfortable and constantly slid down, so I always felt like I was hiking up my pants.  My favorite purchase of the entire pregnancy was the tie dye dress from Forever 21 which was not even maternity.  I’ve continued to wear it postpartum as well and will get a ton of use out of it this Spring and Summer.

Other than creative styling, my main bit of advice is to take a bit of extra time, if you have the energy, and put on makeup and wear color. Nothing will lift your spirits more if you’re feeling tired and down than to look in the mirror and see, along with your beautiful baby, a bright flash of color across your face.

Visit here to see my 2nd Trimester Style Recap.Follow my blog with Bloglovin


Every Day I’m Hustling – A Giveaway

SHARE THIS +

Last week I was searching Etsy for pillow covers and I came across Michelle Dwight Designs‘ shop, where she designs and hand makes a very few choice select pillow covers with fun and unique designs and sayings.  I came across this one and knew it had to be in my home. hustle I instagrammed the image and it seems many friends feel just the same as I do. Everyday we feel like we’re hustling. I’ve partnered with Andrea over at Michelle Dwight Designs to give one of these bad boys away. Actually any item in her shop excluding custom covers. Your choice. Just follow the entry rules below for a chance to win. Andrea’s awesome pillow was recently featured in HGTV Magazine and I’d love to help her spread the word. So please enter and share the love! il_570xN Giveaway starts now and ends Sunday night. I’ll announce a winner on Monday. We’re also giving away a pillow on Instagram, so two chances to win! Just follow me over @fourflights to get the details and double your chances to win.
a Rafflecopter giveaway


52 Weeks To Create Week 11 – The Entryway

SHARE THIS +

I’m on a roll ladies and gents and I can’t be stopped. On a roll for me means that I continue to plan. Some action thrown in, but lots of planning. Having somewhat figured out the gallery wall situation, I spent the week browsing prints and ordering a few that I liked. This week I will focus on getting some new family photos printed up. With the gallery walls on a roll, I have now moved on to getting the entry way project set up and going. With some careful rearranging, I realized that I have most of the pieces for the new entryway already in my possession, and just need a new small chair to sit and put shoes on, and a few large baskets for storage. Here’s the photo I found that finally sparked the set up I’ve been trying to put together. casual entryway Granted my set up won’t look nearly the same, and will really only resemble the long strip of wooden pegs, but inspiration is inspiration, right? I went with wooden pegs as opposed to the metal hooks I see on most entryways, just because I’m accident prone and I can imagine many bodily injuries occurring with metal rods sticking out of my wall.  Wooden dowels though?  I should be safe.  Other inspiring entryways I found.  kendra-smoot-entryway Wooden dowel hooks resembling the ones I will be installing, along with a simple slim line chair. e061387fd9fb315598650c634248a6396397e66a_m Bench for sitting and shoe storage. entryway Beautiful baskets for storage and lots of frames and pretty artwork to greet you when you walk in the door. entry-3 Console table resembling the one I’ll be placing in our entryway, with framed photos and space to place baskets and shoes underneath.  The charming wire basket of vintage balls will be absent though, sadly.

The entryway needs to serve as a place to put on shoes, a place to store mail, keys wallets, sunglasses and purses.  Somewhere to hang backpacks and jackets and shoes, to cut down on the morning rush of running back and forth from room to room.  So while our entryway will be missing some of the decor elements seen in the images above, it will be high on functionality, which at the end of the day, is more important than anything.  With very limited storage in this house, we have to make every inch of it work for us.

I hope to show some reveal photos in the next couple of weeks, and perhaps get an Easter craft thrown in as well.  But for now it feels good to continue to work on our home and help it reach its full potential.  Thanks for following along.

So did you create anything this past weekend?  Please share.

Images 1, 2, 3, 4, 5


So Much Lovely

SHARE THIS +

Heather-Landis-Abyss-of-The-Disheartened-V Lately I’ve received several emails asking how I got started in blogging, how to make it, how to make money at it, etc. You know what I say? I shrug my shoulders and say “shit, I don’t know.” I make hardly anything on this blog here. If I get a sponsored post for the month I do okay. If I sell a few ads I do even better. But sometimes I’m too particular for my own good and I know that. I don’t want to fill my blog with sponsored posts so I don’t apply, or I feel funny hustling for ads so I don’t do anything and just sit there. I’m my own worst enemy sometimes when it comes to blogging. I make the vast majority of my money writing for other sites and for right now that works best for me and it just feels right. Until I get a book deal instructing women how to dress, this site will continue to function as my hobby I guess (and kidding, I don’t really want to write a book).

But I’ll tell you what does get me excited and keep me in the blogging game. Good freaking content; creative projects, beautiful imagery, lovely writing. I lucked out big time when I met Jules’ and we decided to become business partners because the lady has vision and good taste and this week she just completed a series over at The Craft Cabinet blog inspired by the ballet documentary First Position. She’s written a whole week of posts covering The Look, The Taste, The Place and The Find, all inspired by the gorgeous world of dance. Isn’t the image above amazing? And the styled looks she pulled together even impressed me ha! Right now we’re giving all our love and energy to The Craft Cabinet, so forgive the obvious plug for my other project, but it’s just so important and dear to us. I hope you’ll go check it out. Thank you if you do.
IMG_5300
On another note, I posted some photos to Instagram last week of me making baby food for Hayden. I received a lot of questions about it so I wrote a post detailing the process over on Disney Baby. Note that the DB version is really simplified and positive, but I’ll say here that I’m not one of those strictly organic, only home made baby food people. And I don’t do it because I want my baby to only have the very best and only organic home made will do, and store bought is total crap and feeding that to your baby is kin to child abuse. I do it because quite honestly, I find it relaxing. I like to cook, and making it is so darn easy that it requires little brain function on my part, so I can spend a few hours in the kitchen accomplishing stuff without feeling like I zapped my brain power by having to read a French cookbook. Plus, the babes do genuinely seem to enjoy the taste a bit more. So it’s a win win all around. I get to zone out and baby gets to eat yumminess. Anyhow, go check out the post if you’re interested 🙂

In other ways to get you away from my blog because clearly, it appears I have no qualms about diverting traffic to other destinations, check out these other fun links I found this week:
I had the pleasure of brunching with Kelly last week and the girl is sweet and talented. Man if I had the time to craft like she does. Maybe in 10 years when the kids are grown. In the mean time she created a kick-bootie series of St. Patty’s Day crafts if you want to do something fun this weekend for the big green event.

These embroidery thread wrapped hoops remind me a lot of my bangles, but a bit simpler and very cool design. Find them at Creature Comforts.

Melanie is filling up an Easter basket for the first time this year, for her cute little guy Beck. She’s sticking to mainly non-candy items (smart lady) and rounded up a whole slew of fun ideas here.

Have a great weekend everyone! See you back here on Monday.
image source


Transitioning Leather Into Spring

SHARE THIS +

IMG_1202 Leather Jacket – Nordstrom (old); Fuchsia maxi skirt – Gap; Tanks – James Perse; Sandals – Shoemint The Meredith; Sunnies – Warby Parker
Loved mixing the airiness of the maxi skirt with the warmth of the leather jacket. Although it’s getting sunnier by the day here in Southern California, it’s still chilly in the shade and so the leather jacket is a welcome layering piece. The nipped in waist of the skirt works well with the lines of the jacket, and the form fitting tanks keeps the look feeling airy instead of bulky. I think I’ll have to get a few more uses out of this look before I stow the jacket away for the season. IMG_1198 IMG_1209 IMG_1206 Happy Wednesday everyone! IMG_1223 And thanks for the photos Alissa, you done good!