What 80’s Style Means To Me – Anything John Hughes

SHARE THIS +

5ootYPtGJCCDpNfRvcZ8uLMmTcg 
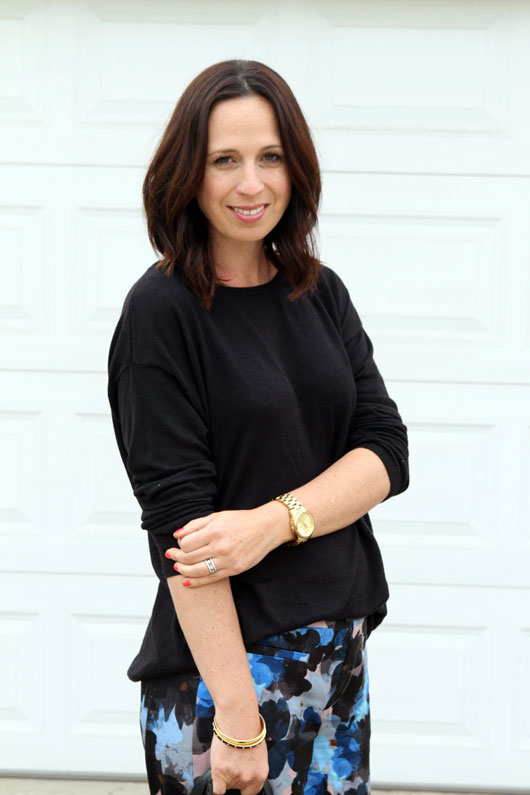
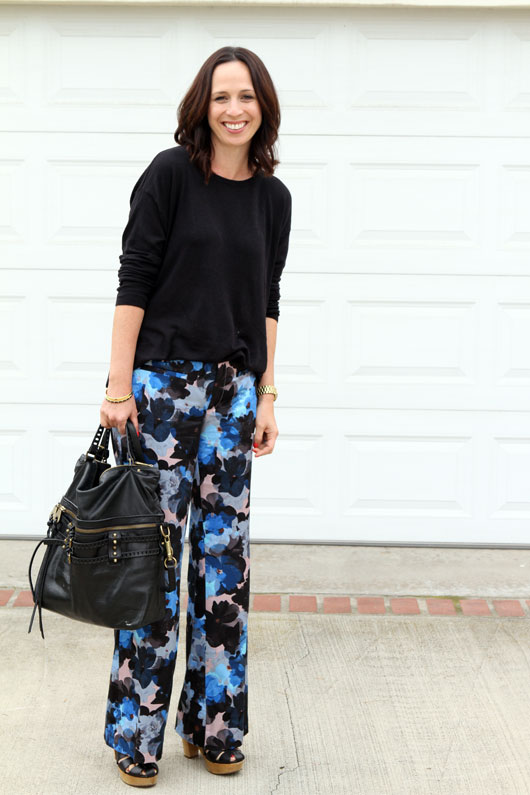
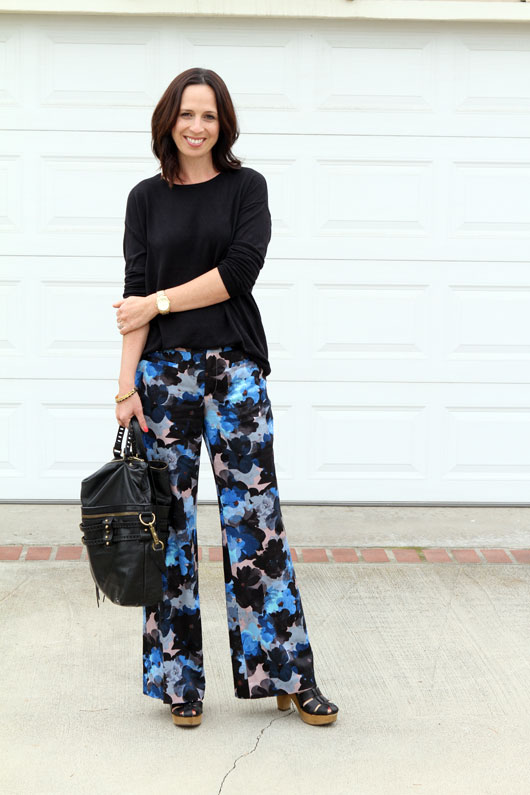
In just 2 short months I turn 38 years old, and have now lived long enough to see a decade I grew up in, chosen as a theme for an upcoming event.  A decade doesn’t get chosen for an event theme unless it’s long gone passed for a while now. I mean, no one’s really holding 90’s themed events yet, are they? At any rate, the 80’s are the decade I remember the most, because during that time is when I started to form my own tastes in music and clothes. Culling my own style happened towards the latter part of the decade, when I entered middle school, and you know that at that age, impressions form fiercely and shape the person you’ll be for the next several years. In my case, there was an intense love for Morrissey, plenty of moody tween angst, and regular scouring of local thrift stores, in search of the perfect vest to wear with my first pair of 8 hole lace-up Doc Martens.  In between boyish cardigans and boots, I mixed in a lot of feminine florals and patent leather.  Actually, my style leanings were very similar, albeit much more refined, to what they are now as a grown woman. A good mix of boyish, loose gender neutral looks, with a lot of soft girlie touches thrown in. pretty_in_pink1 One thing my style was decidedly not though, was what we now come to think of as typical 80’s fashion.  No fish net gloves, or lacy skirts and headbands.  Nothing resembling a deranged jazzercise instructor or Madonna or anything and anyone pop in fact, and surprisingly enough, no neon.  While I recall going through a brief pegged leg jean moment, and even did the layered scrunchy sock thing, it was definitely before middle school, when my mom was still picking out my clothes.  Once I felt like I had more of a say, or at least once I felt like I had more of an opinion about my style, I bucked the traditional 80’s trend items, and leaned towards anything you’d see in a John Hughes film.  Molly Ringwald was my style idol and icon, and all throughout 7th and 8th grade, I had the cut and (attempted) color to prove it. My love and admiration for Molly’s style was only slightly trumped when I saw Uncle Buck for the first time, and drooled over bitchy Tia’s wardrobe.  I can recall with distinct clarity the longing I had to replicate her bundled up looks.   ub7 So while many recall visions of neon and teased bangs and pop-star worthy looks, I just recall anything relating to John Hughes and his films during that decade.  I think because I was so impressionable at the time, and his films had the biggest impact on me emotionally, it was natural that the wardrobe styling would in turn define style for me in the 80’s.  The dress code for the upcoming event isn’t specified, so I’m assuming I could go dressed up or casual.  At this point I can’t decide which way to go, but realistically something dressy would probably best translate as 80’s.  If I showed up wearing something like what Molly Ringwald wore in The Breakfast Club, I may just end up looking like a slightly off version of what we’d wear today.  Like I belong in this decade, but not quite.  And people would probably look at me like all, “I don’t get it.”  It’s a look I got quite familiar with during that time period.  tumblr_msbl8chunG1sx2zfgo1_1280 Let’s have a look at some of the John Hughes’ films that had the greatest style impact on me during the 80’s.  It’s not what we typically think of when we hear 80’s, but no one can deny that these looks are anything but 80’s.  2

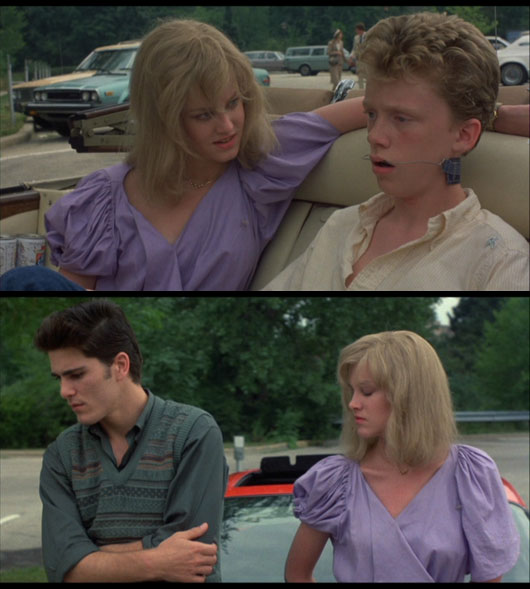
Starting in chronological order, let’s look at Sixteen Candles.  While Sam’s wardrobe wasn’t distinctly memorable for me, I do recall with vivid accuracy her bridesmaid confection of a dress, and pink.  Lots of pink. And of course who could forget Jake Ryan’s sweater vest, and his drunk girlfriend’s poofy sleeved lavender taffeta prom dress. jake-ryan1 Maybe I should go with this look?  Untitled-1 
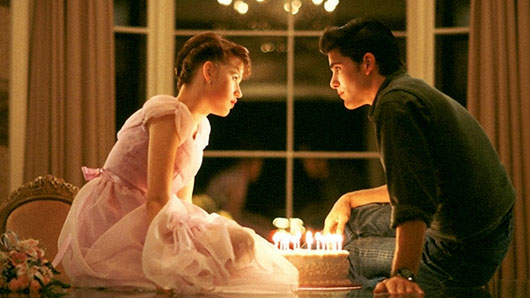
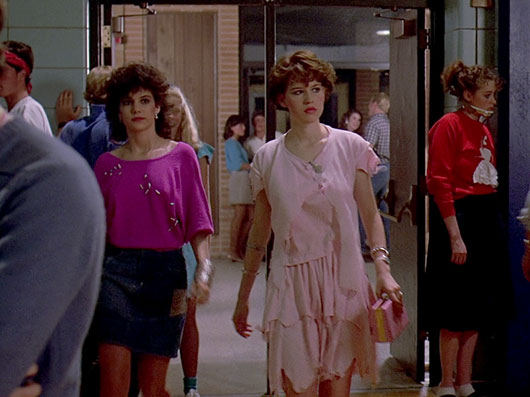
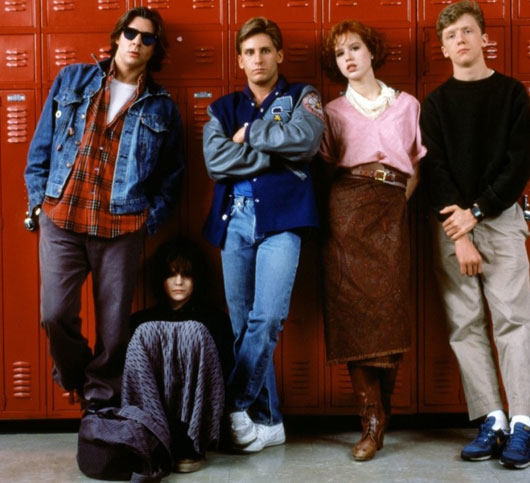
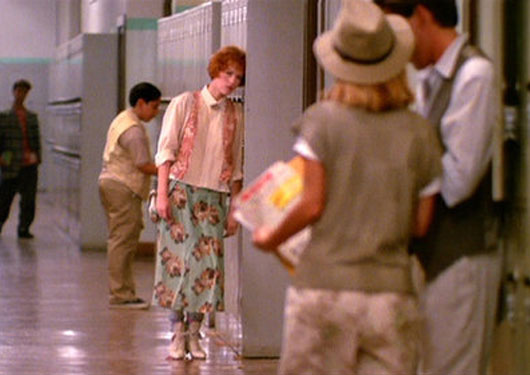
After Sixteen Candles, came The Breakfast Club, and dude, I can’t recall how many times I watched this movie.  Claire, and the entire crew, wore the same outfits throughout the entire movie, which not only helped highlight each character’s decisively different personalities and backgrounds, but also made each outfit stand out that much more.  Claire’s riding boots and too-sophisticated for high-school paisley wrap skirt were style personified for me, and then the dusty rose crossover blouse, gah, it was all too much to handle!  On a side note, I truly can’t express how much of an impact John Hughes’ movies had on me at the time, but perhaps this will help – in high school drama club, my group reenacted the lipstick scene from this movie.  I was Claire, and in front of my whole high school I stuck a tube of lipstick in between my tiny teeny breasts, and applied away.  breakfast-club 
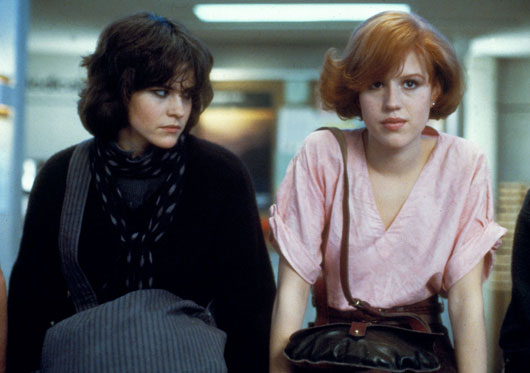
The other pinnacle high-school drama of that decade, was of course Pretty In Pink.  The (literally) poor misfit Andie falls for the rich guy, and her fashion choices make her stick out more than that the fact that she is actually from the wrong side of the tracks.  While her style was a little out there, even for me, there were key looks that I loved, including the huge floral over sized skirt, and the many vests. tumblr_mgboyrIOt21rmq1pto1_500 
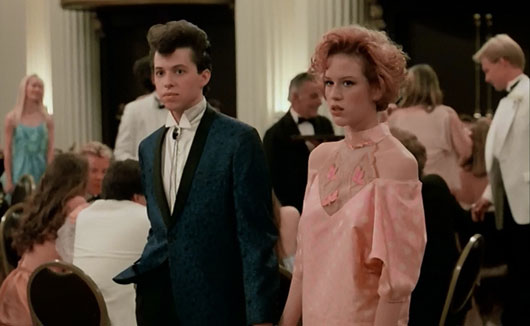
Because Andie was an aspiring designer made her fashion choices all the more relevant to the movie, and the pinnacle point of the movie is when she shows up to prom, with the bolo-tie sporting Duckie on her arm, wearing the “pink” handmade recreation of  her mother’s dress, who had sadly abandoned her years prior.  pretty-in-pink-prom 
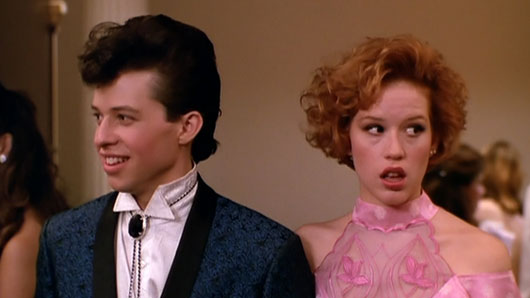
Let’s get a close-up of that neckline, shall we? pretty-in-pink-original 
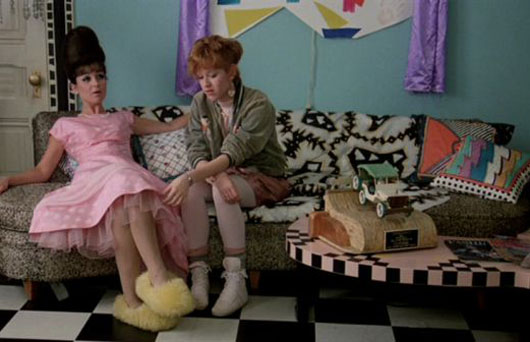
And that hair! Shit that hair is fierce!  And probably my favorite look of the whole movie is this ensemble below.  Take note of the leggings and the wrestling style high-top Adidas.  My big brother, who I looked up to, was a high school wrestler at the time and had these same shoes.  I thought that was totally awesome! protectedimage 
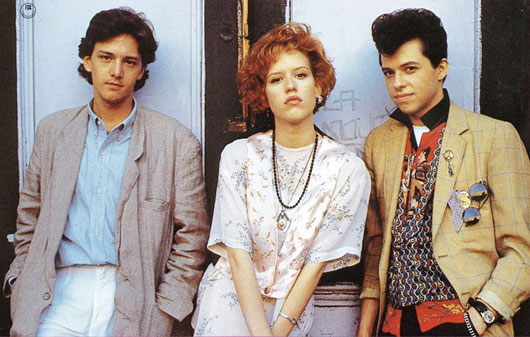
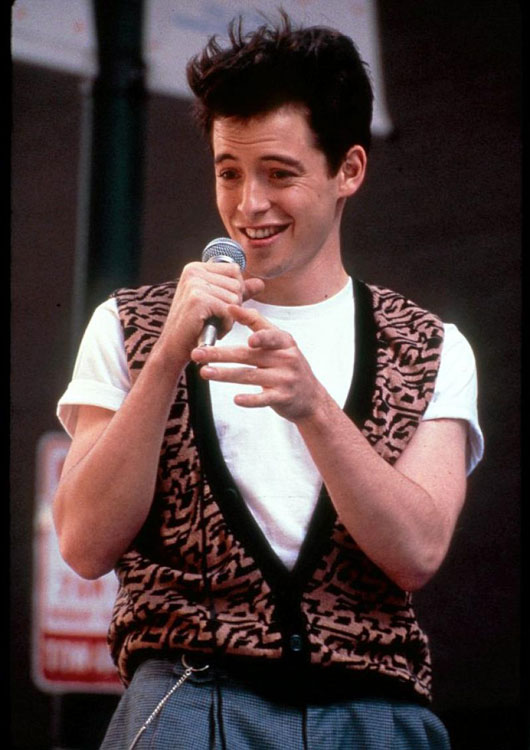
After Pretty In Pink, John Hughes made Matthew Broderick famous in Ferris Bueller’s Day Off, and all the girls I knew added a white fringe leather jacket to their Christmas wish-list. ferris_bueller___art_gallery_by_darianknight-d2xtn5z 
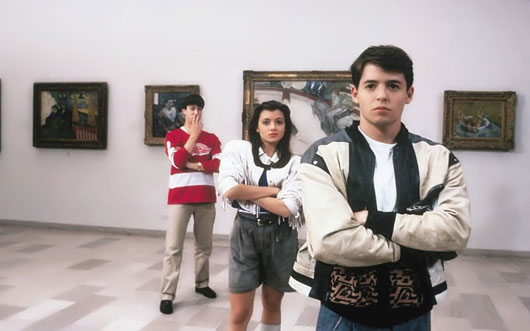
Again with the vests, this time on a boy.  And pleated pants.  Taking notes for Art’s ensemble, because I have to dress the both of us, you know. ferris2 
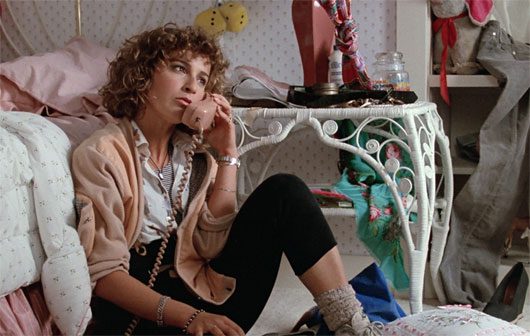
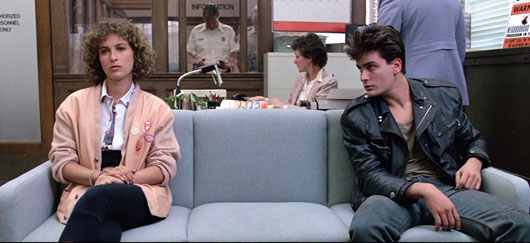
While we both hated and felt sorry for Ferris’ sister, I had nothing but love for the funky and quirky outfit she wore throughout the entire movie.  Over sized cardigan, suspender leggings, and more of the same high-top lace-up wresting shoes, although you can’t see them in this photo.  Shades of rose pink all around! jennifer_grey_jeanie_ferris_buellers_day_off ferris-buellers-day-off-genie-shawna Charlie Sheen is totally winning. UB-T4 
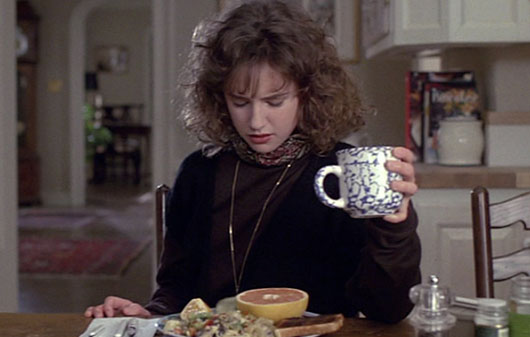
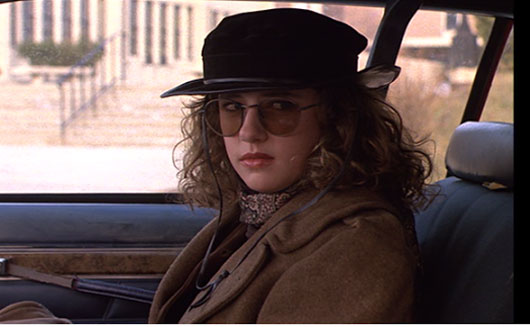
One of the last films John Hughes made in the 80’s was Uncle Buck, a box office hit, but one of the more obscure teenage type movies.  Tia’s wardrobe throughout was as fierce as her glare, and her stockinged legs and short knit skirts made me long to live somewhere cold, in particular Chicago.  Uncle-Buck-john-candy-30055647-1909-1074 
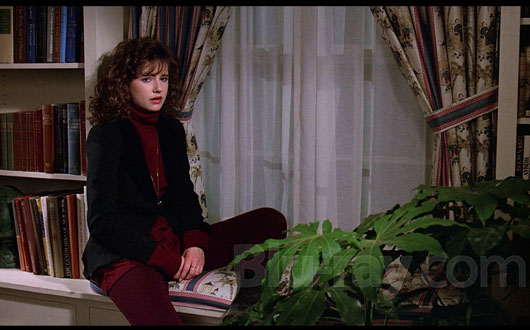
I was 13 when this movie came out, and probably close to 14 when I finally saw it on VHS at home.  I was experiencing all the drama and turmoil that is typical of a high school freshman, and I just remember thinking if I had her wardrobe, life would be better.  Back when you thought the right wardrobe and hair style could solve all your troubles.

The characters in these movies personify 80’s fashion and style for me, and while it’s entertaining to see a younger generation try to pull off the style of the decade, it often winds up being a silly caricature of what it actually was.  Those of us who grew up in it are often guilty of the same.  While it’s fun to exaggerate the trends of the decade, it also misrepresents what the average girl was wearing at the time, because we weren’t all walking around looking like a pop star. enhanced-buzz-13424-1338481269-17

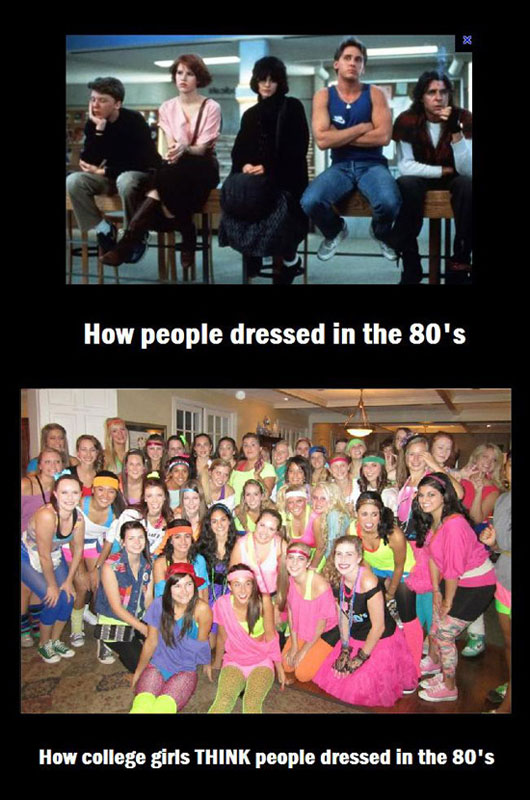
So I’m curious, what does 80’s style mean to you, and how do you interpret it?  Is it loud and boisterous, with layers of lace and an arm full of black rubber bracelets?  Or is it a little more laid back and loose, with some big shoulder pads to top it off?

Whichever way I end up going – dressy or casual – I do know that I can probably find what I need at Forever 21.


Weekend Wrap Up

SHARE THIS +

forever21 It’s been a wonderful week here and at home.  First, big news on the home front – Hayden started walking for real! And over here, I felt extremely encouraged by you all this week, so thank you for that.  I dedicated a good amount of time here and wrote a couple of pieces I’m very happy with, and the time paid off.  Thank you for your feedback and interaction here, on Twitter and on Facebook – 2 spaces that have been quite dusty for a while.  Yesterday on Facebook, I asked for input on laser hair removal: “Laser hair removal. How painful is it? On a scale of 1-10? And how much worse is it than waxing? My good friend just got her PA in dermatological studies and wants practice . Considering the bikini area.”

The responses I received were hilarious, terrifying, and encouraging to give it a go.  Read some below:
“Can I volunteer to have her practice on my chin?? Seriously … the older I get.”

“I did it years ago, so maybe it’s gotten better since then, but it was EXCRUCIATINGLY painful on the downtown.”

“Not bad at all, and took less than 5 minutes. So much better than waxing (doesn’t feel like it took the skin off with the hair!)”

“I’m obsessed with laser hair removal. I’ve had numerous spots done on my body and will continue. It definitely hurts. Numbing cream really does help. But it truly is worth the pain.”

“I’ve had it done and like to believe that I have a high pain tolerance. To me it was excruciating, no way I could return for 2-3 more treatments. They do say that the darker the hair the more it will hurt. Still wincing thinking about it 10 years ago.”

And then I received a couple of cautionary texts from a good friend JJ:
JJ: “When the laser touches your labia, you’ll want to punch the lady in the face. It’s no joke. Also, 10 years later and I’m waxing again. It’s thin and grows slowly, bit it doesn’t go away forever….
Me: “Oh My God do they have to do the labia?!?”
JJ: “If you want the Brazilian. If not, it’s still hot enough to make you curse. Ask them if they use ice cubes. NEVER go when you’re hormonal.”
Me: “You’re killing me!
JJ: “No, your pikachu will kill you if you laser it off!”

So there you have it friends. I think I’ll try one session and see how I do. I have given childbirth drug free, however, I’m well aware that using child birth to compare other pain to is not accurate, since we have a hormonal response to giving child birth that tends to put us in a zone. God did not plan for such hormonal response when getting our pikachu lasered off. Would you try it? Have you tried it? What did you think?

Around the Web:
In response to my question, a friend sent me this article on the downtrend in Brazilian waxes. I personally have been waxing so long, that when I let it grow out, it becomes so uncomfortable to me. Is that weird?

The scary infographic on the result of the anti-vaccine movement. I have a few really, really good friends who are anti-vax and it never bothered me. But hearing others stories makes me wonder if this is something we should all be up in arms about, or are we stepping over the line, demanding parents to do something they’re opposed to in the name of public health?

I’m not a Monkee, but this post from Momastery is incredible. What this teacher is doing won’t fix bullying, but it’s a damn good place to start.

On a lighter note, I had the pleasure of meeting Stacie, the founder and woman behind the handmade shop Gingiber at Alt. Her product is fabulous and I’ll soon be adding this tea towel to my prop drawer.

Mer Mag is coming out with a toy and craft book and it looks FAB!

Super sweet Valentine’s Day printables by Oleander and Palm

And lastly, you may have caught my post this morning on Instagram, but in case you didn’t, the photo above is why grown woman should never shop the front of the store at Forever 21. Rule number 1! Front and center is where they put all the super trendy items, like these horrific pants. Which btw, who thought these were a good idea to bring back, anyhow? My eyeballs are still bleeding. If you need a refresher on how to shop Forever 21 as a grown woman, read my post.

chicken-fingers My Writing Elsewhere:
5 Tips To Eat Clean While Traveling

3 Sustainable Ways To Eat Healthier This Year

How To Not Be An Annoying Character From Portlandia

And finally, the Ups & Downs Of Eating Clean As A Family Of 5 (Syd is still mourning the loss of his chicken fingers)


Food Photography Tips From The Pros

SHARE THIS +

IMG_2684 It’s been really exciting to see what started as a funny little side project, turn into something much bigger than I ever expected it to be.  The Gwyneth Made Me Do It IG feed now has almost 4500 followers, and the community over there has challenged and encouraged me to cook more, research more and change more than I ever imagined.  Many of the things I cook are still from It’s All Good, but many are recipes I find online, or old favorites I tweak to make more healthy.  And the majority of the time I make food on the fly, with no recipe at all.  Friends over on GMMDI are constantly asking for recipes, and the main thing that always holds me back from posting more of them over here, is I am really terrible at food photography.  But not only that, it’s not something I’ve ever really taken very seriously because it just seemed like another thing to learn, and so I instead rushed through shots and posted some pretty terrible photos.  Just look at this photo of the healthy baked chicken nuggets.  One day I’ll go back and re-shoot that, because it’s a gem of a recipe and the photos do it absolutely no justice.

So anyhow, when I saw that Alt was offering a food photography and styling class, I rushed to get in line that morning because attendance was limited.  The class was led by Lindsey Johnson of Cafe Johnsonia (Lindsay also writes for Babble), and Joy Uyeno of Frockfiles.  Not only were these two ladies completely approachable and lacked any bit of pretentiousness when it came to photography, they shared real tips that I could easily take away and replicate at home.  Let me share with you, the tips I found to be the most helpful.

Lighting: Shoot with natural light as much as possible.  Unless we’re lucky enough to live in an amazing loft or house with very large windows, this will most likely mean we need to move our food to where the light is.  If that’s in your bathroom, then set up camp there.  If it’s just next to a nice window in your bedroom, that that’s where you and your food travels.  You can shoot on the floor if need be, to get the most beneficial angle and light, or they used one of those waiter stands used to serve food.  I don’t have one of those at home, but I did remember I had an old outdoor serving tray with an attached stand that I had thrifted years ago, so have now been using that.  It’s the perfect height to let me stand over the food.  Get creative and think outside the box.  Joy also used a flash attachment for when natural light isn’t available, and it utilized her flash by bouncing it off the attachment and towards the ceiling.  I don’t know, it looked complicated so I didn’t’ pay too much attention to that.  I figure I’ll just try and do my shooting during the day. IMG_2679 Props: I’ve always hesitated to buy props because it seemed like a waste of money and figured it would just be more junk to clutter my house, but I realized I only need a few key essentials.  First, I needed some better background surfaces to shoot my food on.  Everything in my house is shiny, which reflects light very strangely.  Look at my shiny black counter tops (they were here when we bought the house), my coffee table is white lacquer, and even our dining room table has a semi-gloss finish.  Joy recommended black foam board to get really dark and moody shots, very similar to Smitten Kitchen or even Kinfolk, and it works like an absolute charm.  Lindsay made a dual sided prop which was a framed piece of black slate on one side (chalkboard material actually, not sure if that’s technically slate), and a piece of lightly white-washed press board on the other.  It wasn’t too large and light enough to transport around, and I figure I can easily store a piece like that in my garage, slid up against our fridge so it wouldn’t take up any extra space.  The salad is shot on the whitewashed side, and the raspberry tart is shot on the black foam board.  Amazing, right?  Gives the photo a warmth and texture I didn’t even realize was missing.

I remember Todd & Diane once shared a photo of their enormous prop room filled to the brim with dishes, linens, etc.  You don’t have to go that crazy to get some pretty items that will elevate your photos.  Lindsay thrifted a set of antique silverware for $10.  Things like wooden pepper grinders and oil & vinegar glass bottles make lovely items to add to photos, and even better, you actually use those things in real life.  We have an ugly plastic black pepper mill from Costco that I never include in shots because it just looks ugly.  So I’ll definitely be picking up a reusable mill that will look good in shots, and is reusable!  Oh!  And dish towels.  I have real world dish towels that I use to sop up messes, but will pick up a few pretty and basic ones I’ll reserve for my food photos that I can toss in shots. IMG_2691 Styling: A few things to share here.  First, start with pretty food.  When using fresh greens and fruits, pick out the ones that look wilted.  Build upon dishes to give them depth and height.  When Lindsay built the salad in the shot above, she carefully placed almost each piece of spinach so it had some life to it.  In fact both ladies kept using the term “signs of life”.  Shots of you pouring dressings and sauces, even taking a single bite out of the food to show the inside, as demonstrated in the tart.  Signs of life allow the viewer to feel like the food is right in front of them.

When working with props, make the shots look natural and real.  It sounds silly, but I always struggle with how to fold the napkin and where to place the utensils so it looks the most natural.  Joy showed us to simply pinch the center of your napkin or dish towel and pull it up, then literally toss it down.  Then take at least 2 forks, spoons or whatever, and lay them on top of each other so it looks welcoming.  It sounds so very basic, but little tips I had never even thought of, which make a big impression.

Joy also talked a lot about creating a “Z” formation when styling your photos so it draws the viewer up and into the photo.  As you can see in the tart photo, the tart is in the center, then the coffee is up in the upper left hand corner, and the towel and utensils are in the lower right corner, creating a very loosey goosey Z.  IMG_2700 Shooting: Lastly, when shooting, make sure to capture your food from a few angles.  A bird’s eye view which can really detail the food, straight on/overhead, a side view and from a seated position.  These different angles will all showcase a different part of the food, creating visual interest and making the viewer want to taste what you’re showing.

As far as equipment goes, Joy shoots with a very basic (and old, yet effective) Canon Rebel, and still gets gorgeous photos.  Lindsay shoots with a Nikon.  They both love shooting with their 50mm lens to get the romantic feeling that only a 50mm seems to be able to capture.  I have a 50mm sitting in my camera bag which I never use.  That’s all changing now though.  IMG_2889 The class was needless to say, very helpful.  Now I just need to practice, a lot, at home.  I rush through things all too often, and I really realized that if I’m going to get good at this, I really need to take my time and focus on my settings and lighting.  I’ve started a little journal to record settings and the kind of light I have when I shoot, so if I come across the sweet spot, I can recreate the magic in the future.

I can’t speak for all you out there, but it seems like us bloggers fall into a few categories.  Those of us who are naturally good at things, or good at them because we have past professional experience in the field.  So great blogs that have amazing graphics, we may come to find out, are written by a graphic designer.  Then there is the category of bloggers who seemingly just luck out with their success.  Their content is great, but it may have been timing or being at the right place at the right time that launched them to success.  Then there’s the blogger who has to really work hard at things to get good at them.  They may be an amazing writer but they struggle with photography.  Or vice versa.  I think all too often we bloggers feel like we are expected to be good at everything, without realizing that to get good at things, we sometimes have to really work at them.  The styling and crafting and cooking and photography doesn’t just come to you because you’re a blogger.  We still really have to study a new skill before we feel completely competent.  That’s exactly how I am when it comes to food photography.  For too long I felt like I was good at DIY photography, so shouldn’t I just naturally be good at all photography?  I’m realizing that that’s definitely not the case, and if I want to get good at it I have to put in the time, the effort and take a million shots.  So that’s what I’m doing!  Wish me luck.

Let me know if you have any specific questions, or email the 2 lovely ladies above for real expert advice.  Thank you Lindsey and Joy for teaching such a great class – I learned so much!


Evaluating the ROI For Blog Conferences Like Alt

SHARE THIS +

Last week I attended Alt Summit for the second year in a row, and while I got home early Saturday afernoon, it took me a few days to process the event and how beneficial I found it to be.  Over the last 2 years, since I attended my first ever “blog conference”, I’ve been asked many times if these conferences are worth it, and more specifically, would I recommend a blogger attending one.  I always hesitate to answer these questions, because answering that question is dependent on a number of factors.  I don’t presume to know an individual’s financial situation, and unless I know a person really well, I can’t really determine via social media, if their personality would be suited to getting the most out of a conference, like Alt.  So after attending a total of 5 large-scale conferences, I thought I’d share some of the factors I have used, and will use more stringently going forward, to determine if a conference is worth the time and expense to attend.

Before we begin though, let’s give a rundown of the costs involved in attending a conference.
Ticket price: average runs from $300-$600 for a 2-3 day conference (Blissdom was the most affordable conference I’ve attended, followed by Camp Mighty, then Mom 2.0, and Alt is by far the most expensive, coming in at $600, a $100 increase from 2013).
Hotel & Air travel: Since the vast majority of conferences will require air travel + hotel accommodations, you’re looking at anywhere from $400-$800, if you get roommates and special conference rates. I was lucky enough to be included in the Cricut conference before Alt this year, and the company generously paid for my airfare, but a ticket to SLC plus hotel accommodations with 1 roommate would have normally been in the $600 range.
Food: Most conference food is included, but late night drinks and appetizers in the bar afterwards should be accounted for, airport food, etc. When all is said and done, you could easily spend $100 over the course of 3 days, and that’s being really stingy.
Childcare: If you have children, you will most likely need to arrange for paid childcare or at the minimum, have your spouse take some time off work. Since I was gone all week, I used a combination of my mom, my mother-in-law, and our normal sitter to help out. We spent about $150 in childcare while I was gone.
Clothes: These conferences love to have some sort of theme night, so even if you are really great about working what you have in your own closet, chances are pretty good that you’ll have to buy a dress to work with the unusual theme. This year, we were asked to wear emerald green to the Thursday night Cricut hosted party. I found a great deal on an Anthropologie dress for $50, but let’s just say the average dress would run about $75.
Grand Total: $1425, using an average ticket prices of $500. That’s a lot of money!

So how can you ensure you’ll get your money’s worth out of these conferences? Let’s look at the categories in which you can expect to increase your knowledge, growth and or expertise. Starting with inspiration, something that is hard to assign an exact dollar amount to, but can be priceless in the end. garance

Inspiration: This is such a nebulous term that means something different to everyone, but blog conferences are meant to be inspiring and motivating. If you’re either in a creative rut, or are just starting out and need help choosing a direction to focus your energy on, you can usually find someone or something to help get you there. Plus, being surrounded by hundreds of other creatives in your field, some inspiration is bound to rub off. But too much inspiration can be detrimental too, and course up feelings of competitiveness, anxiousness, jealousy and even insecurity. I can’t tell you how many people I’ve talked to at these things (including feeling that way myself), who profess to feeling intimidated, nervous and/or negative about their own creative work and what they’re accomplishing. It sounds very woo-woo, but make sure you are in a good place both financially and mentally, to glean what inspiration you can from these conferences, and leave the rest of the nonsense behind. But one cannot spend thousands of dollars alone just to get inspired, so what other more tangible things can we hope to gain? 8dee0f3f32ef1fb8943b9a69b92818da

Keynote Speakers: Keynote speakers are always a part of these things, talking to attendees at the beginning, and usually closing of the conference. Keynote speakers are usually experts in their field, and have some inspiring message to portray. I didn’t get much out of last year’s key speakers at Alt, but that’s not to say hundreds of other attendees didn’t. This year the speakers were completely on point though, for me personally, and I benefited greatly from hearing Garance Dore and Christy Turlington speak. The only problem with attending a conference based on the keynote speakers, is that the speakers are usually announced long after ticket sales have closed, so it’s a gamble.

Classes: Each conference usually offers some sort of classroom instruction taught by an expert in their field. This year, I took a video making class and a food photography class. I can tell you I received a ton of great information from the food photography class, but got almost zero out of the video class, as it would have only been helpful if we had actually got to learn through firsthand experimentation. If I was looking to truly gain video making knowledge, and was looking to the conference to do that for me, I’d be better served taking a 2 day video making class through some place like BlogShop, where classes are about $750 and offer real-world experience and instruction. With that being said, I feel like what I gained from the photography class, plus all the other wonderful things, made the expenses worthwhile. Capture

Panels: I’m going to be quite honest, some panels at conferences are amazing, and some just plain suck, and for each person, the experience is different. This year, I loved the talk by Erica of P.S. I Made This, but a friend did not, and actually walked out. A couple of other panels were so boring and/or offered zero benefit to me, I walked out and spent my time connecting with brands. If you do your research ahead of time and really understand what each panel and round table has to offer, and don’t just go where your friend(s) go, you will likely gain some great information, insight, and how-to knowledge from the panels.

Brand Connections: Another great way to gain some real concrete return on investment, is making connections and building relationships with brands. These alone could in turn help pay for your conference costs. How? Well, you could end up securing some sponsored posts after meeting and connecting with a rep, or they could hire you to write for their site. These things all translate to real dollars, and can equal hundreds if not thousands of dollars, if strategically managed. On average, a sponsored post can pay anywhere from $125-$500, depending on the brand and your reach/influence (some pay thousands if you have a very large readership). Considering this payout, it would take you securing at least 5-8 sponsored posts throughout the year to pay for your conference expenses in full. Is this likely? While I can’t specifically answer this for every individual, I can tell you it’s not completely unreasonable. While brand sponsors are not often announced right away, check out a conference’s past brand sponsors to get a feel for what sort of companies attend that particular conference. But beware, while some brands are more than willing to work with bloggers and provide real monetary compensation, many also just want to offer giveaways or free merchandise, which is great too, but doesn’t necessarily equate to real dollars and cents.

Networking: Meeting other bloggers may not always lead to paid work (or it could if they hire you on as a contributor), but making an impression on other bloggers and content builders will put you on their radar, which could lead to your content being featured or other rewarding collaborations. These again, may not always equal dollars and cents, but it’s a step in building your brand recognition (think of you and your blog as a brand), and growing your readership. This is all important in the grand scheme of things, where numbers do matter to sponsors and brands, but don’t expect these networking opportunities to lead to money in your pocket.

Reconnecting With Friends: This is another category that does not equal payout, but does help you build and maintain your community, which is ridiculously crucial to conserving your sanity in this business. You need a tribe, and some of the best connections and “blog friendships” I’ve made, have been built and fostered around conferences. If you’re really going for longevity in this business, you need blogging friends who get you and understand what you’re talking about when you discuss Google+ and SEO, and I can assure you, you’re non-blogging friends could give a shit. So if you’re going to attend a conference, I cannot stress how important it is to try and be social and make some friends. They don’t have to become your BFF, but at least someone you can commiserate with over Twitter.

Getting The Most Out Of Your Investment: With all these categories considered, i wanted to add a couple of thoughts on actually getting the most out of the conference, because the above is all meaningless unless you can put the knowledge and connections to good use.

First, before you attend a conference, make sure you are in a stage of your life where you can actually foster and grow all the wonderful connections you’re bound to make, after the conference is over. Sending emails, following people on Twitter or IG, liking their Facebook pages, reading and leaving a nice comment on their blog to let them know you stopped by. All those things matter and are important to keeping the conversation going, and key to building that business relationship. Last year, I had a newborn baby, and I didn’t even go through my Alt business cards for weeks, even a couple of months. It was a little awkward to then start emailing people 3 months later,saying “Hey we met at Alt months ago, and sorry, but I’m just now getting around to writing.” It makes you come off as scatter brained to brands, and makes other bloggers feel like you didn’t find them all that important, to write sooner. In the end, last year I really only ended up connecting and fostering a relationship with 1 brand after Alt, so better than nothing, but I could have really done so much better.

Second, I mentioned this in my Alt recap last year, but let me reiterate: Don’t be a wallflower! Introduce yourself, hand out your business cards, don’t glob onto your friend and just talk to 1-3 people. Mingle, network, and come across as friendly, positive and confident. I know this is easier said than done, and for those who tend to be on the shier side (I have a daughter whose extremely shy so I can relate), do what makes you feel comfortable, but in the end, realize you may not get the full potential out of a conference if you stick to yourself. If you’re okay with just soaking up the knowledge and inspiration, fantastic, but if you’re looking for a true ROI, you may have to force yourself out of your comfort zone. bba14b2c9119d208bcbaf5e3c1610ebc

So in the end, does it make financial sense to attend these conferences? It’s a question I’m asking myself and answering much more honestly and stringently, going forward. Leaving my family and investing the money into these things is a hard pill to swallow. In the end, we only have so many hours in the day to foster and grow relationships and connections. I often say I don’t really need anymore friends, just because I don’t have time to meaningfully connect with the ones I do have. I’ve always been a quality over quantity type of person, so for me, I feel like I’m getting maxed out when it comes to filling my Rolodex. But alternatively, things are always changing in this business, and half my blogging tribe could decide tomorrow to quit blogging. Or the brands I had been working with may decide they’re done with that type of marketing. So expanding and growing is always a good thing, it’s just a question of, if doing so at a blog conference is the most ideal way to increase and foster your network base.

Chances are, Alt may end up being the only conference I attend going forward, just because I can count on it always being in the same location, and the content and sponsors are most suited to my niche. I’ve already decided I’m selling my Mom 2.0 ticket this year, because I just can’t leave the kids in the middle of school testing. I can only ask my husband who is a small business owner, to shoulder the responsibility so much. If I was looking to make blogging a full time job, it would be a different story, but in the end my job as a mother comes first, and I have to choose when to best scale back. c722327ee726e5aba7d95fefb0358792

If you’re trying to make the decision whether to attend a conference, especially if it’s your first one, first figure out your expenses, then calculate how much of that you can realistically expect to recoup by meeting brands and learning skills you would other-wise have to pay for. For things like building a network and friendships, you can’t really assign a price tag, but they do indeed have value. It’s just a question of, can you stomach spending money on things with perceived value? For some, the answer will always be yes. But for others, usually the more black and white, practical thinkers, it’s most likely no. It’s up to you to decide which category you fall into.

Let me know if you have any questions, and I’ll do my best to answer them as best I can. Tomorrow I’ll share some of the tips I learned in my food photography class. They’ll blow your mind!

Image source: Alt Summit Flickr stream & via Whoorl and The Well


All You Need Is Love Free Printable

SHARE THIS +

IMG_2906 I have a couple of girlfriends, as well as my mom, who are quite good at sending off nice little handwritten notes and cards to loved ones. Be it a special occasion or just to say hi, receiving one of these cards via snail mail always makes my day and makes me feel quite special. I figure, us crafty ladies spend a great deal of time preparing Valentine’s Day cards for our kids to take to school, only to be ripped open and tossed aside to get the candy prize, without the least bit of decency, why not take some time to make cards to send off to women I know will appreciate them. I asked for a little design help from my friend Heather Myers of River and Bridge Design, after all I’ve never been disappointed with her work (she created the custom invitation for Hayden’s elf themed party), and I just love what she came up with. Together, we created this sweet printable, so you can make some of your own at home and send off to someone special in your address book. IMG_2936
IMG_2707 Begin by printing up the design from the link below on a nice sheet of card stock.  Heather created two different font designs, one a little more modern and one a little more sweet and traditional.  Print up just one or both, and then trim according to the marked lines.

IMG_2710 Grab some paper, either in a solid coordinating color or a patterned one.  Dedicating an entire cabinet to crafts means you wind up hoarding a lot of supplies and sometimes, that hoarding just pays off.  I actually grabbed these circles and twine to make a banner at Alt last year, and held on to them ever since.  I believe they were from the Minted booth.  Anyhow, turns out they were the perfect color scheme to match the printable.   I punched out several hearts from the round pieces of paper, using my large heart punch last used to make the ombre heart tote bags.

IMG_2713 Using a very small hole punch, punch an off-center hole in the top of the heart.

IMG_2715

Thread the heart and wrap with twine around the card at least 2-3 times to give it some depth, and tie or tape down in back.  You can lift up the heart and write a little love note to your friend or sister.  Because all we may need is love, but a good friend who’s got your back certainly never hurt. IMG_2725

IMG_2742 Of course you could just attach your heart with a little tape or dab of glue, but I like being able to lift the heart up to hide a secret message to the recipient.

IMG_2756 To download both printables, simply click on the links below.  In order to print it, you will have to download and save the file as a PDF, for best printing results.  Please let me know if you have any questions!  Happy Valentine’s Day, and enjoy! IMG_2938

Clean & Modern Valentine <—— Click here

Sweet & Classic Valentine <—— Click here


DIY Giant Ombre Hearts

SHARE THIS +

Ombre Paper Hearts Hello and happy Monday friends. I’m back from Alt, and still recovering from late nights, but feel semi-back to normal. I left inspired and determined to change some things, which will inevitably lead to some changes around here, but changes I think we will all be happy with. At least I hope so. At any rate, I’m excited to start the week off on the right foot and get myself more organized. Because besides, sleep, it’s another trait I’ve been sorely lacking this past year. Before I bore you all though, let’s dive into this craft.

Giant ombre paper hearts! I love ombre, and I love hearts, as you can see from my two DIY’s on ombre tote bags, and heart painted jeans. I also love photo booths detailed in pink, if you all remember my ombre pink photo booth back drop. Put pink, ombre, hearts and photo booths all together, and you get these giant hearts, inspired from the Paper Source windows I mentioned last week. Let me preface this project by saying this will take you some time to cut out many round circles, but it’s something you can easily do, and I did, while watching TV or sitting around waiting for the kids to get out of their activities and classes. You can also make much smaller versions for cards and tags. These measure poster board size, at just under 28″x22″. Large enough to make an impact, small enough for kids to hold.  I will tell you though, the new Cricut Explore would have made this project a hell of a lot easier, and I was semi-weeping at the thought when I spent a few days pre-Alt, learning all about the new machine.  Oh well, just means I’ll have to recreate this in the future, after I get my new machine.

Valentines-1016

ValentinesProps-1034

Gather Your Supplies:
A package or two, of shades of pink card stock, available at Michael’s
Poster board
Scissors, glue stick, pencil and scissors
ValentinesProps-1036

Begin by tracing circles on your card stock.  I was able to fit 3 large 3″ circles on my card stock.  Cut many, many circles in various shades, and set aside.  For each large heart, I needed approximately 50 circles.  ValentinesProps-1038

ValentinesProps-1032

Fold your poster board in half lengthwise, and trace a giant heart on one side, making it whichever size you wish.  Then cut out your heart. ValentinesProps-1033 Now it’s time to start gluing.  I made 4 hearts in total, and for 2 of them I went from light to dark, and 2 from dark to light.  It’s your choice how you start, but just make sure to start at the bottom of the heart, and layer on up from there, creating a scallop effect.  Try to be mindful of keeping straight rows, as a couple of my hearts admittedly turned out a little less than straight (shh!).

ValentinesProps-1039

ValentinesProps-1040

ValentinesPropsAnimsm Another thing you’ll want to be mindful of is checking for shading issues in the paper.  Because I did a lot of cutting and gluing at night by the light of the TV, I didn’t realize until it was already too late, that some of the pink paper was off by a shade or two.  Again, not the end of the world, but a little frustrating.  Live and learn in DIY I guess.

ValentinesProps-1047 When you have all your circles glued on, simple trim off the excess and you’re done.  It’s really a very easy project to recreate, just time consuming to cut all those circles.  For those of you who find cutting therapeutic, this is the perfect craft for you.

Valentines-1025

Valentines-1019

Miranda used them as photo booth props last week, and I think I’ll actually hang a couple of them, along with the arrows, in Taylor’s room.  They’re too cute to throw away.  Good luck and have some DIY fun! Valentines-1015

Valentines-1016


DIY Giant Cupid’s Arrows

SHARE THIS +

DIY Giant Cupid's Arrow Last week when Taylor and I were at the mall, I fell in love with the Paper Source windows.  They had multiple gigantic ombre hearts hung all about, and two large arrows intersected the hearts.  They were just about the cutest things I’d seen in a very long time, and I immediately texted Miranda a photo to get her approval.  I had been planning to make large heart garlands as a backdrop for her Valentine’s Day mini shoots, but these seemed to be much more of a time consuming challenge, so of course I was all in.  For the sake of brevity, I’m going to split up the tutorials into 2, and share the DIY for the arrows today, and tomorrow I’ll show you all how to make the hearts.  Both are easy, but fair warning, both take some time.  So don’t plan on making these in the eleventh hour, because cursing will surely ensue.
ValentinesProps-1001
Gather your supplies:
2 large gift wrap rolls per arrow (you want them to be a wider tube, as the narrow skinny tubes will make them look too flimsy)
Duct tape or some other heavy tape
Cardstock in various colors sized 8.5″x11″ (we used shades of pink, red and aqua for a pop)
Glitter wrapping paper or glitter cardstock (we used the wrapping paper roll from Paper Source
Pencil, scissors, scotch tape, glue stick & glue gun
ValentinesProps-1004

Begin by sticking one roll into the other, and then securing with duct tape to make sure they don’t come apart as you’re working.
ValentinesProps-1003

Once secured, begin wrapping your cardstock around your tube, and securing with tape.  I found it looked best when I just slightly overlapped each piece of paper and made sure the taped seams were all in alignment.  There’s no need to cut the paper to fit, just overlap the sheets.  Trim off any excess at the end. ValentinesProps-1005

Once your roll is wrapped, start decorating it with strips of paper.  We put a dark pink contrasting strip right in the center, and then smaller strips towards the outer edges.  We cut strips in two sizes – a wider strip of about 1.5″ and a thinner strip about 1″ wide. ValentinesProps-1014

On either side of the dark pink center, we used dark pink and gold glitter paper, and aqua and gold glitter.  Towards the end of the arrow, where the “feathers” would go, we used a red strip to match the paper “feathers.”

ValentinesProps-1015

ValentinesProps-1016

Once your tube is decorated, begin making your feathers.  Grab 2 sheets of cardstock and fold in half lengthwise, and cut each end at an angle going in the same direction. ValentinesProps-1019

ValentinesProps-1020

Once you’ve cut your angles on both sheet of paper, cut out more strips to decorate your feathers.  We used aqua and gold in 2 sizes again.  Using various sizes and color gives it interest while also making it feel uniform.

ValentinesProps-1017

ValentinesProps-1024

Apply these strips with a glue stick instead of tape to give it a cleaner look.  Now, it’s time to make your gold glitter cone.

ValentinesProps-1008

You need to make a very large circle, at least 18″ in diameter, and the bigger circle you cut, the higher and skinnier your cone tip will be.  The biggest circle I could find in my house was the top of a step stool, so I traced that and then cut.

ValentinesProps-1009

ValentinesProps-1010

Once your circle is cut, you want to cut out a triangle to make a Pac Man face, and then wrap the circle around itself to create a cone.

ValentinesProps-1011

ValentinesProps-1012

Now it’s time to glue on our feathers and cone, using a hot glue gun.

ValentinesProps-1028

Apply glue to the tip and gently push the cone to rest on top nice and secure.  Never mind the grody looking glue gun, by the way.

ValentinesProps-1030

Attach a thin strip of hot glue to the edge of your paper feathers and attach to your tube.

ValentinesProps-1027

ValentinesProps-1025

And now you’re done, and you have a very cute love missile on your hands.  These are great as photo props to hang as a backdrop or for kiddos to hold. diy-cupid's-arrow

Valentines-1025

Miranda hung them in front of a white backdrop and attached with clear monofilament wire.

Valentines-1026

If you’re in the local Long Beach area, Miranda will be holding Valentine’s Day mini shoots with this backdrop plus one more, this Saturday January 25th from 9-2.  You can email her at mirandashanti@gmail.com to book a session!

Valentines-1028

Let me know if anyone tries these!  They would be super cute using paper towel rolls as well, to make mini arrows.


How To Make – The Perfect Kale Salad

SHARE THIS +

how-to-make-the-perfect-kale-salad-at-home I had my first kale salad over a year ago, at the Veggie Grill. The thing that most surprised me about that salad, was that I actually loved it, and went on to crave it. The biggest problem with that salad is that it cost over $10 once you add some protein, and for a “fast food” type of restaurant, you sort of can’t help but feel like you’re being raked over the coals every time you drop that kind of cash on a quick lunch. Perfect-Kale-Salad So I decided to start making my own kale salads at home, so we could afford our mortgage and all, and I was surprised at how much more I loved my own versions, which I could customize to my craving that day, and based on what I had on hand. IMG_2486 “But kale is so bitter, so rough and tough!”, you say.  I know, it is quite an ornery leafy green, not soft and delicate like spinach or even swiss chard.  But the key to getting a great tasting kale salad, is to massage it it with loving care, so you break down that tough texture that kale leaves tend to have.  I never thought I’d end up loving kale so much that we would learn to successfully grow it in our own garden at home, but I do.   I keep at least 2 bunches on hand to juice, make salads with, and saute in olive oil and serve alongside a fried egg.  The best way to start your day, in my humble opinion. IMG_2508 Start your kale making salad process by first chopping off the stems of the kale leaves, and then giving them a rough chop so you get 1-1.5″ square pieces. To cut off the stems, I just fold the leaves in half, exposing the stem, and then slice the stem right off. IMG_2506 Once you’ve got your pieces, place them in a bowl, and cut a lemon, lime or orange in half – anything citrus based works. Squeeze some lemon juice on top, and add in a couple of pinches of salt. IMG_2514 IMG_2525 Then you start massaging away. Take some leaves and press them between your fingers and repeat the process over and over, making sure to massage and squeeze all the pieces for your salad, for at least 3 minutes. You don’t want to beat them into submission, or manhandle them, just knead them if you will. IMG_2532 If you’re not sure if they’re ready, give a piece a try and see if it tastes good to you. Keep in mind that kale has a strong taste and texture to begin with, so it’s not like massaging the kale is going to turn it into butter lettuce, all sweet, light and delicate. But it will make it much easier and softer to chew. Once it’s done, start adding in your toppings. How-to-make-the-perfect-kale-salad I like to keep it simple because it’s just easier and quicker to throw together that way, but some favorite toppings of mine are cold quinoa, beans of some sort, shaved brussel sprouts, carrots, avocados, pomegranate seeds, clementines and persimmons, and bits of cheese and salami. Today I’m just keeping it simple with some red quinoa, garbanzo beans, and shaved brussel sprouts. To shave your brussel sprouts, just peel off the outer leaves so you get more of the tender greens underneath, and thinly slice. You don’t have to cook them at all! You can also buy them prepackaged at Trader Joe’s, but this way is obviously more economical. I truly do find that I get plenty full off of this combination of toppings, as the combination of the quinoa, beans and dark leafy kale packs an outstanding protein punch, giving me long lasting energy while also keeping hunger pains at bay. IMG_2513 IMG_2538 IMG_2549 IMG_2555 Dressing choices are also totally customizable and up to you, but since this particular salad already had a dousing of lemon juice, all it really needs is a few splashes of thyme infused olive oil (just add dried thyme to 1/2 cup of olive oil), and a few more squeezes of lemon juice. Add some cracked pepper, a pinch of salt, and you’re done. Of course if you want a sweeter option, massage your kale with the citrus of an orange, and toss in a raspberry vinaigrette, or whatever else you have on hand. IMG_2563 The recipe below easily makes enough for 2 generous lunch-sized portions, or 4 smaller appetizer portions. Feel free to use any type of kale leaves – there’s often 3-4 varieties available at all times now, but for this recipe I used red kale. I think it looks extra purty with the red quinoa. And speaking of quinoa, make a batch of it over the weekend or whenever you have time, and refrigerate it to use throughout the week. Add to salads, warm it and serve alongside a fried egg in the morning, and of course serve it as a dinner side. This post explains how to make perfect quinoa every time. IMG_2580 Perfect Kale Salad
1 bunch of kale, stems removed and chopped into 1 inch pieces
Juice of 1 lemon
2 tsp of sea salt
1 cup beans, cooked quinoa, brussel sprouts, or whatever your desired toppings are
3-4 tbsp of olive oil

Peel the outer layers of the brussel sprouts and thinly slice and set aside. De-stem the kale, and rough chop into 1 inch pieces. Place in a bowl and squeeze some lemon juice and sprinkle salt on top. Massage the leaves for at least 3 minutes. Keep the leaves in the bowl or transfer to a serving tray, and add in your desired toppings. Drizzle with olive oil and more lemon juice, and sprinkle with salt and fresh cracked pepper. Toss and serve. Will hold in the refrigerator for a day, thanks to its tough texture. This baby won’t wilt at a moment’s notice! Enjoy!
the-perfect-kale-salad All Photos Courtesy Of M. Shanti Photo, in the Long Beach, California area.


Daily Style – Bold Floral & When To Say No To Sale

SHARE THIS +

IMG_2420 Pants – Anthropologie; Sweater – H&M (old), Clogs – Madewell; Purse – Joelle Hawkens via Nordstrom; Bangles – Kate Spade IMG_2423 These pants are a little crazy, even for me. Not that I usually dress all that crazy, but I’m willing to step out of my comfort zone every now and then, especially when they only cost $20. They’re a beautiful fabric and are really well made, so even if I just wear them a few times here and there, I’ll be able to hold onto them for quite some time. Long enough for them to come in and out of season several times, I’m sure. IMG_2429 This time of year, the deep discounts are in full force at almost every single retailer. Between additional discounts off clearance merchandise, and great deals on winter coats, the sales are so tempting they’re likely to lure us out to the mall again to spend our Christmas cash, and then some. But when should you give into the sales frenzy, and when should you say no? Here are a few questions I ask myself now before I head to the sales rack. I find that answering them honestly has actually turned me into more of a full price customer, rather than the die-hard markdown sales shopper I used to be, only ever buying an item if it was on sale. IMG_2435 – First and Foremost, I ask myself if I would buy the item at full price? If I wouldn’t buy the item at full price, why am I wanting to buy it now that it’s on sale? Is it because it’s now affordable, or because it just seems like a good deal. After all, how many times have we all said “But it’s SO CHEAP!! It’s FIFTY PERCENT OFF!!! Look at how much I’m saving! Look at how much it was AT FULL PRICE!!!”

– If the price, and the perceived value on sale, are the main things pulling me in, then I try to stop right there. I said I try, but I do not always succeed. Look at the pants I’m wearing after all. Even at $20, I definitely did not need these. But I think they’re pretty wild and fun, so there.

– But if the item is something I truly love and would buy in a heart beat at full price (if the budget allowed), then I usually go for it, if I’ve also determined that I will get multiple wears out of it, if I can wear it to different events and for different occasions – basically, if it will work for multiple facets of my life.

– I also do a quick mental inventory of my closet, and if it’s too similar to something I already own, I pass. I know some women who are notorious hoarders of striped shirts, or chambray, or jeans. How many of each thing do you reasonably need, even if you love them to the moon and back, and you could wear it everyday of your life?

– When items are on sale, they tend to get low in sizes, and we tend to be a little more liberal with determining how well something fits us. We’re a size 9 shoes, and the store only has a size 8.5, but they really aren’t that tight and they’ll probably stretch, because leather stretches! Right? Or a dress is too big, but it’s such a good deal I could pay to have it altered, and still save money! But that’s just one more thing we’ve got to try and fit into our day. So don’t ever compromise in the fit department, no matter how appealing that price tag may be.

– Basics don’t usually go on sale. That’s been a lesson I’ve finally learned, and something I’ve come to accept. Basic, classic items that will stand the test of time, don’t usually go on sale. Seasonal items, colors and styles will continuously go on sale though because they need to be out in time for the new stuff to come in. A perfect example of this would be a pair of great fitting black basic trousers. I had been searching for a pair of cigarette style pants for ages, since my last pair ripped, only to continually come up short because I was searching for them on the sales rack. But great classic items don’t usually make it to the sale rack, because they sell great at regular price, and they usually sell out before they even have a chance to go on sale. Also, they tend to be season-less, so they can easily merchandise in with new items as they come in. So if there’s a classic item you’ve been trying to add to your wardrobe for quite some time, you may have to just suck it up and buy it at regular price. Chances are, it will probably be worth it.

In all honesty, I probably should have passed on these pants.  They do fit a little big, they are quite limiting, and I would have definitely passed over them at their full asking price.  While my multi-point questionnaire for purchasing sale items may save me from buying some real closet losers, it’s still not 100% full proof.  We all make mistakes from time to time.  My mistake it seems, came in the form of bold floral pants.

What’s something you haven’t regretted purchasing at full price, and something you’ve regretted buying, even on sale?


Of Breasts & Bras

SHARE THIS +

IMG_2466 My first introduction into working retail, was during college at Victoria’s Secret.  During my time there, I perfected the panty table fold, in which I was able to perfectly place hundreds of pairs of panties, into neat and tidy rows, which would be destroyed within minutes of store opening the the following day.  I say with all seriousness, there were many nights that summer I dreamt of panty tables, and the hand motions I would make when tucking in each pair.  But regardless of how much I came to dread the panty table, I enjoyed my time working amongst such beautiful things, even though I never felt truly grown up enough to wear them.  Besides, padded lace push-up bras made for the most impractical of choices when biking to and from class everyday.  Still, I bought a few flirtatious bras and panties, and tucked them in the back of my drawer, only to toss them many years later.

Following graduation, and after a disastrous 3 month “inside-sales” stint at a lease financing company, I decided to return to retail and took a job as an Assistant Manager of the Lingerie Department at Macy’s.  I was in charge of scheduling fittings with Olga and Maidenform brand specialists, and trained employees on bra fittings and finding the right pair of panties that would eliminate panty lines.  Now that I was in charge, my time amidst the lace and silk bras and nighties seemed a lot less fun and held zero ounce of glamour for me.  Have you ever been in charge of the inventory process for thousands of pairs of panties?  The experience made me not the least bit interested in wearing a fancy lace bra ever again.  And that sentiment continued for many years.  Sure, I bought the occasional “nightie” for a special anniversary or what have you, but my bra and panty choices were left to purely practical sentiments, and were selected with as much regard for functionality as one would use to select a vacuum cleaner.  Does it get the job done, and does it last?  With those priorities in mind, I’ve limited my undergarment purchases to Nordstrom for the past several years, always appreciating their expert fitters and wide selection of quality bras and panties.  I didn’t stray too far from a select few Natori styles and the infamous Hanky Panky thongs.

Sometime last year, when Hayden was less than a year old and I was still very much in the throes of nursing, I read Paris In Love, a memoir about a writer who, after fighting breast cancer, decides to move to Paris with her family for a year.  While I loved the book so much, I went on to purchase it after first reading a borrowed library book, it was the chapter on Breasts & Bras (this blog post is borrowed from said titled chapter), that really had me fall in love with the book, and made me declare that once I was done nursing, I would begin wearing pretty undergarments.

 “In the history of my life, this year in Paris might as well be termed the Year of the Brasseiere.  At some point I walked into the lingerie department at Galeries Lafayette and shamelessly eavesdropped on a conversation between a saleswoman and a client, a very elegant, restrained woman d’un certain age, perhaps, sixty-five or seventy.  Madame liked the design of a delightful handful of cream silk embroidered with black roses, but if it were not possible to buy panties that matched, then obviously the bra was not for her.  It occurred to me that it was entirely possible that a lusty, equally elegant Parisian male, also of a certain age, waited for her at home, but more important, his opinion would make no difference to her.  She was dressing for herself.  And her standards were high.”

As I get older, the motto of “look good, feel good” holds less and less relevance, as I can’t help but feel like a similar sentiment, more in the vain of “feeling good starts from within” holds more meaning for me.  Nourishing our bodies and spirit, starting with the thoughts we allow to take precedence, the food we eat, and the undergarments we put on beneath our clothes, has as much, if not more significance than the actual clothes we wear.  Hold on people, I think I’m starting to sound like a yogi.  But in all seriousness…

Our nursing ended with not much fanfare, just a couple of months ago, and while I sometimes wish we would have made it a more memorable occasion, one day Hayden decided he was done and so I decided not to push.  He had been losing interest rather quickly in the days and weeks leading up to our final nursing session, but could usually be prodded into a few minutes each time.  But I finally decided I could move on and so we did.  I continued to wear nursing bras for at least a month, in addition to the very unsupportive Coobie bras I loved throughout the pregnancy and postpartum period.  I told myself I was letting my boobs settle down and settle in to their new size, but really I was just being lazy.  I looked in the mirror a couple of weeks ago, and decided the smooshed breast look wasn’t cutting it anymore, and wasn’t do me any favors.  Sure, my 37 year old girl’s weren’t as perky or as firm as they once had been, after all they had nourished 3 babies for a total of 40+ months, what could I expect?  But that certainly didn’t mean they need be laid to rest.  A good bra could definitely give them much needed new life.

When I asked for recommendations on Facebook, almost unanimously you all recommended Soma.  A Soma store had opened up just a few blocks away from me about 2 years ago, but by peering into the windows I figured it was too mature for me, so I didn’t give it much thought.  But that day, after looking in the mirror and seeing my sad, smooshed breasts in the mirror, I launched into desperation mode, and almost ran into the store, I was so ready to buy something that would give definition and lift to these 2 appendages which had served me, and my babies well.  I’m happy to report that I was pleasantly surprised (I’m officially “mature”), and I loved the bras I found.  Better yet, the music was soothing and there wasn’t a bit of neon or glittery polka dots to be found, typical of what you’d find in a Victoria’s Secret.  You all know I love my neon, but wearing glowing undergarments takes it too far, even for me.  It was in essence, the same intimate experience I had been receiving at Nordstrom for the past several years, but closer to home.

At this point I’d like to mention the importance of a proper fitting each and every time you lose weight, gain weight, have a baby, nurse a baby, stop nursing a baby, or sneeze.  It seems for me anyhow, any life change can alter the size and shape of my breasts, and so again, my bra size has changed.  That makes at least 6 bra size changes in the time since I’ve been counting.  From a 34A all the way up to a 32D, and both B & C cups in between.  Throughout all 6 changes, 34C seems to be the natural state of my breasts, and fits me best.  32D was when I had lost a lot of weight, but the size of my breastplate in essence was still the same even though I had lost tissue, and 36C is usually when I’m fresh out of a pregnancy.  34C is me healthy and happy. IMG_2473

It turns out, I’m also over the thong.  It has its time and place of appropriateness, but really for every day wear, I’m so done with having something wedged up my buttocks.  So in addition to some new bras, I also came home with a bunch of new panties which are ridiculously comfortable and leave zero panty lines, even when I’m wearing my tight workout pants.

For bras, I went with the Embraceable Full Coverage in 2 colors, and the Embraceable Push Up in 2 colors.  While they’re not lacy and frilly, they are still pretty and functional, and have a sweet little crystal at the cleavage.  I’ll venture into more daring styles in the future, but for now it’s a good start.  For panties, I went with the Lace Hipster with a lace panel along the backside, and the Lace Boy Short.  I think both make my back side look infinitely better than a thong, and I now clearly see the disservice I’ve been doing to my back side.   The panties are a bit pricey, but they have great sales and are having one right now in fact.  The bras were 2 for $59, which I thought was a great price, especially if they last as long as everyone on Facebook claimed.

I was on a roll, and so using a Christmas gift card, I also bought a very nice pair of Natori silk pajamas for myself.  In addition to being silk, they’re hot pink and fabulous.  I feel chic and beautiful and sophisticated in them.  I look forward to getting into them, and I wouldn’t be all that embarrassed if I had to answer the door in them.  They are the pajamas of a lady. photo

While my undergarment purchases still have a ways to go to achieve a certain level of upending elegance, we are on our way, and most importantly, I love how “my girls” look in them.  I feel lifted, supported, and I can fill out my shirt.  My breasts look like breasts, and not like some smashed mass on my chest.  They make me feel beautiful and girly and womanly.  Sexy will come eventually, perhaps when me, and the baby, get the sleep thing down.

I thought this post would be quite awkward to write, but in fact has been quite liberating.  I don’t think we women need to boisterously swing our bras from our rooftops, but we could certainly do well with a bit more girl talk on the issue.  Hopefully you’ve gleaned some good information, or at least a good laugh, from my recent brassiere adventures, and I’ll keep you posted on how I advance in the “sexy” department.  But between you and I, I don’t see myself ever wearing a pure lace bra – I just imagine lots of uncomfortable rubbing against my nipples.  Anyone else?

In closing, I’ll leave you with one of the best lines of Paris In Love, and it’s about our bodies, and how us American women view them:

In time I accumulated quite a collection of bras, and the panties to match, of course.  And I had also accumulated an extra ten pounds.  Ordinarily, that dismaying fact would have made me eschew the mirror.  But my Parisian lingerie drew my eyes away from imperfections, and directly to curves enhanced by lace and discreetly ingenious padding.  American women may spend their time hating their waists and hips, but it’s my guess that French women spend the same time admiring their breasts – and their hips – no matter their size. 

Can I get an amen?