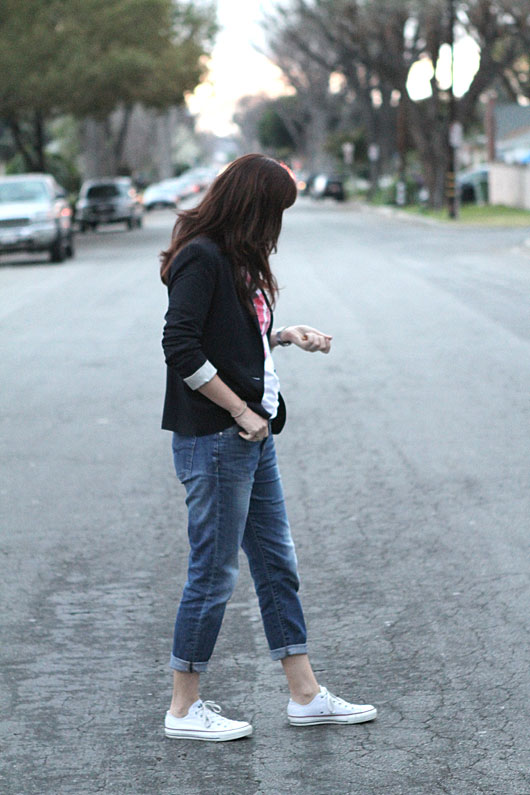
52 Weeks To Create Week 10 – Designing The Gallery Wall

SHARE THIS +

follow-on-facebook This past week something quite awesome happened, in terms of ideas coming together for some unfinished parts of the house.  I finally had a few light bulb moments where it became pretty solidified what I’d like to do to complete certain rooms.  I’ve been agonizing over making decisions and figuring out what to DIY, what to buy, what to save and what to throw away and it finally all clicked.  In large part it’s from taking 3+ years to mull things over.  If me making decisions on our house were a race, I’d certainly come in dead last.  IMG_1138

The other part that’s helped me figure things out, I’m sad to say, is by spending a lot of time online browsing Pinterest.  I’ve recently started taking more of an interest in Pinterest.  In the first 2+ years I’d been using it, I’d pinned about 600 items.  In the last month I’ve pinned over 300.  I can really say that the time has been very well spent, and my family is seeing the benefits by an increase in our meal variety.  But by spending less time creating projects for this blog, which has admittedly hurt my traffic a smidge, I’ve allowed myself the time to spend hours browsing and pinning and asking myself questions and being inspired.  I now know exactly what I need to do to finish off the family room, and to create the “landing zone” area in the entryway that I’ve been talking and dreaming about for almost 2 years; an area where hats can be hung and backpacks could be thrown in an orderly way.  More on that later though.  For today I want to share with you the progress we made on plotting out the gallery wall.

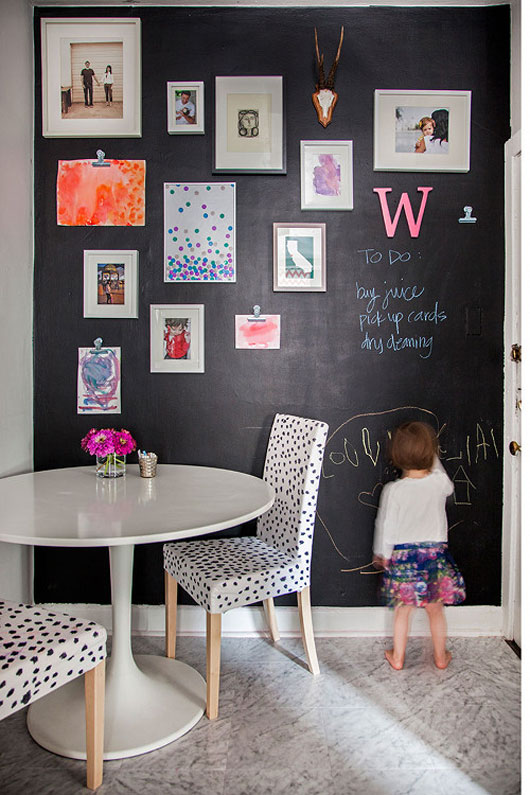
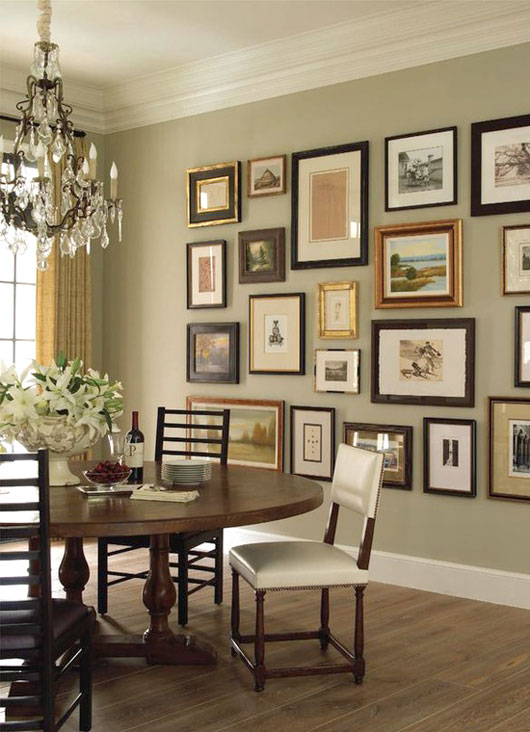
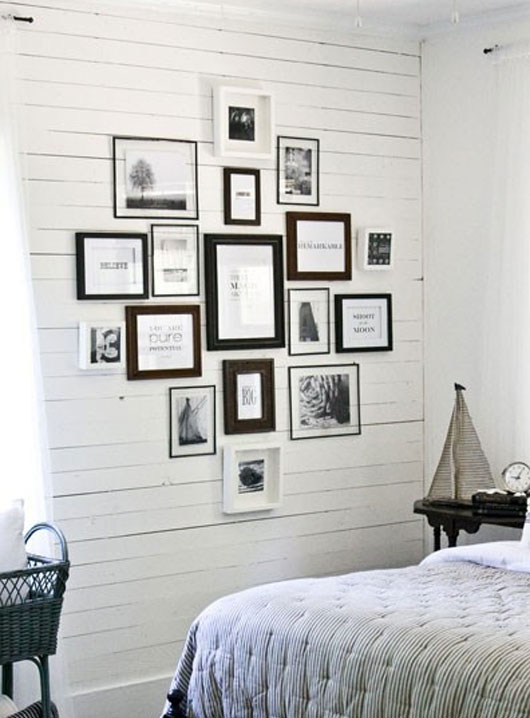
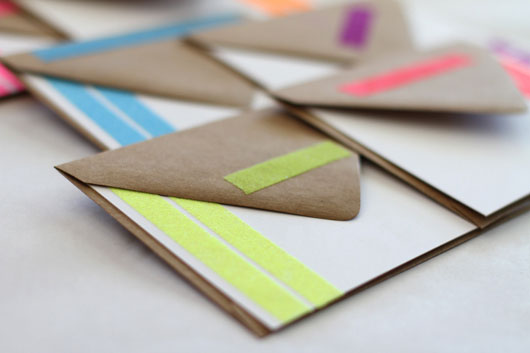
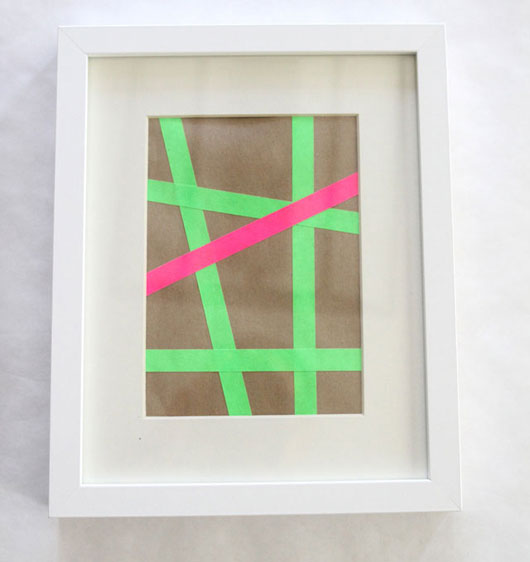
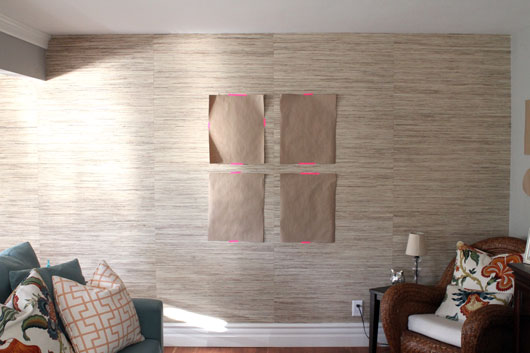
I mentioned on Friday that I had spent some time buying several frames last week.  When we’ve created a wall of pictures in the past, we’ve always laid them on the ground, measured and plotted, and then hung the frames.  But the arrangement never looked quite the same or how we wanted it, mainly because we were envisioning something on the floor versus actually hanging on the wall.  But it occurred to me last night that what I should really be doing is hanging faux frames on the wall in the arrangement I wanted, so that I could easily move the puzzle pieces around until it fit just right.   So I traced the frames I had purchased onto some Kraft paper, cut them out, and then started arranging my layout. IMG_1151

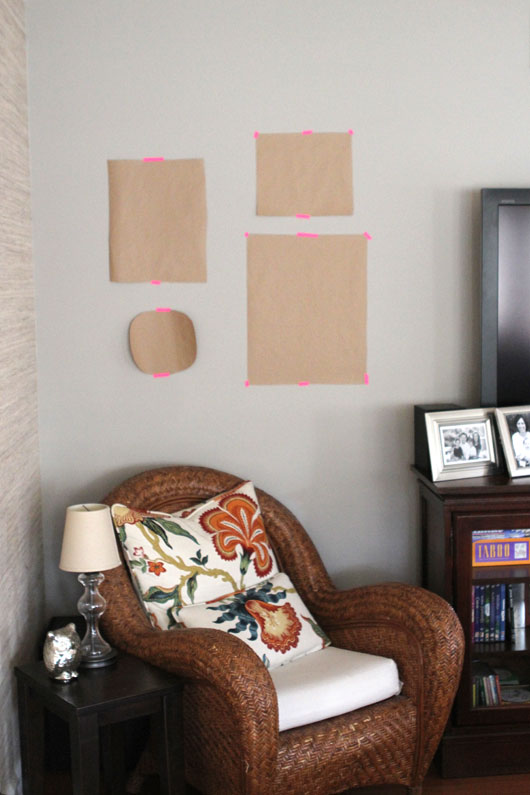
By seeing it actually hung on the wall, I could see where the holes were and where I needed to add or move pieces around.  With just a bit more pre-planning upfront, I’ve now saved myself lots of time moving frames around after they’re hung, and dealing with patching and touching up paint.  Right now the arrangement is very asymmetrical and once the actual frames are up we may want to add a few more filler pieces, but I’m thinking that since the space on either side of the TV is so small, simpler is better.  I’ll save my more adventurous ideas for a larger wall.    IMG_1144

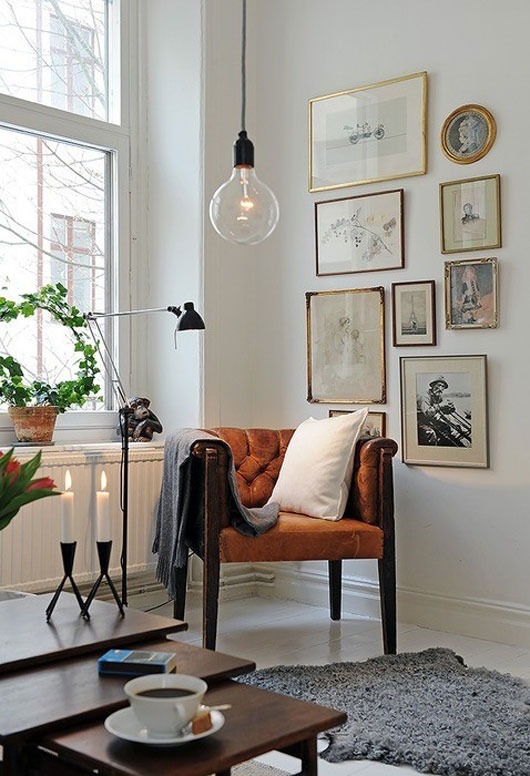
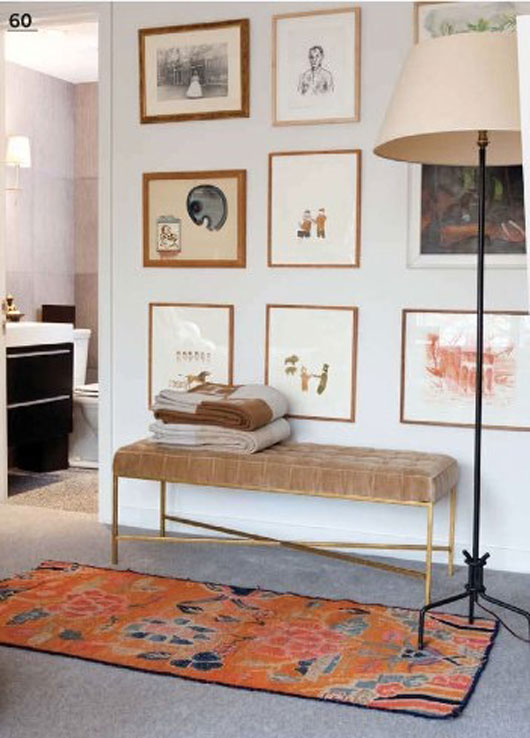
So now to fill the frames.  That was the other part that really intimidated me; what to put in them?  When we’ve created gallery walls before I never really loved them and I now know what was missing.  Art and prints and mementos hung along side pictures of the family.  So between Etsy and some DIY ideas, and a box of family mementos I’ve been saving; ticket stubs, boarding passes, kid’s artwork, I’ll finally be able to create the eclectic mix that I’ve been dreaming of.

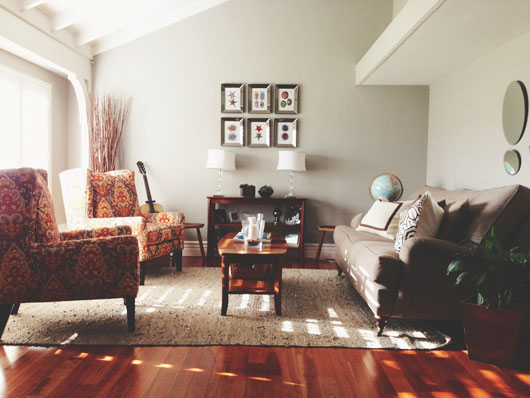
The wall with the 4 frame arrangement will house an Instagram project I’m working on.  Below those frames I’m placing a small bench that used to be in our bedroom, but now will be recovered in a coordinating yet contrasting fabric.  Other plans for the family room include a new coffee table to replace the 9 year old fake leather ottoman that’s literally peeling, a couple of round baskets to hold the toys of our newest family member, and a couple of more fun pillows to offset the very pretty floral fabric.  I’m thinking of bold and even graphics with a saying or two.  I love these hustling pillows but think they may be a bit too bold.  I have a vision overall, and it’s finally very clear.  The frames I’ll be using in this room, by the way, are a mix of Target and Ikea frames.  I originally bought the wood ones for the grasscloth wall but later realized it would blend in together way too much. frames So the progress made in the last week may not seem like much.  But to me it feels like a big, silly weight has been lifted off my shoulder.  My friend Darlene writes about overcoming Design Paralysis and I guess I’ve been sick with a good case of it for a while now.  But I finally feel semi-cured and I’m ready to get ‘er done so we can enjoy.  It’s funny, but even with just the Kraft paper hung up there with that neon tape, it looks more interesting and fun in there than before.  Imagine what it will be once we add the frames and photos?  So do you guys ever suffer from design paralysis, and if so, how do you overcome it?

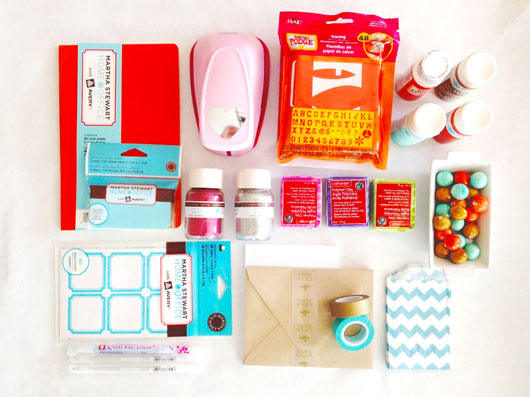
And don’t forget that the hashtag for March is #52weekstocreatemar and the prize is $100 in craft supplies, a round up of my favorite items at the moment.  Post to IG any photos you take of creating in March; including cooking, decorating, crafting and organizing.  Regram this photo for extra entries, and follow along with my creating adventures @fourflights. 52-weeks-Mar


For The Love Of Eating Your Feelings

SHARE THIS +

I’ve been in a pinning frenzy lately. With Spring just around the corner, soft yet saturated colors and light food is calling to me. Follow along with me on Pinterest to get a taste of what Spring means to me. And come say hi and connect on Facebook. 3caitlinwilson
I spent the day making Hayden baby food now that he’s started solids. Something I’ve done with each kid so far, and something I love and find very therapeutic and comforting. I don’t make anything fancy, just simple one ingredient purees, and freeze them in ice cube trays. Simple but homemade, the way to go in my book.

It’s been a tough week. I felt very angry at the internet many times, and just sort of down. Tired too, so so tired. Hayden’s sleep is for crap. I haven’t felt grumpy like that in a while. Someone on the Facebook page for Disney Baby commented on a post of mine and said that Hayden looked like he was possessed. It was enough to cause me to spend the rest of the day angry at the online world and wonder if it’s all worth it (the kind people at DB promptly removed the comment after I brought it to the attention. You can mess with me but don’t you dare mess with my kids). We (bloggers) put ourselves out there, and in some ways by being open we inevitably bring out the assholes. But at the same time, I should feel safe and comfortable doing a job that allows me to contribute to my family, and write about my baby without people being jerks. Follow that up with a few weird altercations on my personal Facebook page, and it led me to taking a much needed break from my computer for the day. I’ve also deleted Facebook off my phone and am only planning to give updates on my For The Love Of page for a while. Me and Facebook are not friends right now. If I didn’t have to have a personal account to keep my FTLO page going, I’d probably delete it all together.

The week online wasn’t entirely a loss though, as I got a few very inspiring comments on my post Monday, on gallery walls. Comments that inspired me so much that I took action last night, and grabbed a coffee and spent almost 2 hours after bedtime just browsing Target and buying some frames so I can start printing up pictures and ordering prints. I’m on my way to that gallery wall. The one pictured above via Little Green Notebook is lovely, but it begs me to ask the question, how much longer will chalkboard walls be au curant?

There’s been quite a few times over the last few weeks where I didn’t feel like I was coming far enough in my goal to create more around my home, get projects started and finished. Too much time being spent working and not enough time creating. But spending a good portion of my day in the kitchen today reminded me that the year has not been a total loss. I’ve consistently tried at least one new recipe each and every week, sometimes even two, so today I thought I’d share a few of the recipes we’ve tried and loved (or didn’t love so much). I figure you can always use a good recommendation, especially after it’s been pinned and tried. lemon-blackberry-muffin I must be craving citrus flavors because half the food I’m pinning is lemon something or other, starting off with these lemon ricotta blackberry muffins from Two Peas And Their Pod. Light but still filling, they were an excellent breakfast treat along with some greek yogurt for a couple of mornings in a row. lime-soup This lime soup from Williams Sonoma was incredible. I am drooling just thinking about it. One modification I made was to add 1 cup of wild rice during the last 10 minutes of cooking to make it a bit heartier and it was an excellent idea if I do say so myself. I very much look forward to making this again. casserole This oatmeal casserole was quite honestly, a big fat fail. Virtually flavorless, the idea is wonderful in theory, but in reality it was mushy yet dry, a strange combination. I can count on my hands the number of times I’ve made something and thrown it out because it was just no good; this was one of those times. bacon-egg-toast-cups So I completely modified these bacon egg toast cups because I only had half a dozen eggs but I wanted to make a dozen cups for my Moms group. I ended up scrambling the eggs instead of making them over easy, by cooking them scrambled in the pan for just a couple of minutes so they congealed together and were no longer completely runny. I then poured them into the cups and baked them for about 15 minutes and they were excellent! I would still like to try them sunny side up though. Meyer-Lemon-Pasta-FoodieCrush-011 So I actually haven’t made this Lemon Fettuccine yet but have all the ingredients to make it tomorrow. It sounds so delicious and refreshing so I’ll let you know how it goes. layer-cake-ck-249959-x And again, haven’t made this yet but will do so this weekend. This Lemonade Layer Cake is supposedly one of the best and most popular cakes on Pinterest. What does that really mean though? ha! I’ll give it a try though since eating the lemon cake my grandma used to make is one of my fondest childhood memories.

So now you know what I’ll be doing this weekend; cooking and figuring out pictures to print to fill up a gallery wall. What will you guys be up to?


For The Love Of Spring Style Inspiration

SHARE THIS +

IMG_0954 Last week I attended Neiman Marcus Modernist event at the Fashion Island store. It was a 60 look runway show in the middle of the store featuring casual looks from their Cusp department all the way to Designer gowns. The show was flawless and inspiring. Even if your budget is not in the designer realm, you can still get a sense of the season’s trends in terms of color, prints, and silhouettes. That’s always what I appreciate most about these type of events. Here are some of my favorite looks from the show, as well as the season’s trends you can expect to see in magazines and filtered all the way down. IMG_0882 “Print Mania” continues to be a huge trend, with every print being covered from tribal to animal to lovely florals. I love this particular print tee back to a very slim tailored suit. modernist-event-2 “Amazing Lace”. Lace details mimicked in prints or made into dresses, lace continues to be hot. modernist-event Other trends to be noted; Gladiator shoes in both casual sandals and high heels will be all over. I love my gladiator sandals so much so I’m happy to see this trend continue. The color orange was all over the runway, from bright electric shades to subtle shades of salmon, orange is the color for Spring. Warm weather leather; lightweight and airy, leather is very Spring appropriate. Untitled-1 IMG_0982 IMG_1019 For accessories and beauty, a fresh face with a bold eye and pale nude lip is the beauty trend you’ll be seeing a lot of. Also, crossbody bags and highly embellished face framing jewelry finish off your look for Spring. IMG_0913 IMG_0914 IMG_1000 IMG_1025 Thank you Neiman Marcus Fashion Island for having me, and giving me lots to day dream about! I love how perfectly styled the show was and can’t wait to see how I can make some of these trends my own for Spring.


Daily Style – How To Wear A Rock N Roll T-Shirt

SHARE THIS +

Walk Too often I hear the words “I can’t wear that.” or “I can’t pull that off” when it comes to trends and silhouettes.  While there are definite personal style boundaries and limits that everyone is comfortable with, I also think that if there’s a trend or look you want to pull off, but don’t think you can or should, you need to think more optimistically. Remember that there are no rules set in stone for personal style, only the ones we set for ourselves.  When I interviewed Laura at Target a few weeks back, she picked out this Rolling Stones T from the Men’s department, and talked about how she would cut off the sleeves and style it back to denim cut offs.  I loved the T for the bright pop of color and classic Rock N Roll graphic, but knew that there was no way I would feel comfortable wearing it as she would.  IMG_0065 Blazer – Zara, Rolling Stones T – Target Men’s Department, Denim – Gap, Converse All Stars

So I thought on it a bit and even talked it over with Mandy, and it was decided that this is how I would and could pull off the look.  Back to my trusty blazer as a layering piece, and worn with my favorite boyfriend jeans and a pair of Converse.  Sort of prepster meets hipster, a suitable style for my kind of life.  Once you start focusing on what you like, rather than getting caught up with how you can’t pull it off, the pieces start fitting together.  Trust your gut, if you love something at first glance, there’s usually a reason.  With some inspiration and even style advice from a fellow friend, your style possibilities are endless.  Sure you might make a mistake every now and then, but things like a $12 Rock N Roll t-shirt are a perfect place to take a risk and flex your styling muscles.  You might just find a new favorite look. IMG_0078 And a little tip for a men’s t. While I may not cut off the sleeves, I will indeed cut off the neckline, as I did here. Men’s shirt necklines are designed much higher than women’s necklines, and are so high that they can be a bit unflattering, and even constrictive. So take some scissors and just cut right around it. I just took the banding off, but you can do a flashdance move and take off more if you wish. I’ve washed the shirt and so far, so good, no shredding and unraveling. IMG_0084 IMG_0069 So are you good about taking fashion risks, or do you find yourself saying “I can’t pull that off” quite often? Is there a style you really love, but you really don’t think you can pull off, and if so, what is it? Maybe I can give you some tips or ideas for making it work for you.

For more ideas on how to style a blazer, you can visit this post where I wear my favorite mint blazer, or this post where I style my navy blazer back to neon yellow.  And want some ideas for how to style a pencil skirt?  See it dressed up here and made casual for every day wear here

I’m all about trying new styles and silhouettes and getting the most out of your closet by styling the same piece multiple ways.  If you’d like to get regular For the Love Of updates to your email box, subscribe over in the box in the right hand column.  And get exclusive content and conversation by subscribing to my Facebook page.  More Love is always a good thing, right?  A sincere thanks for reading!


52 Weeks To Create Week 9 – Making Plans For The Walls

SHARE THIS +

While last week the largest and most time consuming thing I created was the launch of The Craft Cabinet, I did still spend some time creating a few new things, mainly in the kitchen. I plan on sharing which recipes have been working for me later in the week, but for today I thought I’d share what I’ve been planning for.  Our home, like most, is a work in progress.  While we’ve achieved finished progress on some areas of our home, like our backyard and our garage, even Hayden’s room, most of the rooms in our home are not where we want them to be, and I’m sure many of you can relate.   living-room I posted this picture today on Instagram, and many friends responded how lovely it was coming together.  It was a reminder that our home has made more progress than I would like to admit at times, and certainly more than I give it credit for.  This is a very lovely room indeed and it’s almost close to being complete.  The main bones of the room are pretty much in place.  We love the paint color, Benjamin Moore Thunder.  It sets a nice tone for the room and because it gets good morning light and soft afternoon light, it feels cozy and never too bright or gloomy.  We love our English Roll Arm sofa and the two paisley wing back chairs, as well as the Serena & Lily metallic, suede and hemp rug.  But like the rest of the house, it’s so close but it’s the final little details that are holding it back; mainly art work on the very long wall that runs along the back of the sofa.  It’s hard to tell but right now we just have a cluster of beveled mirrors that are hung off-set above the sofa and look really goofy.  I’m convinced that most of our “problems” with this house being finished lies in the walls.  So I pin gallery wall inspiration pictures almost every day. gallery-wall-5 Walls that have an eclectic array of frame colors, textures and widths.  Set in a symmetrical pattern, they look fresh and interesting instead of scattered and hodge-podgeish.

gallery-wall-3

Pretty gilded frames in different shades of metallics are so glam and would look perfect in the living room in particular.  The similar finish allows some play in the arrangement; not so symmetrical but a bit more random.   gallery-wall-2 Of course a gallery wall doesn’t have to look like a puzzle piece and can look just as funky and eclectic when frames are evenly spaced out.

gallery-wall-4 When hung in a diamond shape, using a mix of black and white frames the look is modern and fresh.

Office-Desk-Wall And look at what we have here.  This photo reminded me so much of my bed side office arrangement with the slanted wall and step pattern arrangement of the artwork and prints.  The problem with all of these inspiration images though, is that I just don’t have enough artwork.  I own hardly any as a matter of fact, so I then want to fall back on family pictures, and realistically how many family photos do we need to see all over the house, just in different arrangements?  So does one just find art and prints off of websites like Etsy and Art.Com, or flea markets, garage sales and thrift stores?  While the set up and pattern of the gallery wall can be easily duplicated, it’s what you actually fill the wall with that stumps me.  Like I said, most of my house problems could be solved with some simple wall hangings, but for now I’ll continue to plan and look for inspiration.  In the living room, however, I did finally order the pillows for the sofa and so textiles will all be compelte then.  Sometimes it’s just taking the time to get things finished, like ordering 3 pillows to set on the couch.

Untitled-3 One last thing I worked on just because I was feeling the need to try and bring some color to my dining room, was make some floral centerpieces using fake flowers found at Ikea, and floated in glass jars filled with distilled water, inspired by this pin.  While the process was easy and the effect is pretty, I don’t love the look overall.  Good for a party or a wedding, but not good for a home where the risk of filled to the brim water containers overflowing with the not so gentle nudge of a rambunctious kid can spell disaster at any moment.  Proof that sometimes not all pins turn out as you’d hope.

52-weeks-Mar

Finally, this is the gift bundle (not all items are shown!), for the #52WeeksToCreateMar Instagram challenge.  The chance to win $100 worth of my favorite craft supplies by tagging all of your “create” photos on IG with the hashtag.  Remember that anything you make or do, including home decor and organization, new recipes and crafts and DIY count and can be tagged!  You can also regram this photo, found in my feed, for extra entries.  Remember, I’m @fourflights and I’d love if you left your IG name in the comments so I can follow along if you plan to play!


An Exciting Venture Ready To Be Announced!

SHARE THIS +

Capture Last August, 15 days before I delivered a tiny human into this world, Jules and I launched The Craft Cabinet. Over 20 woman gathered together in a charming vintage shop in Long Beach California to eat, drink, craft and be merry. And merry we were. We had just as much (exhausting) fun as our attendees, and so we wanted to do it again. But not before we got through the Holidays and the whole tricky and tiresome newborn phase.

So in January we reconvened to launch this thing, and he we are, almost 2 months later, finally seeing all our plans come to fruition. The Craft Cabinet site is live and I almost can’t believe it!!! I’d be lying if I said it wasn’t exhausting and at times really, really crazy. We’re moms and wives and we’ve got kids in activities and homework and church and lives and all that. We tried our best to be professionals about all this, but at the end of the day, the kids still need to get to baseball and swim, and such. At times it was comical trying to get it pulled together, in between us running carpool all over town, texting and talking in the spare moments in between. But alas, we pulled it together and here we are, on launch day.

So some of you may be wondering what the Craft Cabinet is all about. Initially we created the idea centered around turning pins into reality. An event to meet and mingle. Eat, drink and craft the evening in a relaxing, creative environment amongst friends and strangers alike. As we’ve talked and dreamed and planned though, we have a larger vision for the future and hope to bring you events that aren’t just about creating crafts, but crafting a well-rounded life. We have lots of ideas and if we can execute 1/10 of them, we’ll bring you some pretty rock solid, kick ass events.

New for the relaunch is to have a lead craft instructor at each event, where you will get to actually learn a craft, in addition or instead of, making your own creative project that you bring with you. Each instructor will be skilled and knowledgeable in their craft, and will bring something unique and fun to enhance the event.

Food and drink will continue to take a huge part of The Craft Cabinet as well. We want you well fed and happy.

If you are at all interested in crafting a full life through creativity and connections and think a well appointed food table is as important as your crafting supplies, then we think The Craft Cabinet is what you need, too.

We would be thrilled if you would visit the new site and say hello, or subscribe to our RSS feed for updates. Of course you can find us on all the usual social media outlets, which you can find on our site, but a side note to say I’d be tickled pink if you liked our Facebook page. Even if you aren’t in Southern California, a little support crosses many miles and distances. Thank you for taking the time to even consider it.

For now we are putting it out there to save the date of April 12th, 2013 for the official relaunch of The Craft Cabinet at Oh Hello Friend in Fullerton, CA. More details to be forthcoming in the next few days, as well as an announcement for ticket sales.

So if you’ve wondered why things have been a little spotty around here, now you know why. This launch was a lot more work than I anticipated, but we’re so excited to be wrapping up this end, and on to the really fun stuff…planning our events! Things will get back to normal here too, next week.

Thank you all for your support and excitement. It means the world. I’m ready for the weekend now and ready to relax and maybe even make a margarita or two. Happy weekend to you all!


Green Grass Easter Eggs

SHARE THIS +

Easter is early this year, and so I thought I’d share this project with you here, since we’ve been doing this for a couple of years now and really enjoy the results.  To get good healthy grass in time for Easter, you’ll want to plant these this weekend, or early next week at the latest.  They’re really simple and fun for the kids to take part in, as well as take care of by watering and making sure they get enough light.  Once grown in, they make for very charming centerpieces, or like we’ve done for the last couple of years, as place card holders.  IMG_4680 Start by gathering your supplies, which are few. Just a dozen (more or less) eggs that have been gently cracked towards the top, emptied and washed out, some planting soil, and grass seeds. We like fescue the best because it grows in really soft and fluffy. IMG_3425 Place a scoop of your soil in each egg cup.  You want to fill them almost all the way to the top.Then add a few seeds. The kids will want to go crazy here but try to limit them to a pinch, like maybe 10 little seeds.  As you can see my kids don’t listen to my instructions very well, but that’s okay. IMG_3441 IMG_3440 IMG_3461 Place a bit of soil over the seeds once you’ve filled each cup.  You don’t want to bury the seeds completely, just dust them really with some soil so they can develop a bit of a root system. IMG_3525 And then water them just a bit every couple of days. You really just need to put a few drops of water in each egg cup, too much water will easily drown them and they will get all soggy and the grass will die. Too little water and the grass doesn’t grow in time. Place them in direct sunlight, under a kitchen window sill is perfect. And don’t do what we did and leave them out on the patio, because birds will definitely eat the seeds up! So make sure to keep them safe indoors.  You’ll notice little bits of grass popping up after just a few days.  If you get great sunlight, like we do here in Southern California, your grass may grow super fast within just a couple of weeks, at which point you’ll want to trim it so it stays within the confines of the eggs and good looking for Easter dinner.  IMG_4678

Enjoy and let me know if you give it a try!


Motherhood Redefined – 6 Months PPD Free

SHARE THIS +

Nx0KmmxaZe8A_T8V0GGkvxm-u_Tns53XTX1tRsO9pEU Tomorrow, Hayden will turn 6 months old, and I will have made it through the first 6 months of his life, free of PPD.  The weeks after he was born, when I felt happy and at peace, there was always a thought in the back of my mind that I couldn’t count myself home free until he turned 6 months old.  Living without PPD for 6 months would truly be a victory.  There’s even a still teeny tiny part of me that thinks talking about it out loud will jinx it, and that tomorrow on his 6 month birthday I will wake up feeling sad and blue.  But deep down I know that’s just me being silly.

For years after having Taylor and Syd, my experience with postpartum depression defined me as a mother, and my experience with having babies.  Ask any of my friends and they’ll tell you, I was openly vocal about my distaste for those first weeks of living with a newborn.  The crying, the constant nursing, the sleep deprivation, the swaying and rocking and patting and shhshhing.  It was clear that I was not a fan.  Sure, once I climbed out of the hole that is postpartum depression, I could see how much I loved my kids and each developing stage they experienced.  But newborn and young infant stuff?  I would joyfully skip over that part if I could, in large part because of the sadness and fear that was intesified by the PPD.  IMG_0615 IMG_0622

For weeks before Hayden was born I struck with bouts of fear and anxiety.  Small, fleeting bouts, but fear nonetheless.  Just days before I delivered, I remember thinking how terrified I was to give birth to another baby that I loved and treasured with all my being, but that I also did not like.  I know that sounds so horrible to say, but with my past experience of dealing with my newborns, I remember vividly laying in bed wide awake at night thinking of all the scenarios of when and how I would protect them against the evils and hurts of the world, but I also remember the feeling of having to shed their weight with a quick thrust of their body as soon as Art walked in the door from work.  It was a very visceral and surreal tug/pull feeling; one moment I would be hovering, and the next I would be saying through clenched teeth “get this baby off of me.”  These experiences were my own and I realize not symptomatic of every single case of PPD.

After Hayden was born, there was only one moment of sheer and utter panic the first night we got home from the hospital.  I was walking down the hall trying to manage bed time with the older kids while Art was holding Hayden, and I just thought to myself, “how am I going to do this?”  I later cried, telling  Art the PPD was already starting in.  He held me and calmed me down and told me I was probably just tired.  It turns out that I probably was just tired. IMG_0676 IyhAdzNZ3Nqj_QuFY93jW3hSm_VhOw5mzSQJzELllFQ

Because in these past 6 months I have been the happiest I can ever remember being.  I have bonded with Hayden in such an intense way that it hurts at times.  I yearn to hold him, I stare at him when he’s sleeping, I don’t mind (as much) when he wakes in the middle of the night for a feeding, I waste hours of my days just kissing his thighs and cheeks and head.  I feel all those things and in all the ways I had always heard women talk.  I am the woman that is sad each day as he gets older because he’s less and less a baby.   My own baby has given me baby fever at times for God’s sake.  These feelings are new and wonderful and a big like “whoa!” this is crazy.  Crazy awesome.

For so long I felt guilt about my first few months of time with Taylor and Syd.  Did I love them enough, hold them enough, smile at them enough?  Or did those feelings of PPD creep into our every day too much, and I held out on them?  For years now I’ve carried that guilt around because I didn’t remember as many times feeling happy in those first few months as I remember feeling sad and scared.  But these past 6 months of being with Hayden and having this new experience has altered my memories in a way.  I now know that I did love them enough and gave them all they need, even if at the time I wasn’t sure or didn’t know.    IMG_0726 IMG_0737

This new experience with Hayden has helped redefine so much of how I look at myself as a mother.  It’s helped me see myself through a new lens.  A lens not clouded by the sadness of PPD, not defined by PPD.  In fact in many ways it’s been a new chapter of motherhood for me, one with a lot more patience and hopefulness and positivity.  Of course we have our days, it’s not perfect, but it’s filled with a lot more joy.  Motherhood no longer defined by a short experience with PPD.  Motherhood redefined indeed.  aZirbbQJOnazhJy4EKf3cPRxGV36Q8AuYmj4O6kdFko

If you have struggled with PPD in the past, or are struggling now, I pray that you seek help in any way you need to.  For me I took what some considered a drastic step and encapsulated my placenta, which you can read about here.  You can also read my drug free birth story, a first for me, here.  If you have any questions about my experience with PPD and placenta encapsulation, you can ask me here in the comments or email me at andrea@fortheloveof.net. 


25 Neon Inspired DIY Projects

SHARE THIS +

With the conclusion of my Valentine’s Day projects a couple of weeks back, it occurred to me that I had completed a whole year’s worth of holidays and DIY crafts centered around neon. When the neon trend came about in early 2012, I wasn’t automatically smitten, but after a couple of months of seeing everything from neon glitter, to neon skinny belts, I realized how much I did indeed love it, especially when styled back to neutral and white. The trend inspired me to devote a whole week of content, of nothing but neon projects, here on the blog, but it didn’t stop there, and continued into more projects and holidays for the rest of the year. Because we spent a majority of our time this past week together as a family, I don’t have a new project to share with you all, but I thought this round up of all my past neon projects would be fun to share, since I’m sure many of you who are new here aren’t familiar with all of them. So let’s get started shall we? Neon-Easter-Table-Decor Easter Table With A Neon Twist (contributors project for Making It Lovely) DIY-Neon-Glitter-Notecards DIY Neon Glitter Notecards

DIY-Neon-Painted-Canvas-Tote-Bags 4 Great Neon Painted Canvas Bags

Neon-Bow-Canvas-Tote-Bag Plus One More Just For Fun DIY-Neon-Bow-Shirts Neon Bow Shirts For Girls
DIY-Graphic-Neon-T-Shirt Graphic Neon Shirt

DIY-Neon-Bangles Neon Rhinestone Bangles
DIY-Neon-Chain-Necklace Neon Chain Link Necklace DIY-Neon-Painted-Dinosaurs Neon Painted Dinosaurs DIY-Neon-Manicure Asymmetrical Neon Manicure

DIY-Neon-Polka-Dot-Pots Neon Polka Dot Pots DIY-Neon-Polka-Dot-Tray Neon Polka Dot Tray (contributors project for Making It Lovely) DIY-No-Sew-Neon-and-Leather-Clutch No Sew Leather Clutch Neon-Dip-Dye-Chair Neon Dip Dye Chairs Neon-Nursery Hayden’s Neon Inspired Nursery

DIY-Neon-Artwork Neon Artwork (contributors project for Making It Lovely) DIY-Neon-Pumpkins Neon Halloween Pumpkins

Neon-Thanksgiving-Table-Decor Neon Inspired Thanksgiving Tablescape DIY-Neon-Holiday-Artwork Easy Neon Holiday Artwork

DIY-Neon-Heart-Paper-Chains Neon Heart Paper Chains DIY-Neon-Valentine's Neon Valentine’s

neonvalentines Neon Valentine’s Color Alternative

Twenty five neon inspired projects, not to mention all the times I wore neon in a style post, and I’d say that certifies me as a neon crazed nut.  But I’m good with that.  Clearly Neon was my favorite DIY trend from this past year.  What was yours?  Ombre, paint chips projects, Mason Jar projects?  The list is endless of inspiring points of interest for us DIY’ers, and it’s always fun to see new trends emerge.  Can’t wait to see what the rest of 2013 brings.  For me, I think neon has run its course.  So onto bigger, although I’m sure not brighter, projects!


Helping Determine Your Style Each Season

SHARE THIS +

The good thing about taking outfit pictures of yourself, even if they don’t all get published to the blog, is that you start to get a good idea of the clothes you gravitate towards on a regular basis.  This can be really helpful in helping to decipher what your true sense of style is all about, and not to mention, it is very useful in helping determine your style for your life.  While I might think a must-have item to add to my wardrobe is a black leather moto jacket, by looking over what I really wore over the past year, I can see that I hardly ever wear the brown leather jacket I already own, so is a black one going to get that much more use?  Probably not.  I can see that I wore the heck out of my blazers though, so maybe that’s where I should invest my “jacket” dollars.  Do you see where I’m going with this? Alternative-Styles-1 The Fall/Winter season is almost over, and it occurred to me the other day that many of the items I felt were “must haves” I was actually able to get through the season without, just fine.  Side note, when I say “must-haves” I use that in a very lose sense of the word.  I know that when it comes to clothes, nothing is a must-have.  For instance, last September I started a search for a pair of faux leather leggings because I loved the look, and felt they would be the perfect fun addition to my closet.  I tried on several pair and never found any that I loved, so here we are at the end of February, and I can see that I got through the season unscathed, with no leather leggings.  I still had plenty of things to wear all season long, and my world continued to turn.  I then started thinking of all the things I had on a wish list these past few months, and what I lived without and used as an alternative.  I thought I’d share it with you.  Perhaps this little exercise will help you better evaluate what your own wardrobe “needs” are, and maybe even think harder about making some of those purchases, as we start a new season.  I will attend a Spring season preview at Neiman Marcus next week, so it will be interesting to take a look at their trends and make another “must-have” list, and see what sticks and what loses out to reality.

1. Textured/tweed jacket – these were all over the trend reports last season, and the very lady-like tweed jacket filtered down from top end designers like Chanel, all the way to Target. While I have an affinity for a textured knit jacket because of all the years I spent working at St. John, I decided in the end that for my current lifestyle as a mom of a newborn, the look was just too much. I still love the look paired back to jeans or a pencil skirt, for right now, my trusty blazers helped fit the bill whenever I was in need of feeling pulled together and polished.

2. Faux fur vest – I love a pretty faux fur vest, it’s so Rachel Zoe bananas right? But again, after evaluating my lifestyle and being honest with myself about how often I was going to be able to wear it here in Southern California, I realized that a scarf would fulfill my faux fur needs just as well. It was January before I felt like I finally emerged from the newborn fog, and by then temps were already up in the 70’s again. Maybe next year.

3. Faux leather legging – If I had found a pair that fit, I probably would have bought some. But since I didn’t start actually losing some of the postpartum weight until recently, I just didn’t feel comfortable in them. A pair of $15 leopard leggings from H&M helped fill the fun legging void in my life.

4. Printed Denim – I stuck to my guns and didn’t buy anymore jeans aside from my LC skinny jeans, and even though I really wanted a pair of cute floral printed denim, I just felt that it would be a waste of money in the end. Instead I stuck to my trusty boyfriend jeans a lot that are a very generous fit, as well as my LC skinnies.

5. Riding Boot – I have a black and brown pair of riding boots, both over 4 years old. I figured I could invest in a new pair of black ones this past fall season, and brown next year. As it turns out though, I found that my ankle booties were much more handy, comfortable and functional to wear on a regular basis than knee high riding boots. I ended up adding the black Sam Edelman Petty booties to my closet and saved myself a penny, because riding boots are pricey, even on sale!

6. High Top Trainers – In my head I imagine I can still pull off looks that I pulled off in Junior High, like high tops. In reality though, I am more of a Converse gal, and feel much more comfortable in these. Sticking with my Chucks saved my wallet and my self esteem, because I would’ve ended up feeling like a dork walking around in these.